
Instruction Manual

66 • Replacing the AC Fuses Beacon 410 Gas Monitor Operator’s Manual
Replacing the AC Fuses
The Beacon 410 has two user serviceable AC fuses.
NOTE: To replace other components of the Beacon 410, contact RKI Instruments, Inc.,
for further information.
1. Turn off or unplug all incoming power to the Beacon 410.
2. Open the Beacon 410 housing door, then place the power switch in the OFF position.
3. The fuses are located to the left of the AC in terminal strip. Use a flat-blade
screwdriver to rotate the applicable fuse holder 1/4 turn counterclockwise. The fuse
holder releases from the socket.
4. Remove the fuse holder from the socket, then remove the fuse from the fuse holder.
CAUTION: Verify that the replacement fuses are the same type and rating as the fuses
you are replacing. The Beacon 410’s fuses are fast blow fuses rated for
6A, 250 V
5. Install the replacement fuse in the fuse holder, then place the fuse holder in the
socket.
6. Push the fuse holder into the socket, then turn the holder 1/4 turn clockwise to secure
it in the socket.
7. Plug in or turn on all incoming power to the Beacon 410.
8. Place the Beacon 410’s power switch in the ON position, then verify that the PILOT
light is on.
9. Close and secure the housing door.
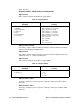
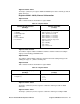
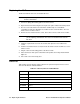
Parts List
Table 22 lists the part numbers and descriptions for replacement parts and accessories
offered for the Beacon 410 Gas Monitor.
Table 22: Parts List, Beacon 410 Gas Monitor
Part No. Description
18-0107RK Conduit Hub (3/4 in.)
43-0440RK Reset Switch
43-4170RK Fast Blow Fuse, 6A, 250 V
51-0096RK Strobe/horn, 10-33 VDC, NEMA 4X
52-1016RK Buzzer
71-0131RK Beacon 410 Gas Monitor Operator’s Manual (this document)