
User Manual

18 • Alarm Indications Beacon 100 Gas Monitor Operator’s Manual
NOTE: You can select normally energized or normally de-energized relays and latching
or auto resetting alarms in the Instrument Setup program. The following sections
describe the default setting for the relays and alarms: normally de-energized and
latching respectively. The fail relay is factory-set for normally energized and is
not user-selectable.
Alarm 1 Condition
This section describes the audible and visual indications for an alarm 1 condition and
suggests response to an alarm 1 condition.
Alarm 1 condition indications
When the gas reading of an active channel reaches the alarm 1 setpoint, the Beacon 100
senses an alarm 1 condition. The Beacon 100 alerts you to an alarm 1 condition as follows:
• the ALARM 1 light turns on
• the gas reading in alarm 1 condition flashes
• the buzzer sounds a pulsing tone
• the alarm 1 relay energizes
Responding to an alarm 1 condition
This section suggests response to an alarm 1 condition.
1. Follow your established procedure for a low level combustible or toxic gas condition
or a decreasing oxygen content condition.
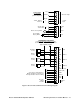
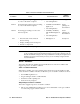
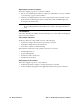
Table 2: Visual and Audible Alarm Indications
Condition Cause Visual Indication
Audible
Indication
Alarm 1 Increasing (decreasing for O
2
) gas reading
at or above the alarm 1 setpoint
• ALARM 1 light is on
• Gas reading flashes
Pulsing tone
Alarm 2 Increasing (decreasing for O
2
) gas reading
at or above the alarm 2 setpoint
• ALARM 1 and ALARM 2
lights are on
• Gas reading flashes
Faster
pulsing tone
than Alarm 1
Alarm 3 Increasing gas reading at or above the
alarm 3 setpoint
• ALARM 1, ALARM 2,
and ALARM 3 lights are
on*
• Gas reading flashes
Faster
pulsing tone
than Alarm 2
Fail • Disconnected or misconnected
detector wiring
• Display reading below fail setpoint
• Defective components
• FAIL light is on Steady tone
* The ALARM 1 and ALARM 2 lights are not on for oxygen channels.