
User Manual


35-3010RKA-06 Sample-Draw Detector • 17
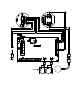
Replacing Components of the Sample-Draw Detector
This section includes procedures to replace the sensors, the hydrophobic filter, and the
char coa l filter.
Replacing the Combustible Sensor
1. Turn off incoming pow er.
2. Open the housing door of the sample-draw detector.
3. Unscrew and r emove the two screws that secure the re taining plate, then lift the plate,
connector, and sensor o ut of the housing.
4. Unplug the connector from the sensor.
5. Verify that you are using the correct replacement sensor ( NC-6245 is printed on the
sensor), then plug the sensor into the connector.
6. Place the sensor in the combustible gas sensor cavity, then position the retaining plate
on the two sta ndoffs.
7. Secure the retaining plate to the standoffs with the two screws you removed in step 3.
8. Turn on incoming power.
9. Calibrate the replacement sensor as described in “Calibration” on page 19.
Replacing the Hydrogen Sulfide Sensor
1. Turn off incoming pow er.
2. Open the housing door of the sample-draw detector.
3. Unscrew the 5 screws that retain the preamp circuit board.
4. Lift the pream p circuit board away from the flow block.
Be care ful not to pull on the cables that connect the preamp circuit to the main circuit
board.
There is a foam gasket in the bottom of each flow cavity beneath the circuit bo ard.
Make sure the gaskets stay in place.
5. Pul l t he H
2
S sensor off the preamp circuit board. It is located in the amp 2 posi tion
(right side) of the preamp circuit board.
6. Plug the new sensor into the preamp board.
7. Reinstall the preamp circuit board with the sensors onto the flow blo ck.
8. Turn on incoming power.
9. Calibrate the replacement sensor as described in “Calibration” on page 19.
Replacing the Hydrophobic Filter
1. Tu rn off or unplug power to the contro ller.
2. Locate the hydrophobic filter. It is just to the left of the main circuit board.
3. Grasp the hydrophobic filter and pull it out of its m et al clamp.
4. Remove the rubber seals from each end of the hydrophobic filter and remove the
filter.
5. Place the new hydrophobic filter in the same orientation as the one that was removed.
6. Place the new hydrophobic filter back into the metal clamp.