
Instruction manual


IMCB25-E3 11
7.7 SV Alarm Type Selection (SL11)
For ALM1 setting, the first digit from the right is set to “0”
in the following cases.
• When the instrument does not have ALM1 output.
• When the ALM1 output is used for process/deviation/
band alarm or Loop Break Alarm (LBA).
For ALM2 setting, the third digit from the right is set to “0”
in the following cases.
• When the instrument does not have ALM2 output.
• When the ALM1 output is used for process/deviation/
band alarm, Heater Break Alarm (HBA) or Loop Break
Alarm (LBA).
• When Z-168 is specified.
To make SV alarm setting effective, set SL4 to “0000”
when using ALM1 for SV alarm, or set SL5 to “0000” when
using ALM2 for SV alarm. SL4 and SL5 have priority to
SL11 setting.
Factory set value varies depending on the instrument specification.
Alarm Details of setting
0 SV alarm not provided
Alarm 1 1 SV alarm provided
[ALM1] 0 SV high alarm
1 SV low alarm
0 SV alarm not provided
Alarm 2 1 SV alarm provided
[ALM2] 0 SV high alarm
1 SV low alarm
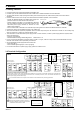
SV alarm action type
( : Alarm set value)
SV high alarm
OFF ON
SV low alarm
ON OFF
SV
Low High
SV
Low High
Change Settings
Example: Change the SV alarm type of the ALM1 from “SV high
alarm (0001)” to “SV low alarm (0011)”
1. Press the SET key ten times at SL1 until SL11 is displayed.
2. Press the <R/S key to high-light the tens digit. Next, press
the UP key to change the number to 1.
SV
PV
SV
PV
High-light
3. Press the SET key to store the new set value. The display
goes to the initialize code parameter.
7.8 Setting Limiter [High] (SLH)
Setting Limiter [Low] (SLL)
For voltage or current input, set scaling within the input range.
See Input range table (P. 12)
Factory set value varies depending on the instrument specification.
Setting range
Input type
Setting limiter
[high]
Setting limiter
[low]
K SLL to 1372 °C 0 to SLH °C
SLL to 2502 °F 0 to SLH °F
J SLL to 1200 °C 0 to SLH °C
SLL to 2192 °F 0 to SLH °F
R SLL to 1769 °C 0 to SLH °C
S SLL to 3216 °F 0 to SLH °F
B SLL to 1820 °C 0 to SLH °C
SLL to 3308 °F 0 to SLH °F
TC E SLL to 1000 °C 0 to SLH °C
SLL to 1832 °F 0 to SLH °F
N SLL to 1300 °C 0 to SLH °C
SLL to 2372 °F 0 to SLH °F
T SLL to 400.0 °C −199.9 to SLH °C
SLL to 752.0 °F −199.9 to SLH °F
W5Re/W26Re SLL to 2320 °C 0 to SLH °C
SLL to 4208 °F 0 to SLH °F
PLII SLL to 1390 °C 0 to SLH °C
SLL to 2534 °F 0 to SLH °F
Factory set value varies depending on the instrument specification.
Setting range
Input type
Setting limiter
[high]
Setting limiter
[low]
U SLL to 600.0 °C −199.9 to SLH °C
TC SLL to 999.9 °F −199.9 to SLH °F
L SLL to 900 °C 0 to SLH °C
SLL to 1652 °F 0 to SLH °F
RTD Pt100 SLL to 649.0 °C −199.9 to SLH °C
JPt100 SLL to 999.9 °F −199.9 to SLH °F
Voltage 0 to 5 V DC
0 to 10 V DC *
1 to 5 V DC
Current 0 to 20 mA DC
4 to 20 mA DC
SLL to 9999
(Programmable
scale)
−1999 to SLH
(Programmable
scale)
* Z-1010 specification
Change Settings
Example: When the display range is scaled to 0.0 to 400.0 for
a voltage input of 1 to 5 V DC.
1V 5 V
Factory set value → 0.0 100.0
Scaling → 0.0 400.0
1. Set Cod to 0001, and press the SET key. The display will go
to SLH.
Setting limiter [high] display
Initialize code selection display
SV
PV
SV
PV
2. The high-lighted digit indicates which digit can be set. Press
<R/S key to high-light the first digit from the left.
SV
PV
3. Press the UP key to change the number to 4.
SV
PV
4. Press the SET key to store the new set value. The display
goes to SLL.
5. Set SLL to 0.0.
6. Press the SET key to store the new set value. The display
goes to the next parameter.
7.9 Decimal Point Position (PGdP)
Use to select a decimal point position of the input range (voltage
input and current input). PGdP is displayed only for voltage or
current input.
Inappropriate settings may result in malfunction.
Set
value
Description
0000 No decimal place ()
0001 One decimal place (.) [Factory set value]
0002 Two decimal places (.)
0003 Three decimal places (.)
Change Settings
Example: Change the decimal point position from “One
decimal place (0001)” to “No decimal place (0000)”
1. Press the SET key two times at SLH until PGdP is displayed.
2. Press the DOWN key to change the number to 0.
SV
PV
SV
PV
3. Press the SET key to store the new set value. The display
goes to the next parameter.