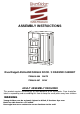
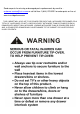
ASSEMBLY INSTRUCTIONS RiverRidge® ASHLAND SINGLE DOOR / 3 DRAWER CABINET ITEM# 06-086 WHITE ITEM# 06-087 GRAY ADULT ASSEMBLY REQUIRED This product requires assembly by an adult because of the small parts. Care should be taken in unpacking and assembling this item to keep the small parts away from children. WARNING Young children can be seriously injured or killed, if furniture tips over. Don’t use this item for a TV stand. Use angle-braces or anchors to secure furniture to the wall.
Send requests for missing or damaged parts replacements by email to : customer.service@ssi-rr.com or call toll free 1-(844)-223-5201 or order parts on line at www.riverridgehome.com THIS CABINET WILL HOLD UP TO 25 POUNDS PER SHELF AND 10 POUNDS PER DRAWER OR A TOTAL OF 130 POUNDS. DO NOT LOAD EACH SHELF WITH MORE THAN 25 POUNDS OR EACH DRAWER WITH MORE THAN 10 POUNDS. LOADING WITH MORE THAN 25 POUNDS PER SHELF AND 10 POUNDS PER DRAWER MAY CAUSE DAMAGE TO THE CABINET OR CAUSE SERIOUS INJURY OR DEATH.
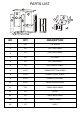
PARTS LIST NO QTY DESCRIPTION 1 1PC TOP BOARD 2 1PC LEFT SIDE PANEL 3 1PC RIGHT SIDE PANEL 4 1PC TOP SHELF 5 1PC BOTTOM BOARD 6 1PC DECORATIVE PANEL 7 3PCS DRAWER BOTTOM BOARD 8 3PCS DRAWER FRONT BOARD 9 6PCS DRAWER SIDE PANEL 10 3PCS DRAWER BACK BOARD 11 1PC SMALL BACK PANEL 12 1PC DOOR 13 1PC LARGE BACK PANEL 14 1PC MIDDLE PANEL 15 1PC SHELF
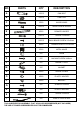
NO PARTS QTY DESCRIPTION A 16PCS CAM BOLT B 16PCS CAM LOCK C 5PCS WOOD DOWEL D 22PCS WOOD SCREW 3x10mm E 6PCS DRAWER HOLDER F 24PCS G 22PCS BACK BOARD SCREW 2.5x12mm H 6PCS DRAWER PLASTIC STOPPER I 2PCS METAL HINGE J 1PC KNOB K 1PC MACHINE SCREW 4x20mm L 1PC MAGNET PLATE M 1PC MAGNET N 2PCS SCREW 3x14mm O 4PCS PLASTIC HOLDER P 2PCS BRACKET Q 1PC SCREW 2.5x14 mm R 1PC PLASTIC ANCHOR S 1PC SCREW 4 x 40 mm T 1PC SCREW 3.
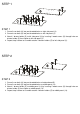
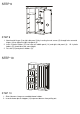
STEP 1 STEP 1 1. Screw 2 cam bolts (A) into pre-threaded holes on right side panel (3). 2. Screw 4 cam bolts (A) into pre-threaded holes on left side panel (2). 3. Attach 1 drawer holder (E) to left side panel (2) by inserting 2 wood screws (D) through holes on drawer holder (E) then tighten to left side panel (2). 4. Repeat step 3 above to assemble another 2 drawer holders (E) to left side panel (2). STEP 2 STEP 2 1. Screw 2 cam bolts (A) into pre-threaded holes on bottom board (5). 2.
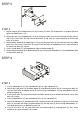
STEP 3 STEP 3 1. Attach magnet (M) to middle panel (14) by inserting 2 screws (N) through holes on magnet (M) then tighten to middle panel (14). 2. Attach top shelf (4) to middle panel (14) by inserting cam bolts (A) into cam lock holes on top shelf (4), then insert 2 cam locks (B) into the cam lock holes on top shelf (4), rotate clockwise to secure cam bolts (A) in place. 3.
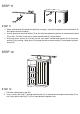
STEP 5 STEP 5 1. Screw 6 cam bolts (A) into pre-threaded holes on top board (1). STEP 6 STEP 6 1. Attached top board (1) to pre-assembled left side panel (2), right side panel (3) and middle panel (14) by inserting cam bolts (A) into cam lock holes on the left side panel (2), right side panel (3) and middle panel (14). 2. Insert 6 cam locks (B) into cam lock holes on left side panel (2), right side panel (3) and middle panel (14), then rotate clockwise to secure cam bolts (A) in place.
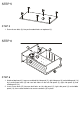
STEP 7 STEP 7 1. Attach small back panel (11) and large back panel (13) to back of cabinet. Insert 22 screws (G) through holes on small back panel (11) and large back panel (13) then tighten to back of cabinet. STEP 8 STEP 8 1. Attach 1 drawer side panel (9) to drawer back board (10) by inserting 2 screws (F) through holes on drawer side panel (9) then tighten to drawer back board (10). 2. Repeat above step to assemble another drawer side panel (9) to drawer back board (10). 3.
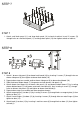
STEP 9 STEP 9 1. Attach metal hinges (I) to right side panel (3) by inserting 4 wood screws (D) through holes on metal hinges (I) then tighten to right side panel (3). 2. Insert 4 plastic holders (O) into holes on middle panel (14) and right side panel (3). All 4 plastic holders (O) should be at the same height. 3. Put shelf (15) onto plastic holders (O). STEP 10 STEP 10 1. Slide 3 drawers into pre-assembled drawer holders. 2. Insert 6 drawer plastic stoppers (H) to prevent drawers from pulling out.
STEP 11 STEP 11 1. Attach metal bracket (P) to back of cabinet by inserting 1 screw (Q) through hole on metal bracket (P) then tighten to back of cabinet. 2. Use the position of the metal bracket (P) on the cabinet to determine position of second metal bracket (P) on wall. Drill hole in wall where second metal bracket (P) will be placed. 3.
ENJOY YOUR NEW RiverRidge® CABINET NOW ! Attention Adults: The cabinet should be checked periodically for damage or loose screws/parts. Take appropriate action necessary to correct the hazard such as tightening of screws and taking any damaged parts away from children. Thank you for purchasing this RiverRidge® Home Products item. We hope you enjoy it, and consider purchasing other RiverRidge® items. Send requests for missing or damaged parts replacements by email to : customer.service@ssi-rr.
INSTRUCCIONES PARA EL ARMADO ARMARIO CON UNA PUERTA Y 3 CAJONES ASHLAND de RiverRidge® ARTÍCULO N.° 06-086 BLANCO ARTÍCULO N.° 06-087 GRIS REQUIERE QUE LO ARME UN ADULTO Este producto requiere que lo arme un adulto debido a las piezas pequeñas. Se debe tener cuidado al desempaquetar y armar este artículo para que las piezas pequeñas estén lejos de los niños. ADVERTENCIA Los niños pequeños pueden sufrir lesiones serias o incluso la muerte, si el mueble se tumba.
Envíe pedidos de piezas dañadas o que faltan por correo electrónico a: customer.service@ssi-rr.com o llame gratis al 1-(844)-223-5201 o pida piezas en línea en www.riverridgehome.com ESTE ARMARIO ACEPTARÁ HASTA 25 LIBRAS POR ESTANTE Y 10 LIBRAS POR CAJÓN O SEA UN TOTAL DE 130 LIBRAS. NO CARGUE CADA ESTANTE CON MÁS DE 25 LIBRAS O CADA CAJÓN CON MÁS DE 10 LIBRAS. CARGARLO CON MÁS DE 25 LIBRAS POR ESTANTE Y 10 LIBRAS POR CAJÓN PODRÍA CAUSAR DAÑO AL ARMARIO O CAUSAR SERIAS LESIONES O LA MUERTE.
LISTA DE PIEZAS N.° CANT.
N.° PIEZAS CANT. DESCRIPCIÓN A 16 PIEZAS PERNO DE LEVA B 16 PIEZAS TRABA DE LEVA C 5 PIEZAS CLAVIJA DE MADERA D 22 PIEZAS TORNILLO PARA MADERA 3 x 10 mm E 6 PIEZAS SOPORTE DEL CAJÓN F 24 PIEZAS G 22 PIEZAS TORNILLO DE LA TABLA TRASERA 2.
PASO 1 PASO 1 1. Atornille 2 pernos de leva (A) en los agujeros con rosca en el panel del lado derecho (3). 2. Atornille 4 pernos de leva (A) en los agujeros con rosca en el panel del lado izquierdo (2). 3. Sujete 1 soporte del cajón (E) al panel del lado izquierdo (2) insertando 2 tornillos para madera (D) en los agujeros del soporte del cajón (E), luego apriételos al panel del lado izquierdo (2). 4. Repita el paso 3 anterior para armar otros 2 soportes del cajón (E) al panel del lado izquierdo (2).
PASO 3 PASO 3 1. Sujete el imán (M) al panel del medio (14) insertando 2 tornillos (N) en los agujeros del imán (M) luego apriételos al panel del medio (14). 2.
PASO 5 PASO 5 1. Atornille 6 pernos de leva (A) en los agujeros con rosca en la tabla de arriba (1). PASO 6 PASO 6 1. Sujete la tabla de arriba (1) al panel del lado izquierdo prearmado (2), panel del lado derecho (3) y panel del medio (14) prearmadas insertando pernos de leva (A) en los agujeros de las trabas de leva del panel del lado izquierdo (2), panel del lado derecho (3) y panel del medio (14). 2.
PASO 7 PASO 7 1. Sujete la panel pequeño de atrás (11) y la panel grande de atrás (13) a la parte de atrás del armario. Inserte 22 tornillos (G) por los agujeros de la panel pequeño de atrás (11) y panel grande de atrás (13) y luego apriételos a la parte de atrás del armario. PASO 8 PASO 8 1. Sujete 1 panel del costado del cajón (9) a la tabla de atrás del cajón (10) insertando 2 tornillos (F) en los agujeros del panel del costado del cajón (9) y luego apriételos a la tabla de atrás del cajón (10). 2.
PASO 9 PASO 9 1. Sujete las bisagras de metal (I) al panel del lado derecho (3) insertando 4 tornillos para madera (D) en los agujeros de las bisagras de metal (I), luego apriételos al panel del lado derecho (3). 2. Inserte 4 soportes de plástico (O) en los agujeros del panel del medio (14) y panel del lado derecho (3). Los 4 soportes de plástico (O) deben estar a la misma altura. 3. Ponga el estante (15) en los soportes de plástico (O). PASO 10 PASO 10 1.
PASO 11 PARED PASO 11 1. Sujete el soporte de metal (P) a la parte de atrás del armario insertando 1 tornillo (Q) en el agujero del soporte de metal (P) y luego apriételo a la parte de atrás del armario. 2. Use la posición del soporte de metal (P) en el armario para determinar la posición del segundo soporte de metal (P) en la pared. Perfore un agujero en la pared donde va a colocar el segundo soporte de metal (P). 3.
¡DISFRUTE SU NUEVO ARMARIO de RiverRidge® AHORA! Atención adultos: Se debe inspeccionar periódicamente el armario para determinar si está dañado o hay piezas o tornillos flojos. Tome las medidas apropiadas necesarias para eliminar el peligro, tales como apretar los tornillos y mantener las piezas dañadas lejos de los niños. Gracias por comprar este producto RiverRidge® para el hogar. Esperamos que lo disfrute y que considere comprar otros productos RiverRidge®.