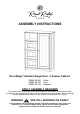
ASSEMBLY INSTRUCTIONS RiverRidge® Ashland Single Door / 3 Drawer Cabinet ITEM#: 06-086 ITEM#: 06-087 ITEM#: 06-126 White Gray Espresso ADULT ASSEMBLY REQUIRED This product requires assembly by an adult because of small parts. Care should be taken in unpacking and assembling this item to keep small parts away from children. During assembly children should be kept away from the product due to possible risk of injury.
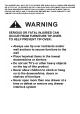
THIS CABINET WILL HOLD UP TO 25 POUNDS PER SHELF AND 10 POUNDS PER DRAWER OR A TOTAL OF 130 POUNDS. DO NOT LOAD EACH SHELF WITH MORE THAN 25 POUNDS OR EACH DRAWER WITH MORE THAN 10 POUNDS. LOADING WITH MORE THAN 25 POUNDS PER SHELF AND 10 POUNDS PER DRAWER MAY CAUSE DAMAGE TO THE CABINET OR CAUSE SERIOUS INJURY OR DEATH.
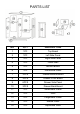
PARTS LIST NO QTY DESCRIPTION 1 1PC Top Board 2 1PC Left Side Panel 3 1PC Right Side Panel 4 1PC Fixed Shelf 5 1PC Bottom Board 6 1PC Decorative Panel 7 3PCS Drawer Bottom Board 8 3PCS Drawer Front Board 9 6PCS Drawer Side Panel 10 3PCS Drawer Back Board 11 1PC Small Back Panel 12 1PC Door 13 1PC Large Back Panel 14 1PC Middle Panel 15 1PC Adjustable Shelf
NO A B C D E F G H PARTS QTY DESCRIPTION 16PCS Cam Bolt 16PCS Cam Lock 5PCS Wood Dowel 22PCS Screw (3x10mm) 6PCS Drawer Holder 24PCS Screw (3.5x25mm) 23PCS Screw (2.
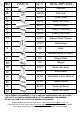
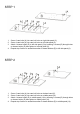
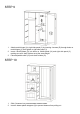
STEP 1 1. 2. 3. 4. Screw 2 cam bolts (A) into cam bolt holes on right side panel (3). Screw 4 cam bolts (A) into cam bolt holes on left side panel (2). Attach 1 drawer holder (E) to left side panel (2) by inserting 2 screws (D) through holes on drawer holder (E) then tighten to left side panel (2). Repeat step 3 above to assemble another 2 drawer holders (E) to left side panel (2). STEP 2 1. 2. 3. 4. Screw 2 cam bolts (A) into cam bolt holes on bottom board (5).
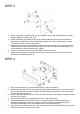
STEP 3 1. 2. 3. 4. 5. Attach magnet (M) to middle panel (14) by inserting 2 screws (N) through holes on magnet (M) then tighten to middle panel (14). Attach fixed shelf (4) to middle panel (14) by inserting cam bolts (A) into cam lock holes on fixed shelf (4), then insert 2 cam locks (B) into the cam lock holes on fixed shelf (4), rotate clockwise to secure cam bolts (A) in place.
STEP 5 1. Insert 2 screws (U) through holes on adjustable anchor brackets (P), then tighten to top board (1). 2. Screw 6 cam bolts (A) into cam bolt holes on top board (1). STEP 6 1. 2. Attach top board (1) to pre-assembled left side panel (2), right side panel (3) and middle panel (14) by inserting cam bolts (A) into cam lock holes on the left side panel (2), right side panel (3) and middle panel (14).
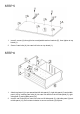
STEP 7 1. Attach small back panel (11) and large back panel (13) to back of cabinet by inserting 23 screws (G) through holes on small back panel (11) and large back panel (13), then tighten to back of cabinet. STEP 8 1. 2. 3. 4. 5. 6. 7. 8. Attach 1 drawer side panel (9) to drawer back board (10) by inserting 2 screws (F) through holes on drawer side panel (9), then tighten to drawer back board (10). Repeat above step to assemble another drawer side panel (9) to drawer back board (10).
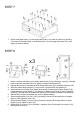
STEP 9 1. 2. 3. Attach metal hinges (I) to right side panel (3) by inserting 4 screws (D) through holes on metal hinges (I), then tighten to right side panel (3). Insert 4 shelf holders (O) into holes on middle panel (14) and right side panel (3) making sure all 4 shelf holders are at the same height. Place adjustable shelf (15) onto shelf holders (O). STEP 10 1. 2. Slide 3 drawers into pre-assembled drawer holders. Insert 6 drawer plastic stoppers (H) to prevent drawers from pulling out.
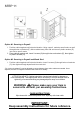
STEP 11 Option #1: Securing to Drywall 1. Position cabinet against wall in desired location. Using a pencil, make two small marks on wall through holes on brackets (P). Move cabinet away from wall and screw 2 plastic anchors (R) into wall on pencil marks. 2. Place cabinet against wall, insert 2 screws (S) through holes on brackets (P), then tighten to plastic anchors (R). Option #2: Securing to Drywall and Wood Stud 1. Position cabinet against wall in desired location.
Enjoy your new RiverRidge® Cabinet! Thank you for purchasing this RiverRidge® Home item. We hope you enjoy it and consider purchasing other RiverRidge® items. To order replacement parts at no cost to you, email customer.service@ssi-rr.com, call 1-(844)-223-5201 or order parts online at www.riverridgehome.com. Only valid in the United States. If purchased outside of the United States, please contact retailer where purchased. RiverRidge® is a registered trademark of Sourcing Solutions, Inc.