
User Guide Part 1


Wi-Fi Array
204 Configuring the Wi-Fi Array
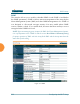
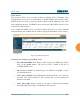
5. Network Address Translation (NAT): Check this box to enable the
Network Address Translation feature.
6. Lease IP Range—Start: Enter an IP address to define the start of the IP
range that will be used by the DHCP server. The default is 192.168.1.100.
7. Lease IP Range—End: Enter an IP address to define the end of the IP
range that will be used by the DHCP server. The DHCP server will only
use IP addresses that fall between the start and end range that you define
on this page. The default is 192.168.1.200.
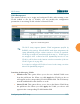
8. Subnet Mask: Enter the subnet mask for this IP range for the DHCP
server. The default is 255.255.255.0.
9. Gateway: If necessary, enter the IP address of the gateway.
10. Domain: Enter the DNS domain name. See also, “DNS Settings” on
page 190.
11. DNS Servers (1 to 3): Enter the IP address of the primary DNS server,
secondary DNS server and tertiary DNS server. These DNS server
addresses will be passed to stations when they associate, along with the
assigned IP address. Note that if you leave these blank, no DNS
information is sent to the stations. DHCP will not default to sending the
DNS servers that are configured in DNS Settings. See also, “DNS
Settings” on page 190.
12. Click Apply to apply the new settings to this session, or click Save to
apply your changes and make them permanent.
See Also
DHCP Leases
DNS Settings
Network Map