
Instruction Manual


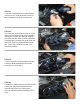

STEP 6
Apply 3 drops of Blue threadlock to all seven mounting bolts. In-
stall the 4 5/16 x 1.5” bolts in the front of the motorplate first
threading each bolt in until they seat equally up against the
plate. Check that even contact is made front-to-back on the mo-
torplate rear surface. Proceed to tightening all 4 bolts equally.
Now install the 3 eccentric cams into the rear of the motorplate
noting that the bottom cam is marked with a ‘B’. Align the cam
holes to the threaded holes in the transmission and then thread
in the 3 5/16 x 2.250” bolts. This is what the mounted motor
plate will look like to this point. Install oil filter nipple if center-
mount oil filter is being used.
STEP 7
Install the starter motor using the two 5/16-18 x 3-3/4” socket head cap screws.Place the starter to
the rear of the trans flange and slide the bolts through to the threads in the motor plate.
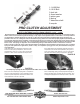
STEP 8
At this point it’s time to address the starter jackshaft components which are included with the belt
drive kit (see last page for an exploded view of the starter mechanism).
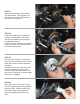
STEP 5
Now it’s time to install the motor plate on the bike. Position the
plate over the shafts and push forward until contact is made,
sandwiching the front motor plate spacer between the motor plate
and the engine case. Make certain all mounting holes are properly
indexed.
Begin by installing the starter coupler onto the end of the starter motor. Then the remaining pieces . . .
the extender, spring, pinion gear, thrust washer, lockwasher and bolt. Insert this assembly into the
coupler. Make certain the lockwasher is correctly oriented to the slot in the extender. Tighten the bolt.
Bend the locking tab over to keep the bolt from vibrating loose.
B
Note: The eccen-
tric cams are used
on this belt drive
because the bolt
pattern on the
1990-2000 Dyna®
models is different
then the 2001-
2005 Dyna® mod-
els.