
Installation manual

Rinnai Australia 27 Installation Manual
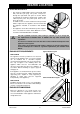
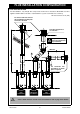
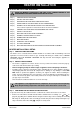
HEATER INSTALLATION
2. Remove the Surround , by removing the 2 retaining screws located on the inner left hand and
2 on the inner right hand side. Place it safely aside.
3. Carefully remove the ‘Glass Panel Assembly’ , by removing the 4 retaining screws top and
bottom. Carefully place it safely aside.
4. Very carefully remove the log set from the combustion chamber taking care not to scrape the
lining or to damage the main burner.
5. Remove the ‘Lower Horizontal Cover Panel’ and the ‘Manual Control Switch Panel’, .
Ensure you disconnect the RJ45 Connector from the manual control switch , before pulling this
panel away.
6. Extend and fasten the Lintel Stand-Off Brackets .
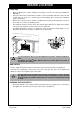
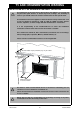
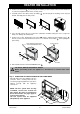
Step 4 . INSERT AND FIX THE APPLIANCE TO THE FRAME WORK
Carefully manoeuvre the appliance into the
enclosure frame ensuring that both the
consumer gas piping and the flue system are
aligned correctly with the appliance
connections.
NOTE: The flue system must be fully
assembled, located and secured into
place before the heater is installed into
the enclosure frame. See pages page 23,
23 & 24 for flue details.
The flue system must be supported
independently of the appliance.
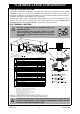
240 VOLTS, RISK OF ELECTRICAL SHOCK!
Before proceeding ensure the appliance is disconnected or isolated from mains
power.
3
5
1 2 3
5
6
7
4
6
7
RJ45
Connector
4
8
Typical 2 places
Note: Cladding support bracket
fitted to RDV3611ETR Only!
8
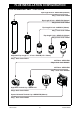
WARNING
TYPICAL 4 PLACES