
Installation manual

Rinnai Australia 26 Installation Manual
HEATER INSTALLATION
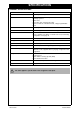
HEATER INSTALLATION OVERVIEW
Step 1). CONSTRUCTING THE FRAME
Step 2). UNPACK THE APPLIANCE
Step 3). PREPARING THE APPLIANCE FOR INSTALLATION
Step 4). INSERT AND FIX THE APPLIANCE TO THE FRAME WORK
Step 5). CONNECT FLUE AND INSTALLING THE FLUE RESTRICTOR
*Flue restrictor required for vertical and vertical off-set flue installation.
Step 6. CONNECT THE APPLIANCE TO CONSUMER GAS PIPING
Step 7). INSTALL THE LOG SET
Step 8). REPLACE THE GLASS PANEL ASSEMBLY
Step 9). CONNECT TO ELECTRICITY SUPPLY
Step 10). COMMISSION THE APPLIANCE
Step 11). REPLACE PANELS
Step 12). COMPLETE THE CLADDING
Step 13). FIT THE SURROUND
Step 14). REPLACE MESH DRESS GUARD & DRESS GUARD FRAME ASSEMBLY
HEATER INSTALLATION - DETAIL
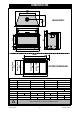
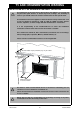
Step 1. CONSTRUCTING THE FRAME
The frame is to be constructed from suitable materials in accordance with local building codes and
regulations. Provisions must be made for gas, electricity and flueing. For details refer to HEATER
LOCATION and FLUE TERMINAL LOCATION and Step 6 below ‘Connecting the appliance to
consumer gas piping’.
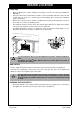
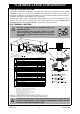
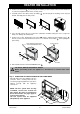
Step 2. UNPACK THE APPLIANCE
• The heater is supplied in one carton, check to ensure you have all contents as listed on page (i)
at the start of this manual before proceeding.
• Remove shipping clamps on bottom edge of appliance before attempting to lift heater.
• Carefully remove carton by removing the straps and lifting the *box off the appliance. Remove
all packaging materials and check all components for damage. If any damage is evident DO
NOT install or operate this appliance. Contact your supplier for advice. Before installing the
heater, check it is labelled for the correct gas type, (refer to the data label located adhered to the
inside of the base body panel of the heater). Refer to the local gas authority for confirmation of
gas type if you are in doubt.
*Note: Retain the card board carton for use in the next step.
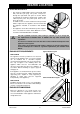
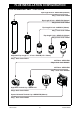
Step 3. PREPARING THE APPLIANCE FOR INSTALLATION
To protect the floor lay the cardboard carton out flat in front of where the heater is to be fitted.
1. Remove the ‘Mesh Dress Guard and Mesh Dress Guard Frame’ assembly, (see and on
page 26) by pulling in an outward direction along the bottom edge of the assembly, the assembly
will swing out. Gently lift the entire assembly up-off and away from the locating fold along the top
edge of the Glass Panel Assembly , and place it safely aside.
READ THIS MANUAL THOROUGHLY AND GAIN A FULL UNDERSTANDING OF THE
REQUIREMENTS BEFORE UNDERTAKING INSTALLATION.
This appliance is not supplied with Flue components. These are purchased separately.
Only ‘Abey®’ Flueing components referred to in these instructions can be used.
IMPORTANT
NOTE
1
2
5