
Installation manual


Rinnai Australia 12 Operation & Installation Manual
HOW TO OPERATE YOUR HEATER
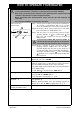
FLASHING SMALL FLAME SYMBOL ‘ON’
The small flashing flame symbol on the RF controller display indicates the room temperature is within
0.5°C of set temperature.
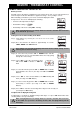
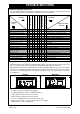
TO BEGIN PROGRAMMING
With the controller ‘OFF’, press and hold the ‘P’ button for 2 seconds to initiate programming. The LCD
will display ‘PROG’. ‘Pd’ and the time at which the controller is currently set will flash. Period 1 can
now be set.
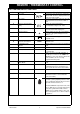
Setting the day of
the week
(days of the week
flash)
Step 1. Press and release the ‘UP’or ‘DOWN’ button to
change the day of the week.
Step 2. Press and hold the ‘UP’ or ‘DOWN’ button for 2
seconds to increase the day of the week by 1 day.
Scrolling order is as follows:
MO TU WE TH FR MO TU WE TH FR
SA SU - SA SU MO TU WE TH FR SA.
Step 3. To accept the selected day/s of the week press
‘OK’.
Setting the hour
‘ON’ (time and
hours flash)
Step 1. Press and release the ‘UP’ or ‘DOWN’ button to
increase or decrease the hour setting by 1 hour.
Step 2. Press and hold the ‘UP’ or ‘DOWN’ button for 2
seconds or longer to increase or decrease the hour
setting by 1 hour every 0.5 seconds. Press ‘OK’ to
accept and select the minute.
Setting the
minute function
(time and
minutes flash)
Step 1. Press and release, or press and hold the ‘UP’ or
‘DOWN’ button to increase or decrease the minute
setting by 1 minute similarly to the hour setting.
Step 2. Press ‘OK’ to accept and select the day of the week.
Setting the run
period starting
time
Step 1. After setting the day the AM/PM settings will flash. To
set the ‘P1’ starting time, press and release the ‘UP’ or
‘DOWN’ button for the hour setting. Ensure that the
AM/PM is set correctly.
Step 2. To accept press
‘OK’.
Step 3. The minute setting will now flash, adjust as in Step 1
and press ‘OK’ to accept.
Setting the
temperature (set
and temperature
flash)
Step 1. After setting the time period the temperature will flash.
Press and release the ‘UP’ or ‘DOWN’ button to adjust
the temperature to the desired setting. If you do not
require the heater to come ON during a period, adjust
the temperature ‘DOWN’ until °C is displayed.
Step 2. To accept press ‘OK’.
Period 1 is now set for the day/s of the week you have
chosen.
The LCD will display ‘
P2’ to indicate Period 2 can now be
set for the same day/s of the week.
Repeat programming process for remaining periods.
The controller will automatically turn ‘OFF’.
MO TU WE TH FR SA
SET
PROG
SET
PROG
°
MO
SET
PROG
°
SET
PROG
°
SET
PROG
°