
Installation Guide


Rinnai 3 SFD01 Installation Instruction
Fitting Mounting Bracket To The Appliance
4. Loosen the 2 adjustment screws located on
both ends of mounting bracket .
This allows cup hooks of the mounting
bracket to be positioned inside the lip of
the appliance flue terminal .
Securing Mounting Bracket To The Appliance
5. Align the cup hooks with the lip so that
when the 2 adjustment screws are re-
tightened both will engage.
6. Re-tighten the 2 adjustment screws until the
cup hooks and the lip are firmly engaged
and secured.
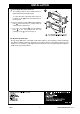
7. Apply the warning label to water heater, aligning
the label to the right edge and 5mm below the
flue spigot as shown.
The warning label becomes hidden once
the sideways flue diverter is fitted to the
appliance. This warning label reminds a
serviceperson to replace the sideways
flue diverter after servicing activities.
Attaching The Box Panel
8. Re-attach the box panel to the mounting
bracket with the retaining screws
removed in step 2.
Ensure that the drainage holes are pointing
downwards. See step for details of left or
right handed flue product discharge.
ii
D
C
E
C F
G
iiiii
E F
D
D
E F
Apply warning label to
water heater, aligning
the label to the right
edge and 5mm below
the flue spigot.
5mm
NOTE
iv
B
C
A
H
v
INSTALLATION