
User Manual


Rinnai 12 ORH OIM
INSTALLATION METHOD
1� Open the packaging and carefully take the heater out and inspect for any damage.
2� Determine the mounting position for the heater, refer to "Approximate Heating Area" on page 10 "Outdoor
Radiant Heater Mounting" on page 10 and 11 to assist with the location of the heater.
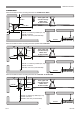
3� Set the adjustable angle mounting brackets to desired angle:
For ceiling mounted installations the available mount angles are restricted to 0°, 15° and 30° only.
For wall mounted installations the available mount angles are restricted to 15°, 30° and 45° only.
4� Mark the position of the two brackets, using the following minimum recommended bracket spacing below to
determine the correct location.
Dimension (mm) ORH15SR ORH18MR ORH24LR ORH32XLR
A 530 ± 50 710 ± 50 990 ± 50 1400 ± 50
5. Install the brackets onto the nominated surface or structure using appropriate xing screws suitable for the
mounted surface material and able to support more than double the weight of the heater being installed, refer
to "Specications" on page 7.
6� Hang the heater on the brackets and rmly secure in place with the mounting bracket locking plates by
tightening the bolt A rst, and then bolt B as indicated below.
0° 15° 45°30°
CeilingWall
A
B
A
B
A
INSTALLATION