
Installation Sheet


Installation & Servicing Instructions Rinnai E-Series
88
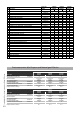
Boiler basic piping g. 5
1. shutovalve
2. system circulator
3. check valve
4. balancing valve
5. boiler drain valve
6. dirt trap
7. air separator
8. automaticllvalve
9. backowpreventer
10. expansion tank
11. bypass for system cleaning
Plumbing Kit installation g. 6
1
2
3
4
5
6
7
1. Plumbing kit
2. Safety valve
3. Drain and Purge connection
4. Bronze adapter ttings
5. Service valves*
6. Flow 1 1/4"
7. Return 1 1/4"
8. Pressure gauge*
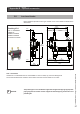
8
Compression fittings.
Parts:
1. Nut
2. Ferrule
3. Fitting
Fitting instructions:
Clean pipe ends tho-
roughly. The outside
surface has to be
smooth before fitting.
1. Push the complete
fitting over the pipe as
far as possible. Ferrule
should be over the
pipe completely.
2. Turn the nut handtight
clockwise.
3. Use 2 wrenches, one
to hold the fitting on
its place, the other
for tighten the nut
clockwise in 3/4 turn.
21
3
!
WARNING
NOTICE
i
NOTICE
i
Do not overtighten these ttings when
connecting ow and return pipe to the
plumbing kit. Max. 150Nm / 100 foot-
pounds (ft lb) / 1327 inch-pounds (in lb). Failure to follow these
instructions may result in leakage causing property damage
and would not be covered under warranty.
* After installation of the plumbing kit to the
boiler the pressure gauge and both handles
of the service valves must be mounted. Be
surethegaugeisttedleakfreeandthatthehandlesaresecured
with the supplied nuts.
T
P
Low Loss Header
V1
Service valve
V2
Service valve
1
2
3
4
56
7
8 9
11
10