
Installation Sheet


Installation & Servicing Instructions Rinnai E-Series
60
Installing casing gure 30
Ending the O
2
measuring procedure:
- Press the - button until is shown (keep button pressed).
With this the procedure has ended..
- Replace the black cover on the gas valve and secure it with the screw.
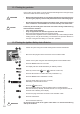
13.4 Measuring the ionization current
- SwitchothesystemusingtheCentralHeatingbuttonandtheDHWbutton
- Disconnect the plug and the socket
connection on the probe and connect the
measuring device in series. See gure 29.
Select the µA direct current range on the measuring
device. The measuring device must have a resolution
of at least 1 µA.
- Switch on the sytem using the Central Heating button
and the DHW button.
- Press the MODE-button for 5 seconds.
- The display will show COdE followed by an arbitrary
number;
- Select by means of the or the button the code C123;
- PresstheStore-buttontoconrmthecode(codeblinks1x);
- Press the MODE-button until SERV is shown;
- Press the STEP-button once until 1 is shown;
alternately 1 and OFF will be shown.
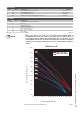
- Press the button until the maximum value (in kW) is achieved;
The boiler will burn on full load (value on display in kW)
value in BTU/hr = x3415
- Measure the ionization. When the boiler is in full load the ionization current must
be > 4 µA and write down this value in the log book.
- Press the button until OFF is shown (keep button pressed).
- SwitchothesystemusingtheCentralHeatingbuttonandtheDHWbutton
- Disconnect the measuring device and restore the plug and the socket connection
on the probe.
- Switch on the sytem using the Central Heating button and the DHW button.
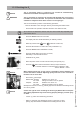
13.5 Installing the casing
- Install the cover on the boiler and close all 4
quick releases of the casing
- Tightenthe4screwsA,B,CandDinthequickreleases(gure30);
- TightenthescrewEbehindthedooronthefrontofthecasing(gure30);
Ionization test gure 29