
Full Product Manual


OPERATION
WARNING: To reduce the risk of fire, explosion, or damage to Vac:
• Do not leave Vac running while unattended - you may fail to notice important signs indicating abnormal
operation such as loss of suction, debris/liquid exiting the exhaust, or abnormal motor noises.
Immediately stop using Vac if you notice these signs.
• Do not leave Vac plugged in when not in use.
• Do not continue running when float has cut off suction.
• Sparks inside the motor can ignite airborne flammables. Do not operate Vac near flammable
liquids or in areas with flammable gases, vapors, or explosive/airborne dust. Flammable liquids,
gases, and vapors include: lighter fluid, solvent-type cleaners, oil-based paints, gasoline, alcohol,
and aerosol sprays. Explosive dusts include: coal, magnesium, aluminum, grain, and gun powder.
• Do not vacuum up explosive dusts, flammable liquids, or hot ashes.
• Do not leave sawdust or rags with stain or polyurethane residue inside Vac. Empty drum after picking up
these potentially self-heating materials.
WARNING: To reduce the risk of electric shock or injury:
• Do not expose to rain or allow liquid to enter motor compartment. Store indoors.
• Do not handle plug, switch, or Vac with wet hands.
• Unplug Vac before servicing. If your Vac is not working as it should, has missing parts, has been
dropped, damaged, left outdoors, or dropped into water, return it to an authorized service center or call
customer service.
• When using an extension cord, use only outdoor-rated cords that are in good condition. Do not allow the
connection to come into contact with liquid.
!
!
CAUTION: To reduce the risk of hearing damage, wear ear protectors when using the
Vac/Blower for extended time or in a noisy area.
!
6
Hose
Locking Tab
(K)
Vac Inlet Port
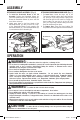
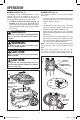
ATTACHING /REMOVING VACUUM HOSE (Fig. 5)
1. To Insert Hose: Locate the larger end of the
Tug-A-Long Positive Locking Hose with Dual-Flex
(K). Push the Tug-A-Long Positive Locking Hose
with Dual-Flex into the Vac Inlet Port. Engage the
Hose Locking Tab onto the lip of the Vac Inlet
Port. The Tug-A-Long Positive Locking Hose with
Dual-Flex should snap into place.
2. To Remove Hose: Press the Hose Locking Tab
and pull the Hose end straight out of the Vac Inlet Port.
Fig. 5
ASSEMBLY
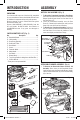
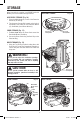
DETACHABLE BLOWER ASSEMBLY (Fig. 4)
2. To Install the Detachable Blower to the Lid
Assembly: Position the Detachable Blower (A)
above the Indented Area of the Lid Assembly (B).
Rotate the Detachable Blower (A) down until the
travel of the unit stops.
3. Lightly press down on the Carry Handle of the
Detachable Blower (A) until you hear the “snap”
of the Detachable Blower Latch engaging the
Detachable Blower (A). The Detachable Blower (A)
is now latched to the Lid Assembly (B).
Carry Handle
(A)
(B)
Indent
Area (2)
Blower
Latch
Fig. 4
SP7124 WD40801 ES.indb 6SP7124 WD40801 ES.indb 6 9/10/21 10:19 AM9/10/21 10:19 AM