
Full Product Manual


12
STORAGE
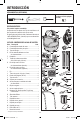
D
R
A
I
N
D
R
A
I
N
(S)
(N)
Polarized Plug
Power Cord
Cord Clip
(Q)
Caster Foot
Post (2)
(O)
(T)
(M)
(W)
(U)
(V)
(R)
Nozzle Ridges
(U)
Locking
Tab
(S)
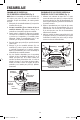
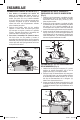
When vacuuming is complete, your RIDGID Wet/Dry
Vac has convenient storage locations.
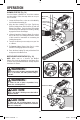
ACCESSORY STORAGE (Fig. 15)
1. For Storage: Slide the Extension Wands (S) and the
Accessories (R, T, U, V or W) onto the Caster Feet
Posts.
2. To Remove Wands and Accessories: Lightly rotate
and pull upward.
3. Snap additional Accessories (R, T, U, V or W) onto
the Accessory Caddy (M).
CORD STORAGE (Fig. 15)
1. To Store Cord: Wrap the Power Cord around the
Powerhead Carry Handle/Power Cord Wrap (N)
beneath the Two Tabs.
2. Secure the Power Cord using the Cord Clip on the
Polarized Plug.
HOSE STORAGE (Fig. 15)
1. The Tug-A-Long Positive Locking Hose with
Dual-Flex (Q) may be stored around the Powerhead
Assembly (A) using the Two Hose Storage
Clips (O).
LOCKING ACCESSORIES (Fig. 15)
Your RIDGID Wet/Dry Vac includes Locking
Accessories to prevent the Accessories from falling off
when in use.
1. To Connect the Locking Accessories: Align the
Nozzle Ridges of the Accessory (R, T, U, V or W)
with the Locking Tab of your Extension Wand (S).
Press to secure the Nozzle to the Extension Wand.
2 To Disconnect the Locking Accessories: Twist the
Nozzle and Extension Wand (S) to disengage the
Nozzle Ridges and pull. You may also press the
Locking Tab and pull to disengage.
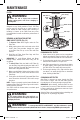
WARNING:
Do not put any object into ventilation openings. Do
not vacuum with any ventilation openings blocked;
keep free of dust, lint, hair or anything that may
reduce air flow.
CAUTION:
Do not operate vacuum while the hose is still
wrapped around the powerhead assembly in the
storage position.
Fig. 15
SP7051-1 ESF.indb 12SP7051-1 ESF.indb 12 4/21/21 10:57 AM4/21/21 10:57 AM