
Operation Manual


Making your very rst 3D print – Quick Print Guide
6
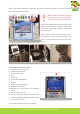
1.3 Plugging in your Creatr HS
OPTIONAL: If you want to use the printer con-
nected to your computer, use the USB cable
supplied with the printer, insert the USB-A (at
rectangular connector) cable in your computer
and insert the USB-B (square connector) cable
in the backside of the Creatr HS.
In this Quick Guide we will use the stand-alone
modus, therefore the cable does not have to be
plugged in.
NOTE: If your printer has a USB-A
(at rectangular) backside connec-
tion, make sure you only use the USB-A cable with the built in FTDI chip that is included
in the box. Any other USB might interfere with the communication.
STEP 5: Plug the power cord in the outlet and turn on your Creatr HS.
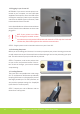
1.4. Preheating the printer
Before you start loading your lament, it is necessary to preheat your printer. Heating your extrud-
ers will make sure that your lament will melt and feed through. You are also preheating your print
bed. This will make sure your print will stick to your bed.
STEP 6: To preheat, scroll to the preheat icon
on your screen, and push the button. If the co-
lour of the icon changes, your nozzles and bed
are preheating.
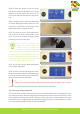
1.5. Loading lament
The Creatr HS is compatible with a wide range
of 1.75 mm laments. All laments provided by
Leapfrog 3D Printers are of high quality and are
thoroughly tested by us. For every lament, we
also provide standard settings for Simplify3d
(to be found in The Ecosystem).
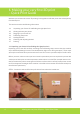
STEP 7: Unpack your role of lament and cut
the end into a sharp point.
OPTIONAL: connect USB cable to port
STEP 6: Preheat
STEP 7: Cut to a sharp point