
Operation Manual


Making your very rst 3D print – Quick Print Guide
Making your very rst 3D print – Quick Print Guide
5
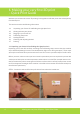
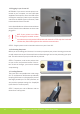
STEP 2: Pull off the tape from the plastic bag wrap on the top of the printer and push the plastic
down and away from the printer.
NOTE: Do NOT grab the Creatr HS
by the top cover as this can damage
it. Lift the machine from the bottom.
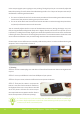
STEP 3: Place the printer in its new location and
make sure it sits rmly on all four rubber feet.
If necessary adjust their length by unscrewing
the feet slightly.
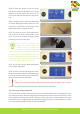
STEP 4: Remove three sets of tie-wraps with a
cutting tool: at the front of the carriage, in the
corner of the carriage and in the back of the
printer.
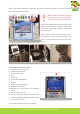
1.2. Getting to know your printer
1. Printing head and extruders
2. Filament guiding tube
3. Filament drive unit
4. Axes
5. Print bed
6. Print bed levelling knobs
7. Display
8. Quick release knob (back)
9. USB port for USB stick
10. USB port for connecting to the computer
(back)
11. Belt (inside the printer)
12. Z-sensor adjustment knob (only to be used
when bed levelling cannot be achieved using
the print bed knobs!)
Large image including close ups on page 26.
STEP 2: Remove plastic wrap
STEP 4: Cut the tie wraps at the front and back of the carriage and in the back of the printer
The Creatr HS
1
2
4
5
6
79
12
11
3