
Operation Manual


Preparing for your next printMaking your very rst 3D print – Quick Print Guide
8
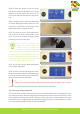
In the next paragraph you are going to start printing. During this print you can manually adjust the
bed while printing. Check if the bed is levelled during the rst 2 or 3 layers of the print and verify if
the lament is adhering well to the bed.
• If a corner of the bed is too far from the nozzle you observe lament being extruded too loosely
in this area of the print bed, causing your print not to stick.
• If a corner of the bed is too close to the nozzle the extruder scratches through the print sticker,
or (almost) no lament comes out of the nozzle.
You can manually adjust the four corners of the bed where necessary during printing by very care-
fully turning the bed levelling knobs. Only turn it slightly! Usually not more than a quarter of a turn
is necessary. Looking from the top, slightly turn the knob clockwise in the corner where no lament
is owing or where the nozzle is scratching the print sticker. Turn the knob counter-clockwise in the
corner where the lament is not pressed enough onto the bed and comes loose easily.
If these steps are not sufcient to successfully calibrate the printer, it can be recalibrated using the
computer, which is explained in Section 3.
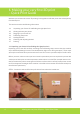
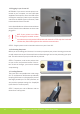
1.7 Printing
STEP 14: Surf to creatrhs.lpfrg.com and click on ‘Demo Print Downloads’. Select the single extrud-
er print.
STEP 15: Insert your USB stick in the front USB port of your printer.
STEP 16: On your screen, select the USB stick icon and press the button.
STEP 17: Find your le, select it and press the
button. It can take a few seconds for the les to
be displayed if there are many les on the USB
stick. The printer will now start to heat up to
the required heat encrypted in the le. Once it
hits that temperature, it will start printing!
TIP: The rst layers of a print are always the most difcult and it is best to carefully ob-
serve them. Slight adjustments to the level of the bed during the rst print layers might
be necessary to obtain a successful print.
Calibrating the printer.
STEP 17: USB port and display in one screen