Kop Platte tekst
Follow us online! facebook.com/lpfrg twitter.com/Leapfrog_3D instagram.com/leapfrog_3d Sign up for our newsletter www.lpfrg.
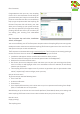
Dear Customer, Congratulations with your very own Leapfrog Creatr HS! In this document we will help you get started with your first print and with all the prints to come after that. Also, we would like to help you get acquainted with the Leapfrog 3D Printers Ecosystem. We will be by your side when you are setting up your printer and help you with any questions you might have during printing. We will also cheer you on when you are making your amazing and value-added prints.
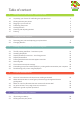
Table of content 1. Making your very first 3D print – Quick Print Guide 1.1 1.2 1.3 1.4 1.5 1.6 1.7 Unpacking your Creatr HS and finding the right place for it Getting to know your printer Plugging in your Creatr HS Preheating the printer Loading filament Checking and adjusting the bed Printing 2. Preparing for your next print 2.1 2.2 Removing your print and replacing your print sticker Changing filament 3. Creating your own printable file: from STL to gcode 3.
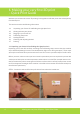
1. Making your very first 3D print – Quick Print Guide We know you cannot wait to start 3D printing! In this guide we will take you on the easiest journey from box to print. This section contains the following information: 1.1. 1.2. 1.3. 1.4. 1.5. 1.6. 1.7. Unpacking your Creatr HS and finding the right place for it Getting to know your printer Plugging in your Creatr HS Preheating the printer Loading filament Checking and adjusting the bed Printing 1.1.
STEP 2: Pull off the tape from the plastic bag wrap on the top of the printer and push the plastic down and away from the printer. NOTE: Do NOT grab the Creatr HS by the top cover as this can damage it. Lift the machine from the bottom. STEP 3: Place the printer in its new location and make sure it sits firmly on all four rubber feet. If necessary adjust their length by unscrewing the feet slightly.
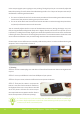
1.3 Plugging in your Creatr HS OPTIONAL: If you want to use the printer connected to your computer, use the USB cable supplied with the printer, insert the USB-A (flat rectangular connector) cable in your computer and insert the USB-B (square connector) cable in the backside of the Creatr HS. In this Quick Guide we will use the stand-alone modus, therefore the cable does not have to be plugged in.
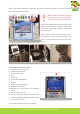
STEP 8: Home the printer so you can reach the bottom where the filament has to be fed through. To do this, select the home icon on your screen and press the button to start homing. STEP 9: Make sure your nozzles are preheated to at least 180 degrees Celsius. Place your role of filament in the bottom of the printer. Start feeding the filament through the hole.
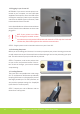
In the next paragraph you are going to start printing. During this print you can manually adjust the bed while printing. Check if the bed is levelled during the first 2 or 3 layers of the print and verify if the filament is adhering well to the bed. • • If a corner of the bed is too far from the nozzle you observe filament being extruded too loosely in this area of the print bed, causing your print not to stick.
2. Preparing for your next print In this chapter we will take you through the processes of preparing your printer for your next print. We will take you through the processes of replacing your print sticker, exchanging your filament and we will offer you to methods of calibrating your machine: manually and through using Simplify3d. 2.1. 2.2. Removing your print and replacing your print sticker Changing filament 2.
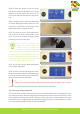
STEP 4: Apply the new sticker 2.2 Changing filament If you are ready to use a different role of filament for your next print, follow these steps to remove your current role of filament. STEP 1: Preheat your printer by selecting the preheat icon in your screen and pushing the button. Make sure the nozzle which contains the filament you are about to exchange heats up to at least 180 degrees Celsius.
3. Creating your own printable file: from STL to gcode In this chapter we will teach you how to ‘slice’ (create your own 3D printable file named ‘gcode’) using your 3D model (or ‘stl’) as input. The slicing software we will be using to do so is Simplify3d. In the gcode, all movements of your printer and characteristics of the different layers are encrypted.
TIP: Simplify3d is regularly updated for new functions which are accessible for free for existing customers. 3.3 Simplify3d software overview Here we will familiarize you with the Simplify3d software. When you open the Simplify3d software, you see the following screen. There are 5 sections in this screen that are important to get familiar with: 2 3 5 1 4 STEP 2: Simplify3D software workspace 1. Build table: the build size you see in your screen corresponds to the build volume of your Creatr HS.
TIP: The standard print settings for each material are divided in categories: there is a trade-off between quality and speed of getting a part. Before printing you need to ask yourself what is of more importance to you: would you like to receive your part as fast as possible with a rougher finish? Choose fast printing. If you want to have a very detailed print with a nice finish, you can choose high quality printing. If you want the best of both worlds, use medium printing.
For a simple single colour print without support, click on “add” in “processes” and select the profile with the correct material, extruder, and print detail (for instance, a fast print using PLA from the right extruder). For more complicated prints see Section 3.5. STEP 5: Click on ‘prepare to print’. In the next view you can see all the movements your printer is going to make while printing.
terial would just fall on the bed. You can build two types of support structures; breakaway support and soluble support. Breakaway support is a support type that adds support material in the same material and color as the material you use to print your object. In this image the support material is printed with the second extruder. After the print is finished you have to breakaway the support structure manually.
3.5.2 Applying support structures to your stl model You can either define the support structures manually or you can have Simplify3d place support for you on all parts where there is a 45 degrees overhang. It is beneficial to use the minimum amount of support structures that are required as this will keep the surface of your print as smooth as possible. You always apply support structures to your stl model, not to your gcode (so you have to do this before or during the slicing procedure).
Printing with dual extrusion: allocating the right process to the correct extruder . Printing with dual extrusion: allocating the right process to the correct extruder . The key to printing in two different colours is that you need two different STL files; one for each color. So in your CAD program, you have to save your file in two parts (you will get two stl files). In Simplify3d, you can place both stl files over each other to create one object again.
STEP 3: click ‘add process’ and select another process for ‘Dual Support’. However, this one must be configured for the left extruder. STEP 4: Double-click on the process and click on the ‘layer’ tab. In the tab ‘primary extruder’ now select ‘left extruder’. Then select the models that you want to be printed by the left extruder. STEP 5: In the default setting any support present will be printed by the left extruder.
Nylon Nylon is a generic designation for a family of synthetic polymers known generically as aliphatic polyamides. Nylon is one of the most commonly used polymers. It has self-lubricating properties which can be useful in for example bearings. The material is very tough and light. It is also able to withstand higher stress than most other printable plastics making it more suitable for engineering applications.
The following are some functionalities of controlling your printer directly with Simplify3d: In the “machine control panel” (to be accessed below “tools” in the menu bar) you can: • Move your print bed and nozzles over the three axes using ‘jog controls’ • Extrude filament using the extrude buttons in ‘jog controls’ • Heat up your nozzles and bed “accessory control” Jog Controls and Accessory Control 20 Creating your own printable file: from STL to gcode
3.9 Recalibrating your printer using Simplify3D If small manual adjustments during the first layers of a print are not sufficient to calibrate the bed, it is best to recalibrate the bed using Simplify3D. STEP 1: Connect your printer to Simplify3D as described in Section 3.7 and go to ‘jog controls’ in the “machine control panel” STEP 2: Select ‘Home All’. This moves the print bed up as close as possible to the extruders, and the head to the left-front.
4. Frequently Asked Questions Although our instructions in this manual are of course highly brilliant ;-) we can imagine that you run into some questions while you are printing. This section of the manual is devoted to that. Note that you can find much more help and support in The Ecosystem, which you can access through creatrhs.lpfrg.com/. This section contains the answers to the following frequently asked questions. 4.1 How can I solve the issue of the print not sticking to the bed? 4.
4.2 What should I do when I cannot get my filament to go through the filament guiding tube? If you cannot get the filament to go through the guiding tube remove the push in-coupling at the top of the drive unit push the filament through and then screw back the push in coupling and push the filament all the way to the printhead. 4.3 What can I do if my filament does not come out of the extruder? The first thing to check is if the drive wheel is slipping and not pushing the filament through.
5. Glossary of 3D printing vocabulary 5.1 3D printing vocabulary Slicing what?! We know that the vocabulary of 3D printing may be quite new to you. That’s why we are proving you with a short glossary below. Extruder The extruders of your Creatr HS can be found in your printhead. They handle the feeding and extruding of the filaments. They consist of two assemblies: a cold end to pull and feed the thermoplastic from the spool, and a hot end (nozzle and hot end) that melts and extrudes the thermoplastic.
Hot end The heated portion of the extruder mechanism, which gets hot enough to melt plastic (or potentially other materials). The hot end used in the Creatr HS can withstand temperatures of up to about 270 °C. (Heated) Print bed A build surface that is warmed in order to keep the base of an extruded part from cooling (and shrinking) too quickly. If the base layers of a print shrink too quickly, this will lead to so-called ‘warping’ : the most common result is corners of parts lifting off the build surface.
5.
1. Printing head and extruders 2. Filament guiding tubes 3. Filament drive unit 5. Print bed 6. Print bed levelling knobs 7. Display 8. Quick release knob 9. USB port for USB stick (front) 10. USB port for computer (back) 11. Belt 12. Z-sensor adjustment knob* 4.
Leapfrog 3D Printers H. Kamerlingh Onnesweg 10 PO Box 252 2408 AW Alphen aan den Rijn The Netherlands T +31 (0)172 503 625 W www.lpfrg.com E info@lpfrg.