
User Manual - Version 2.3 User Manual


Counterpart User Manual - Scale Operations 59
Counterpart Setup for WeighVault
1. On the Counterpart, enter configuration mode (see Section 3.0 on page 19) and navigate to Setup »
Config » Ethernet.
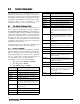
AUDIT CALIBR SETUP TEST DISPLAY ID
SCALES FEATURE SERIAL ETHERNET PFORMT
CONFIG
VERS
DIGIO
SETPTS
SETPTS
DHCP IPADDRESS NETMASK
DFLGTWY
DNSPRI DNSSEC LCLHSTNM
PORT
MAC REMOTEPT REMOTEIP
VAULT
OFF
ONBOARD
EXTERNAL
ON
OFF
ECHO
OFF
ON
COUNTERPART
Figure 5-3. Ethernet menu
2. Set the DHCP parameter to OFF.
3. Set the IP address. In this
example, we will use 192.168.0.1, which is in the same range as the PC, but the
last digit is different. Check with your network administrator when setting an IP address for your system.
4. Set the NETMASK parameter (subnet mask) to
255.255.255.0.
There are no changes needed to the DFLGTWY, DNSPRI, DNSSEC, and LCLHSTM parameters.
5. Set the PORT parameter to
10001.
6. Set the REMOTEIP parameter (remote IP address) to
192.168.0.02. This is the same IP address assigned
to the PC.
7. Set the REMOTEPT parameter (remote port) to
5466.
8. Set the VAULT parameter to
ONBOARD.
9. On the Counterpart, set up the
Code softkey which enables quick access to ID codes.
5.6.2 Using Weighvault
Once the above criteria have been met, IDs can then be entered into WeighVault and saved on the PC. The Edit
Part dialog box in Figure 5-4 shows ID parameters which can be saved in W
eighVault. For testing purposes,
enter a few part numbers and click on
Save Changes to Database.
Figure 5-4. WeighVault Edit Product Dialog Box
To access a saved ID from WeighVault over the network connection,
1. Using the
Counterpart front panel, press the CODE key.
2. Enter an
ID CODE value.
3. Press the
TARE(Enter) key. The ID CODE is loaded and ready to use.
Note
If the demo feature is complete and not being used permanently with WeighVault, go the your network
settings and turn off the Assign IP Address feature.