
Installation Guide

AP22143
INSTALLATION INSTRUCTIONS
Temperature Switch Replacement
for 40 & 50 Gallon, Residential PowerVent Water Heaters
Read these instructions thoroughly and understand all steps and procedures before proceeding with the installation.
DANGER: Failure to properly install the temperature
switch in the blower assembly may result in unsafe opera-
tion of the water heater causing bodily injury, explosion, fire
or death.
1. INSPECT SHIPMENT:
Inspect contents for possible missing or damaged components.
This kit includes:
Qty. 1 – Temperature Switch
Qty. 1 – Installations Instruction Sheet
2. ADDITIONAL INSTRUCTIONS REQUIRED:
Refer to the Use and Care Manual supplied with the water
heat¬er for complete information on the installation, lighting
instruc¬tions, operation and maintenance of the water heater.
TOOLS REQUIRED:
a. Torx T-20 screwdriver
b. Long or Needle Nose Pliers
3. POWER SUPPLY DISCONNECTION
a. Slide the “ON/OFF” switch located on the gas control to
the “OFF” Position.
b. Unplug the electrical supply cord of the blower assembly
from the electrical supply.
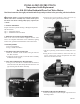
4. VENT PIPE AND HOUSING DISASSEMBLY
a. Using a 5/16” Nut Driver or Slotted Head Screwdriver
loosen the hex head, band clamp then disconnect the vent
pipe or fitting from the blower assembly.
b. Using the Torx T-20 screwdriver, remove the seven (7)
screws securing the top of the blower housing.
c. Lift the top housing off the blower assembly and set it
aside.
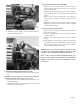
d. Using the Torx T-20 screwdriver, remove the three (3)
screws securing the control compartment door then
remove the door and set it aside.
5. TEMPERATURE SWITCH REMOVAL
a. Locate the temperature switch and pull it up and out of its
mounting bracket.
5/16" Hex Head Band
Clamp