
Quadra User's Guide

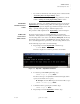
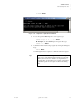
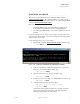
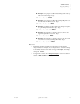


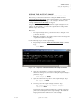
Table Of Contents
- Table of Contents
- Introduction
- Installation and Setup
- Operations
- In This Chapter
- Introduction to Operations
- Setting Output Format
- Testing Outputs
- Selecting an Input Source
- Enabling and Disabling Outputs
- Understanding Auto Sync
- Cropping an Image
- Zooming an Image
- Panning an Image
- Sizing the Output Image
- Using Position
- Adjusting Brightness and Contrast
- Adjusting Hue and Saturation
- Adjusting Sharpness
- Creating a Background
- Creating a 2x2 Monitor Wall
- Command Line Interface
- Image Concepts
- Communications Setup
- Connector Types
- Firmware Upgrades and Troubleshooting
- Technical Specifications

OPERATIONS
Understanding Auto Sync
350-7951 Quadra User’s Guide 36
. . . . .
• If you want to “interactively” time an input, please continue with the
“Performing Interactive Input Timing
” section.
• To name and save a custom set of input timing parameters, continue
with the “Naming and Saving Input Timing Values
” section.
PERFORMING
INTERACTIVE INPUT
. . . . . . . . .
TIMING
If you want to “fine tune” a set of timing parameters visually, you can use the
INputINTeractive
command. Using a white box which appears around the
input image, you can precisely align the upper left and lower right corners of the
image — precisely scaling the image to match the display raster.
The procedure is fully explained in the “Input Timing
” section in Chapter 2.
NAMING AND
SAVING INPUT
. . . . . . . . .
TIMING VALUES
If you have loaded a custom set of timing parameters or performed the
“Interactive” timing adjustment, it is highly recommended that you name and
store the settings in the “user” section of the Factory Timing List. In this way,
the next time Quadra is turned on and RGB inputs are used, when the “Auto
Sync” search through the list is performed, your saved settings will be loaded.
Use the following steps to name your custom timings:
1. Request help text for the INputNAME
command. Type:
H INNAME Enter
This action displays the command’s parameters and variables.
Figure 3-9.
Help Text — Input Name Command
2. To name the specified RGB input timings, type:
INNAME <input #> [name] Enter
The name can be up to 23 alphanumeric characters in length, with no
spaces (use an underscore for a space).
S Example: To name RGB input 3 as “Boardroom PC 1,” type:
INNAME 3 Boardroom_PC_1 Enter
3. Confirm the name by querying the command. Type:
INNAME <input #> Enter
4. Request help text for the INputSAVE
command. Type: