
Quadra User's Guide
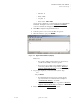

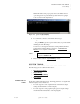
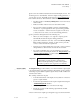
Table Of Contents
- Table of Contents
- Introduction
- Installation and Setup
- Operations
- In This Chapter
- Introduction to Operations
- Setting Output Format
- Testing Outputs
- Selecting an Input Source
- Enabling and Disabling Outputs
- Understanding Auto Sync
- Cropping an Image
- Zooming an Image
- Panning an Image
- Sizing the Output Image
- Using Position
- Adjusting Brightness and Contrast
- Adjusting Hue and Saturation
- Adjusting Sharpness
- Creating a Background
- Creating a 2x2 Monitor Wall
- Command Line Interface
- Image Concepts
- Communications Setup
- Connector Types
- Firmware Upgrades and Troubleshooting
- Technical Specifications

INSTALLATION AND SETUP
System Timing
350-7951 Quadra User’s Guide 20
. . . . .
Quadra can be used with both standard and non-standard display devices. You
can allow Quadra to automatically “learn” the display’s timing parameters, or
you can enter your own. Internally, Quadra keeps an “Factory Timing List
”
that contains both factory-defined and user-defined timing values.
• The first 99 entries in the Factory Timing List are reserved for factory
defined entries.
• Entries from 100 to 160 are reserved for user-defined values.
• The “user entry” feature is helpful for storing non-standard timing
information, or special applications where a preset timing parameter
needs to be adjusted — and then stored in a register. In some cases,
you may also need to create your own custom timing parameters.
Quadra performs its timing functions in the following way:
• When you connect a display to one of Quadra’s outputs, Quadra
automatically measures the display’s timing parameters.
• Quadra then searches the “user entry” section of the Factory Timing
List. If it finds a match (for example, one that you have previously
stored), it selects and loads those parameters.
• If Quadra does not find a match in the “user entry” section, it searches
through all factory defined entries and loads the closest match.
• If you want to manually enter your own parameter to more closely
match those of the selected display monitor, the “Output Timing
” and
“Advanced Output Timing
” procedure enable you to do so, and store
those settings in a memory register.
. . . . . . . . .
OUTPUT TIMING
The Output Timing procedure enables you to match a channel’s output signal
to the graphic display device that is attached to that channel. Quadra generates
a wide range of preset VESA-compliant output formats, and also enables users
to define custom values.
The overall procedure has four parts:
• Learn the characteristics of the display device(s) that are connected to
Quadra’s output channels.
• For the first output channel, load the required output format using the
“OutPutTiMingLOAD
” function.
• Use your display’s controls to center and size the image.
• Repeat the procedure for all remaining output channels and their
associated displays.
A list of common device signal types that Quadra supports can be found in the
Important If you choose to manually enter timing parameters, the
output timing procedure should be performed first,
followed by the input timing procedure. This sequence
should be repeated for each of Quadra’s four channels.