FCC Compliance NOTE: This equipment has been tested and found to comply with the limits for a Class B digital device, pursuant to Part 15 of the FCC Rules. These limits are designed to provide reasonable protection against harmful interference in a residential installation. This equipment generates, uses and can radiate radio frequency energy and, if not installed and used in accordance with the instructions, may cause harmful interference to radio communications.
End Product Labeling This transmitter module is authorized only for use in device where the antenna may be installed such that 20cm may be maintained between the antenna and users (for example: Notebook, Access Point, Router and similar product). The final end product must be labeled in a visible area with the following: “Contains TX FCC ID: PXPAP2001G’’.
Contents INTRODUCTION............................................................................................ 9 THE PRODUCT .................................................................................................9 PRODUCT FEATURES ..........................................................................................9 BASIC IP NETWORKING .................................................................................... 10 WIRELESS LAN BASICS ................................................
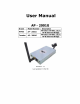
Introduction The Product The product is based on the IEEE 802.11g standard, which is the latest 54Mbps Wireless LAN (WLAN) standard. This standard is five times faster than the widely deployed WiFi (802.11b) products that are found in homes, airport and public wireless hotspots. Because 802.11g uses the same 2.4GHz frequency band, the product is fully interoperable with existing WiFi cards and devices.
Basic IP Networking IP = Internet Protocol IP stands for Internet Protocol. In an IP network, every device has a unique IP Address (For example: 192.168.1.35) to identify itself. There are two ways of assigning an IP address to a PC or Router: Static and Automatic (DHCP). Static IP addresses are keyed-in manually, while Dynamic IPs are distributed by a DHCP Server.
Wireless LAN Basics A Wireless LAN (WLAN) is a computer network that transmits and receives data with radio signals instead of using cables. WLANs have become common in homes, offices, airports and public Hotspots. WLAN can support the same applications and software that run on a wired network (LAN). Besides supporting the same software and functions, WLAN brings greater convenience and eliminates the need to lay Ethernet cables in a home or office. The AP-2001g is based on the finalised 802.11g standard.
Signal Strength Radio signals drop in power over a distance. Even if all the settings are correct, a low signal strength makes association impossible. The usable distance between the AP and client can range from a few meters indoor to 200m outdoors maximum. When setting up the AP, make sure that you: Keep the distance from the AP to the clients as short as possible. Make sure that the WLAN signals do not have to pass through too many concrete walls and metal structures to reach the client.
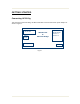
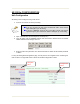
GETTING STARTED Connecting AP-2001g This manual is for both AP-2001g and EB1-T002-TRK. Connect RJ45 and the power adapter as shown in Figure 1.
AP-2001g CONFIGURATION Web Configuration AP-2001g can be configured using a web server. 1. Connect the network as shown previously. If you are accessing the web server via Ethernet cable, check that the upper LED lights up on AP-2001g. If your PC is wireless, check the PC’s card utility to make sure that the signal strength is good and that the bottom LED lights up on AP-2001g. 2. Open a Web browser (Internet Explorer, Netscape etc.). 3. Type AP-2001g LAN IP (10.0.0.
Remember that after every configuration change, it is necessary to: - Click Save on the page. Reboot AP2001g. The changes take effect only AFTER Reboot.
Status System Summary This page presents a convenient overview of the overall status of the AP-2001g. The most common configuration parameters are shown here, for a quick look. Site Survey This page shows all the AP around AP-2001g. It also shows details such as the SSID, channel, MAC Address, radio mode and etc. of the surrounding AP.
Statistics This page shows the Statistics of AP-2001g such as the signal strength of the radio, the data rate, the error rate and etc.
Basic Setup Admin Setting This page allows you to change the System Name, Username and Password for AP-2001g. The default system name is Teraoka and the default username and password is admin / admin. After every factory reset, the Username and Password reverts to this combination. The username and password are case sensitive. User Setting This page allows you to change the User name and Password of the new user.
IP Address Setting This page allows you to change the IP address, Subnet Mask and Gateway of AP-2001g. The default IP address is 10.0.0.2. Wireless Setup Basic Setting This page allows you to change the basic settings of the wireless configuration. Operation Mode: AP-2001g can be used as an Access Point or as a Wireless Client. The default setting is Client WDS: Wireless Distribution System. Enable WDS allows more than one user to connect to AP-2001g.
Country: List of different countries which you can choose and set for the AP-2001g device. Radio Channel: There are 11 different frequency channels. You can choose to set the frequency channel to use or use SmartSelect for automatic channel selection. Remember that after every configuration change, it is necessary to: - Click Save on the page. Reboot AP-2001g. The changes take effect only AFTER Reboot. Advance Setting Data Rate: You can fix the data rate to different values as 11Mbps or 24Mbps.
Transmit Power: Sometimes, it is useful to decrease the coverage range of each AP-2001g, so that more AP-2001g can be located together without interference to one another. The default transmission power is 100% (full). Antenna Diversity: Allows you to choose which antenna to use. Always choose Best for best performance. Do not change this setting without seeking advice. Fragment Length: Specifies the fragment length. Enter a value between 256 and 2346.
Key Entry Method: Choose Hexadecimal if you want to enter the Keys in hexadecimal format. Otherwise, choose Ascii Text to enter the Key in ASCII format. ASCII is also called Alphanumeric in some systems. Key Length: Choose the number of bit for the encryption key. WPA-PSK Security Key Entry Method: Choose Hexadecimal if you want to enter the Keys in hexadecimal format. Otherwise, choose Ascii Text to enter the Key in ASCII format. ASCII is also called Alphanumeric in some systems.
WPA Security This security setting is only available when AP-2001g is operating as an Access Point. RADIUS Server: Enter the IP Address or the Name of the RADIUS Server (for 802.1x authentication purposes). This is used only when you have a RADIUS Server and want to use it for authenticating the Wireless Clients. RADIUS Secret: Enter the Shared Secret of the RADIUS Server. (Only if 802.1x protocol is used) Confirm Shared Secret: Enter the Shared Secret again.
WPA2-PSK Security Key Entry Method: Choose Hexadecimal if you want to enter the Keys in hexadecimal format. Otherwise, choose ASCII Text to enter the Key in ASCII format. ASCII is also called Alphanumeric in some systems. Key: Enter the Encryption key. The Encryption key has to be between 8 - 64 characters. Cipher Type: Choose TKIP or AES System Setup Backup/Restore Settings Backup the current settings to a file: To save the current configuration of AP-2001g.
Firmware Upload This page allows you to update the firmware (software) in AP-2001g. New firmware is issued to improve the performance and add features to the product. Browse to the new firmware file name apimg1 and click upload. Do not change the filename of the new firmware as doing so will cause the upgrading process to fail. Do not change the filename of the new firmware. New firmware with filename other than “apimg1” will cause the process to fail.
About This page shows the firmware version and the date at which the firmware was updated. Factory Default Setting To set the wireless bridge back to factory default setting, press the reset button for 5sec and release.