
User manual


RF Technology WinTekHelp User Manual Page 34
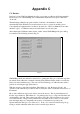
3.5 Exit To Windows WinTekHelp User Manual
The middle left button, “Create Master BackUp File”, creates a file in WinTekHelp’s home directory with the
name serialno.r50, for a receiver, or serialno.t50 for an exciter, where “serialno” is the actual serial number of
the receiver or exciter. This file contains all the parameters, and channels, for that receiver and exciter, and can
be used to restore all values to a known good set.
The bottom left button, “Download Master BackUp File”, is the reverse of the second. If the user clicks on this
button, WinTekHelp will look for a file whose name is as defined by the logic of the second button. When the
file is selected, WinTekHelp will set all the parameters and channel data to the values defined in this file.
The top right button, “Calibration”, takes the user into the Calibration Menu. This opens a whole series of dialog
boxes that take the user through all the steps required to calibrate, or re-calibrate an exciter or a receiver.
Generally this is performed as a final stage in the production process. With the possible exception of re-
calibrating the reference oscillators, to compensate for drift, the user would not be expected to use this feature.
Appendix C gives an outline of the processes that are involved.
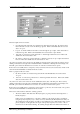
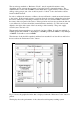
The middle right button is used to set a new baud rate for the exciter or receiver. The dialog box shown in Fig.
21 allows the user to select a new baud rate. Changing a new baud rate changes the baud rate of the COMM port
as well as the baud rate of the exciter or receiver. It also resets the exciter or receiver so that the device begins
operating at the chosen baud rate immediately.
All programming of parameters and channels can be completely discarded, and the original calibration data
restored by clicking on the bottom right button, “Restore Unit to its Factory Default”.
3.5 Exit to Windows
Click on this button in the Main Menu to exit from WinTekHelp.
3.6 Go to the Prompt Window
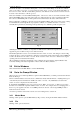
When you select “Go to the Prompt Window” Option from the Main Menu, you will be presented with a window
that looks like fig 4.
This is a terminal emulator, and can be used to communicate directly with the firmware. Anything that is typed
on the main keyboard is transmitted as ASCII to the exciter or receiver. Any ASCII data received from the
exciter or receiver is displayed in the window itself.
If, after hitting the ENTER key, there is no prompt received (“R50>” for a receiver, or “T50>” for an exciter),
then there is a communication problem with the exciter or receiver. For example, there is no unit plugged in, or
there is no power applied to the unit, or no COMM port has been selected, or the wrong COMM port and/or
baud rate have been selected.
Across the top menu bar of the window can be seen several dialog items to select from.
3.6.1 Master Menu
Clicking on this option re-opens the Main Menu (see Figs 1 and 2), closing the Terminal emulation window.
3.6.2 File
Clicking on this, opens two list items.
Fig. 21