
UDX Venting Instructions
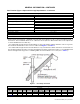
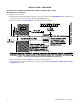
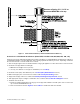
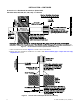
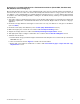
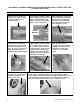
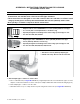

Table Of Contents
- VENTING INSTRUCTIONS FOR UNIT HEATERS (MODEL UBX: STANDARD POWER VENT BLOWER TYPE AND MODEL UDX: STANDARD POWER VENT FAN TYPE)
- GENERAL INFORMATION
- INSTALLATION
- Instructions for Commercial/Industrial Installations (Model UBX or UDX, All Unit Sizes)
- Instructions for Residential Installations (Model UDX, Unit Sizes 030, 045, 060, 075, 100, 125)
- Instructions for Commercial/Industrial or Residential Installations (Model UDX, Unit Sizes 030, 045, 060, 075, Vertical Category I)
- APPENDIX A: INSTRUCTIONS FOR ATTACHING DOUBLE-WALL TYPE B VENT PIPE TO SINGLE-WALL PIPE
- APPENDIX B: INSTRUCTIONS FOR INSTALLING FLEX-L BRANDCATEGORY III VENT PIPE
- FIGURES
- Figure 1. Roof Slope and Pitch
- Figure 2. Horizontal Vent Terminal (Commercial/Industrial Installations)
- Figure 3. Vertical Vent Terminal (Commercial/Industrial Installations)
- Figure 4. Horizontal Vent Terminal (Residential Installations)
- Figure 5. Vertical Vent Terminal (Residential Installations)
- Figure B1. Reducer and Vent Cap
- TABLES

APPENDIX B: INSTRUCTIONS FOR INSTALLING FLEX-L BRAND
CATEGORY III VENT PIPE
NOTES:
• SUPPLIER NOTE: The adapters for Flex-L vent pipe, which are not available from the heater
manufacturer, are available from a Flex-L brand vent pipe distributor.
• These instructions are designed to assist the contractor who has selected to use Flex-L brand
category III vent pipe to install a power-vented heater with a 4-inch (102-mm) venter outlet.
• Work quickly to assemble components before sealant dries.
11
CP-UBX-UDX-VENT (03-21) 1034631-0
1. Attach adapter pipe or reducer to venter collar:
a. Place continual bead (see Figure B1, DETAIL A) of high-temperature silicone around inside of pipe on end of
adapter or reducer that attaches to venter collar (end of adapter with double emboss without locking ring hole).
b. Push adapter pipe or reducer over flue collar.
c. Drill 1/8-inch hole on top of overlap and secure joint using sheet metal screw (see Figure B1, DETAIL B).
• Adapter pipe, Flex-L #SRARZA4, for 4-inch (102-mm) diameter vent pipe
• 4-inch (102-mm) diameter, 12-inch-long
• Specially-designed for attaching Flex-L brand category III vent pipe to unit
• For unit sizes 030, 045, 060, 075, 100, and 125
• Adapter reducer, Flex-L #SRARZA43, for 3-inch (76-mm) diameter vent pipe
• 4- to 3-inch (102- to 76-mm) diameter, 6-3/4 inches long
• Specially-designed for attaching Flex-L brand category III vent pipe to unit
• For unit sizes 030, 045, and 060
Vent
Vent
• Flex-L brand elbow
• Attached to 12-inch (305-mm) adapter pipe
• Extend vent in any direction above horizontal