
Gas Conversion Guide
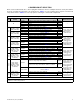
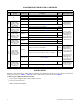

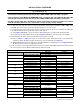
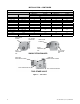
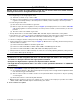
Table Of Contents
- GAS CONVERSION KIT INSTALLATION FOR UNIT HEATERS (MODELS UDBP AND UBX: STANDARD POWER VENT BLOWER TYPE, MODELS UDBS AND UBZ: SEPARATED-COMBUSTION BLOWER TYPE, MODELS UDAP AND UDX: STANDARD POWER VENT FAN TYPE, AND MODELS UDAS AND UDZ: SEPARATED-COMBUSTION FAN TYPE)

7
CP-UB-UD-GC (04-21) 1034364-A
⚠ WARNING ⚠
Do not attempt to drill burner orifice. Use factory-supplied orifice only.
f. Install replacement burner orifice (see Figure 2, DETAIL A).
⚠ CAUTION ⚠
If the heater will be operated at an elevation >6,000 feet (>1,830 meters), a high-elevation pressure
switch must be installed.
NOTES:
• If the installation elevation is >6,000 feet (>1,830 meters), verify that the elevation on the rating
plate or high-elevation label is >6,000 feet (>1,830 meters). If the rating plate or label does not
indicate an elevation of >6,000 feet (>1,830 meters), order and install the appropriate high pressure
switch kit.
• If the heater is equipped for installation at an elevation of >6,000 feet (>1,830 meters) and is being
installed at a lower elevation, order and install the appropriate switch.
• Contact your distributor to select the factory-authorized replacement part.
4. For installations at elevations >6,000 feet (>1,830 meters), replace pressure switch:
a. Locate pressure switch in control compartment (see Figure 1) and mark and disconnect two pressure switch
wires.
b. Mark and disconnect sensing tube(s) from pressure switch.
c. Remove two screws that secure mounting bracket and remove bracket and pressure switch. Save bracket
and screws for reuse.
d. Install replacement pressure switch using mounting bracket and two screws. Reconnect sensing tube(s) and
wires.
5. Restore electrical power and gas supply:
a. Turn on electrical power.
b. Turn on gas supply and relight heater, following instructions on heater.
6. Perform leak test:
a. Check all connections for gas leaks using commercial leak-detecting fluid or rich soap and water solution.
Leaks are indicated by presence of bubbles.
b. If leak is detected, tighten connection. If leak cannot be stopped by tightening connection, replace part(s).
7. Adjust manifold (outlet) pressure:
⚠ WARNING ⚠
Manifold gas pressure must never exceed 3.5 IN WC for natural gas or 10 IN WC for propane.
a. Determine correct outlet pressure (refer to Table 4) for elevation of installation. If unsure of elevation, contact
local gas supplier.
b. Turn knob or switch on top of valve to OFF to prevent flow to gas valve.
NOTE: A manometer (fluid-filled gauge) is recommended rather than a spring-type gauge due to
the difficulty of maintaining the calibration of a spring-type gauge. Use a water column manometer
that is readable to the nearest tenth of an inch.
c. Connect manometer to 1/8-inch output pressure tap on valve (see Figure 3).