Table of Contents 512019 RN All Rights Reserved 1.About This Manual whatsit the Box 3.Camera Overview 4.Getting Started 41 stalling the Dash cam Mort insertions the Memory Card 4.3 Power the Camera and Format Memory Card 4.4 Mount the Rear Cam 4.5 Installing the Camera onto the Windshield 5.Basic Operation 5 Device Power 5.2 Menu Settings 5.3 Display Control 5.4 Video Recording 5.5 Video Playback 5.6 GPS Playback 57 Taking Photos 5.8 WI-Fi Connect 6.Mode Setup videotex Mode Settings 6.
1 This user manual describes the device's functions and features in detail. Please note the following: About This s » Images, screenshots and contents may Manual differ in appearance from the actual product or software provided by service providers, and are subject to change without prior notice. » Available features and additional services ray vary by device and software. + Applications and their functions may vary by country, region, or hardware specifications.
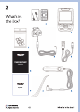
512019 RN All Rights Reserved 1 Sexing V1P Dash Cam Car Charger Rear Camera Mountainside Plate 8:3M Adhesive Mini-USB Cable Cable'Management Coal: Cable Clips: V1P Quick Start Guide V1P Safety Guide: » W The items supplied with the device and any available accessories may vary depending on your region. Appearances and specifications are subject to change Without prior notice. Availability of all accessories is subject to change.
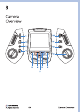
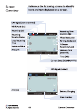
Screen Reference the following screens to identify Overview cans and text displayed on a screen.
4 Getting Started 4.1 Installing the Dash Cam Mount 512019 RN All Rights Reserved “7in, Important haunt " as shown g e Follow these steps to install the Mount on the vehicle's front window. Note: Ensure the distance from of the Mount and Car Charger is less than 12 feet. a. Place the 3IM tape on the Mount. Note: Do not remove the release liner on the opposite side of the tape. b, Select, and clean, the location for the Dash Canon the windshield.
4.2 Insert the Memory Card 512019 RN All Rights Reserved T-interlock on the Mount s oriented in the correct direction. Firmly press the Mount onto the windshield, . Wait at least 20 minutes before. attaching the Dash Cam to the Mount. Depending on the memory card manufacturer and type, some cards may nat be compatible with the device. Visit e penitent comediennes e to view recommended cards, Follow these steps to Insert the memory card into the device.
4.2.2 423 512019 RN All Rights Reserved Press and hold the Power button to turn. the camera Off. Insert the card in the orientation show. Listen for the click sound that signals the card is securely inserted. Follow these steps to remove the memory card from the device. Important! Do not remove the menswear card white the device is transferring or. accessing information. Press and hold the POWER button to tum the camera Off.
43 Power the Camera and Format the Memory Card 512019 RN All Rights Reserved Blue Led Aughts = Indicate tha daredevils charging or powered o Charging the Battery Connect your camera to your vehicle via the included car charging cable to power your camera and charge the battery while driving. Connect the charger to the car cigarette lighter or 12V D¢ power outlet, then insert the Mini-USB end of the charger into the Mini-USB port on the camera.
512019 RN All Rights Reserved not function properly, If this happens, unplug the charger farm the device. « While charging, the device may heat up. Thesis normal and should not affect the device's performance or lifespan. » IT the device is not charging properly. take the device and the charger to an authorized Sexing Service Center or contact caramelize IR, Connecting the charger i Improperly may cause serous damage to the devise, Any damage caused by misuse Is not covered by the warranty.
512019 RN All Rights Reserved 2 Always format the memory card correctly before using ‘the new card, Follow these steps to format the memory card, 4. Make sure you have inserted your memory cans, then turn on the camera by connecting to a power source. Note: If ‘the camera is On and ot recording, got Step C. b, Press the REC button to stop recording. . Press the MENU button Twice to enter the System Setup Menu. . Use the REC and MIC buttons to navigate to the Fermat setting.
4.4 Mount the Rear Camera 512019 RN All Rights Reserved At this point, disconnect from the. power source. The camera will shut down automatically after 5 seconds, The next: time the camera |s connected to power, the camera should start up and begin recording automatically. Mount the rear camera as shown below. Use ‘the provided rear camera cable to connect ‘the rear camera to the front camera. .
4.5 Follow these steps to install the camera. Installing the Camera onto the Windshield ==l fare) W 4.51 Insert the plastic mount piece into the open space [coated on the back of the camera and slide the camera down to secure it to the windshield, 4.5.2 Carefully route the power cable around the windscreen and tuck it under the trim. 453 Plug the car charger cable Into a 12V DC power anklet or the tor cigarette lighter, 4.54 Plug the charge into the Mini-USB port on the device. Start the vehicle.
5 Basic Operation 51 Device Power 512019 RN All Rights Reserved The Red Dot, Pretest POWER Recant OK button to power button LED thermionic Eights will blink manually red when the device Is powered on and In video record mode. The device is automatically powered on when plugged into a 12V accessory socket or cigarette lighter and receives a charge (12 the vehicle Is started). To turn the device any manually, press and Hold the POWER button until the welcome screen appears.
5.2 Menu Settings 5.21 5.2.2 5.23 512019 RN All Rights Reserved Power the camera On. Note: If the device is On and in a different mode, press the MODE button and toggle to the desired mode. If the camera is recording, press the REC button to stop recording. If the cameras not recording, go to Step 3. Once i the dastard mode Video, press the MENU button once to enter the settings menu for the made.
access the System Settings press the MEN button twice when In any mode. 5.24 Use the REC and MIC buttons and toggle o the desired setting. 525 Press the OK button ta confirm the selection. 5.2.6 Use the REC and MIC buttons and toggle o the desired setting option. 5.2.7 After choosing the setting, press the MENU button to return to the current mode, H2E SCREEN button 5.
54 Video Recording Ra cording- Recording; — T S Pros the REC bunion 10 slop recording 55 Video Playback 512019 RN All Rights Reserved The camera will automatically start recording when the device receives a charge (ie.; the vehicle is started) When recording, the device will display a blinking red dot near the upper left corner of the screen. [t will also show the time of the current recording in the under right corner of the screen.
512019 RN All Rights Reserved o {17/ 9 Device Playback. Follow these steps to play back recordings on the device. 4. Press the MODE button and toggle 1o the Playback Mode. b, Press the REC and MIC buttons to toggle thrush your videos. . Press the OK button to play the selected video, During playback, press the OK button to pause the video. » During playback, press the MIC butane one or more times (2X, 4X, 8X] to fast forward the video.
b. Insert the Micro SD memory, card into an SD Card Adapter. © Insert the 5D Card Adapter tn the computer. d. Ont he computer, navigate to 5D Card drive. The videos are stored ab \CARDIOVASCULAR, & Select the video to playback. 512019 RN All Rights Reserved Using the USB to Mink-8 pin Male Cable & Connect the USB to Mini-B pin Male Cable to the device. b. Connect the cable to a USR Connector on the computer. ¢, Press the Power button and ‘turn the device On, d. Press the OK button to select Mass Storage. .
5.6 GPS Playback GPS Signal {not connected) 512019 RN All Rights Reserved This is important if video clip needs to be saved for future use. To lock a video, press the OK button while in idea recording mode. This feature is only available if you have the Sexing GPS Logger. The optional hardware, and software interface, provides additional information regarding your trip {2 detailed location and speed information).
b, Press the REC or MIC buttons and toggle 1o GPS Snead Unit. €. Press the REC or MIC buttons and select the Mi/H option. d. After a GPS signal is found, the screen icon will turn from bug to green. You can review recorded idea using The #E Sexing GPS Video Player [available on: ] GPs fi'm nce on the website, click the link titled Download GPS Logger software to download 5 7ip folder containing the software installer. Unzip the folder to access the installer file contained within.
Opening a GPS Video Mlle Once you've opened the application. navigate to the top menu bar and click file > Open to browse through your files. Navigate to your video file you want to add to the playback queue, defect it and click “Open’ to load it Into the application. You may also select multiple videos at once. After a brief lading period, the (first) wide should begin playing back automatically, displaying speed and Location information In real time along the right-side panels.
Volume Control Slider, Priam Bar Rewind, Pause/Play, Fast Forward, Next Stop buttons 512019 RN All Rights Reserved Playback Beneath the video 15 a playback bar with a handle which you can drag to skip to any time in the video. Beneath that, there's volume control slider, as well as previous, rewind, pause/play, fast forward, next, and stop buttons.
Additional Controls Snip Took Save the current frame of video as animate (PING. Full Screen button: View the video in full screen (double click the video to exit).
57 Taking Photos 5.71 512019 RN All Rights Reserved Taking and Viewing Photos. Taking a Photo 3 Press the REC button to stop video recording. b, Press the MODE button and toggle to the Photo Mode, £, Press the OK button to take a photo. Viewing Photos d. Press the MODE button and toggle to ‘the Playback Made. & Press the REC and MIC buttons to ‘toggle through your photos.
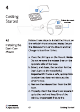
5.7.2 Deleting Videos and Photos. Follow these steps to delete g single {Delete Current) or all {Delete All) videos and photos on the device. 4. Press the MODE button and toggle to the Playback Mode, b Press the REC and MIC buttons 1o toggle through your videos and photos to the one you want to delete. €. Press the MENU button to view the Playback settings. d. Press the MIC button to scroll down tithe Delete option, . Press the OK button and select Delete Current or Delete All. f.
5.8 WI-Fi Connect 512019 RN All Rights Reserved Download "Sexing Connect” app from the App Store or Google Play Store. 4. To access or exit the WI-Fi feature, hold down REC. b. Opera WI-Fi settings on your phone to find *SID" from the list, tap to connect. {Default password: 12345678} £ Open the Sexing Connect app. tap "Connect! to enter the mealtime video streaming page. d. Once connected, the dash cam screen will switch to the caners view and will display "WI-F Connect” message.
6 Mode Setup 6.
613 WDR (Wide Dynamic Range) Screen Icon: et Default: On Select this setting to have the camera automatically adjust the exposure settings and provide balanced lighting and clearer video. Exposure Screen Icon: Default: +0.0 Select this setting to manually adjust the camera's exposure value and brighten or darken recordings. Note: Positive values brighten recordings, negative values darken them.
512019 RN All Rights Reserved Record Audio Screen Icon: Select this setting to enable or disable the audio recording. Note: This setting can be toggled On or Off by pressing the MIC Button. Date Stamp Default: On Select this setting to stamp the date and time on the bottom of the video recording. Plate Number Screen Icon: Default: On I_I Select this setting to enter the vehicle plate number and have it displayed on the bottom of the video recording.
Gravity Sensing Screen Icon: Default: Low Select this setting to initiate an automatic file lock on the current recording when a change in gravitation forces occurs, such assassin vehicular accident. 6.2 Parking Monitor Setting o L Screen con: Default: Off 2. Connect the dash cam to the smart hardwired kit {needs to be purchased separately) to activate the parking monitor function. Installation video could be found at supportradngusacomd. b.
512019 RN All Rights Reserved G-Sensor. When 4 collision is detected while the car 18 parking, the camera will turn on and record a 20-second video clip, which will be locked securely from being overwritten. Pros: G-Sensor mode is more energy efficient. Cons: It may miss recording some videos in the steep mode.
63 System Setup Setting Video, Photo or Playback Mods con £ Cross the MODE button twice to System Settings con 1 Press the REC or MIC buttons to toggle through the 512019 RN All Rights Reserved 35 Mode Setup
Date/Time Default: None Select this setting to set the date, time and date/time format. To enter Date and Time, use REC/MIC to change your current value, press OK to move to next value, press MENU to confirm setting. Volume Default: High Select this setting to enable or disable the device sound effect. Language Default: English Select this setting to choose the menu language.
634 Frequency Default: 60Hz Select this setting to choose the power supply specification used in a country or geographical region. Format Select this setting to format the memory card. Important! Formatting the card will delete all files, including locked files. Be sure to back up any important footage or photos before formatting. Screen Saver Default: Off Select this setting to specify 18 Seconds the duration of time the display P will stay on after the device is powered on.
Daylight Saving Default: Off Select this setting to have the device adjust the time for Daylight Saving, GPS Speed Unit Default: mi/h Select this setting to choose the units that speed information is displayed on the bottom of recordings. Note: Requires GPS Logger. Set Time Zone Default: Off Select this setting to update the time to the current time zone. AR Note: Requires GPS Logger.
6.3.10 Default Settings Default: None Select this setting to reset all the settings to their default values. 6.3.11 Version Default: None Select this setting to see B50.655.5523.181121HC.07 current firmware installed on the device. 6.
Photo Mode Icon Press the Mode button atone enter the =\l s e Photo Mode fingerings. oK. W Plato Mode Settings clan §7 Press the REC or MIC buttons to toggle through the 3] settings. Pres the OK button 1o select the setting.
641 Capture Mode Screen con: Note: There is not a screen icon if Capture Mode is set to Single. Default: Single Select this setting to set a timer that counts down before capturing images. 6.4.2 Resolution Screen con: M Default: 5M Select this setting to set the pixel resolution for captured images. Note: Higher resolution images are more detailed, but take up more space on the memory card. 643 Sequence e e Select this setting to enable the On camera to take three photos in rapid succession.
64.5 Sl 64.6 Daylight L Tungsten 512019 RN All Rights Reserved 2 Quality Screen con: & Default: Normal Select this setting to set the quality level of captured images. Note: Lower quality images will use less space on the memory card but are more visually compressed. Sharpness Screen Icon: None Default: SCENT Select this setting to automatically enhance images for a clearer, more distinct picture.
Color Default: Color Select this setting to set the type of photo the camera will take. Note: Sepia is a black & white photo with a “warm” tone added. IS0 Screen cor: 130 Default: Auto Select this setting to adjust the camera's sensitivity to light when taking pictures. Note: The higher the ISO, the better the camera operates in low light but images have a grainy appearance. Exposure Default: +0.0 Select this setting to set the camera exposure value and brighten or darken the images.
512019 RN All Rights Reserved Anti-Shaking Screen con: Default: Off Select this setting to automatically reduce the amount of blurriness in the images due to quick {shaky) movement. Quick Review Default: Off Select this setting to preview a photo and capturing it. Date Stamp Default: Date/Time Select this setting to apply date and/or time stamp to captured photos.
7 Updating the Firmware 512019 RN All Rights Reserved To update the camera’s firmware: 1. Format the memory card using the Format function {see Section 4.3.7 Formatting the Memory Card). 2. Take note of your firmware version number 3..0n computer, visit the Firmware. Section of sexiness cont and follow the prompts to locate the correct firmware for your caners, 4. Download the firmware zip file to your computer. 5 Unzip the fle. 6. Move the resulting file Lin) to the root of your memory card. 7.
camera, 8. Tum the camera on by connecting to a power source. 9. The camera will update automatically. The screen will stay off but the status Hg ht will stay on for p to 1 minute while the firmware updates. 10 After updating, format the memory rad acne more. Failure to do this will result in the camera attempting to update the firmware every time it's powered on. 1. After formatting, use the Power button ‘to reboot the camera. Do not disconnect the camera from the power source. 12.Upon reboot.
9 Warranty & Support 512019 RN All Rights Reserved Warranty. The Sexing VIP Dash Cam comes with a full 12 months warranty. If you register your product o our official site o D) you can extend the warranty to 18 months. Support you have any questions regarding your product, please do not hesitate to contact us St oo, or callus at {208 Bad bis Queries are typically answered within 1.2 hours. Your opinions matters Sexing is firmly committed to always improving our products, services, and user experience.