
User manual

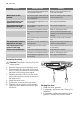
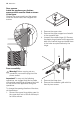


7. Carefully put the appliance to its rear
side, totally unscrew the adjustable foot
and screw it in the opposite side.
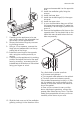
8. Remove the bottom hinge by unscrew-
ing its fixing screws.
9. Using a 12 mm spanner, unscrew the
hinge pin and reassemble it on the op-
posite side of the hinge.
10. Install the lower hinge in the opposite
side, using the screws previously re-
moved.
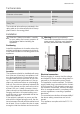
11. Carefully put the appliance in its working
position and adjust the level of the appli-
ance by screwing / unscrewing the ad-
justable feet at the bottom of the cabinet
using your fingers or a tool.
12. Slide the hole cover out of the ventilation
grille by pushing it in the direction of the
arrow and reassemble it on the opposite
side.
13. Install the ventilation grille, fixing the
screws.
14. Install the lower door.
15. Install the middle hinge (H) in the oppo-
site side.
16. Install the upper door.
17. In your documentation bag you will find
the upper hinge necessary to make the
reversibility. Put the hinge in position and
screw it.
18. Remove the handles and fix them on the
opposite side. Put the plastic lids on the
holes that were situated where the han-
dles are presently.
Do a final check to make sure that:
• All screws are tightened.
• The magnetic seal adheres to the cabinet.
• The door opens and closes correctly.
If the ambient temperature is cold (i.e. in Win-
ter), the gasket may not fit perfectly to the
cabinet. In that case, wait for the natural fit-
ting of the gasket.
In case you do not want to carry out the
above mentioned operations, contact the
nearest After Sales Service Force. The After
Sales Service specialist will carry out the re-
versibility of the doors at your cost.
electrolux 13