user manual Fridge-Freezer RNB44454C
electrolux Electrolux. Thinking of you. Share more of our thinking at www.electrolux.
electrolux 3 • It is dangerous to alter the specifications or modify this product in any way. Any damage to the cord may cause a short-circuit, fire and/or electric shock. Warning! Any electrical component (power cord, plug, compressor) must be replaced by a certified service agent or qualified service personnel. 1. Power cord must not be lengthened. 2. Make sure that the power plug is not squashed or damaged by the back of the appliance. A squashed or damaged power plug may overheat and cause a fire. 3.
electrolux by a qualified electrician or competent person. • This product must be serviced by an authorized Service Centre, and only genuine spare parts must be used. Environment Protection This appliance does not contain gasses which could damage the ozone layer, in either its refrigerant circuit or insulation materials. The appliance shall not be dis- carded together with the urban refuse and rubbish.
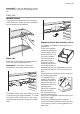
electrolux 5 Important! Do not use detergents or abrasive powders, as these will damage the finish. Daily use Movable shelves The walls of the refrigerator are equipped with a series of runners so that the shelves can be positioned as desired. Bottle rack Place the bottles (with the opening facing front) in the pre-positioned shelf. Important! If the shelf is positioned horizontally, place only closed bottles. This bottle holder shelf can be tilted in order to store previously opened bottles.
electrolux Positioning the door shelves To permit storage of food packages of various sizes, the door shelves can be placed at different heights. To make these adjustments proceed as follows: gradually pull the shelf in the direction of the arrows until it comes free, then reposition as required. Warning! Do not use metallic instruments to remove the trays from the freezer. Air cooling The Dynamic Air Cooling (DAC) fan let food cool quickly and a more uniform temperature in the compartment.
electrolux 7 ing the food to be frozen in the freezer compartment. Place the fresh food to be frozen in the bottom compartment. The maximum amount of food that can be frozen in 24 hours is specified on the rating plate , a label located on the inside of the appliance. The freezing process lasts 24 hours: during this period do not add other food to be frozen.
electrolux • lean foods store better and longer than fatty ones; salt reduces the storage life of food; • water ices, if consumed immediately after removal from the freezer compartment, can possibly cause the skin to be freeze burnt; • it is advisable to show the freezing in date on each individual pack to enable you to keep tab of the storage time.
electrolux 9 Defrosting of the freezer The freezer compartment of this model, on the other hand, is a "no frost" type. This means that there is no buildup of frost when it is in operation, neither on the internal walls nor on the foods. The absence of frost is due to the continuous circulation of cold air inside the compartment, driven by an automatically controlled fan.
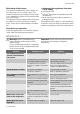
electrolux Problem Possible cause Products prevent that water flows into the water collector. Solution Make sure that products do not touch the rear plate. Water flows on the ground. The melting water outlet does not Attach the melting water outlet to flow in the evaporative tray above the evaporative tray. the compressor. The temperature in the appliance is too low. The temperature regulator is not set correctly. Set a higher temperature. The temperature in the appliance is too high.
electrolux 11 Technical data Dimension of the recess Height 1950 mm Width 695 mm Depth 669 mm Rising Time 20 h The technical information are situated in the rating plate on the internal left side of the appliance and in the energy label. Installation Ambient temperature SN +10°C to + 32°C N +16°C to + 32°C ST +16°C to + 38°C T +16°C to + 43°C Location The appliance should be installed well away from sources of heat such as radiators, boilers, direct sunlight etc.
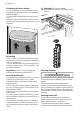
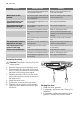
electrolux Rear spacers Inside the appliance you find two spacers which must be fitted as shown in the figure. Slacken the screws and insert the spacer under the screw head, then retighten the screws. 2. Remove the upper door. 3. Remove the upper support and install it in the opposite side. 4. Unscrew the middle hinge (H). Remove the plastic plugs located on the opposite side of the central hinge and install them in the holes occupied before by the hinge.
electrolux 13 13. 14. 15. 16. 17. 18. 7. Carefully put the appliance to its rear side, totally unscrew the adjustable foot and screw it in the opposite side. 8. Remove the bottom hinge by unscrewing its fixing screws. 9. Using a 12 mm spanner, unscrew the hinge pin and reassemble it on the opposite side of the hinge. 10. Install the lower hinge in the opposite side, using the screws previously removed. 11.
electrolux Environmental concerns The symbol on the product or on its packaging indicates that this product may not be treated as household waste. Instead it should be taken to the appropriate collection point for the recycling of electrical and electronic equipment. By ensuring this product is disposed of correctly, you will help prevent potential negative consequences for the environment and human health, which could otherwise be caused by inappropriate waste handling of this product.
electrolux 15
www.electrolux.