
Monarco-HAT-Hardware-Reference-Manual


Monarco HAT Hardware Reference Manual 20190728-1
17
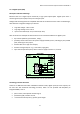
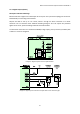
Connecting ARM Debugger (P3) 3.3.
There is a space for standard 9 (10) pin ARM Cortex debug connector with SWD (single wire
debug) interface on board, marked as P3. Normally you do not need this, so it’s not
populated. If you want to hack Monarco MCU firmware, proper header can be soldered in
(20021511-00010T4LF type by FCI).
Compatible with "J-LINK 9-PIN CORTEX-M ADAPTER" provided by Segger.
P3 – ARM MCU Debug Interface
1
VCC 3.3V
2
SWDIO
3
GND
4
SWDCLK
5
GND
6
SWO
7
–
8
Not Connected
9
GND
10
RESETn
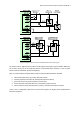
Connecting Power for Touchscreen Display (P4) 3.4.
Monarco provides dedicated connector, marked as P4, with 5 VDC output to power a
touchscreen display connected to the Raspberry Pi. We tested this with the official Raspberry
Pi 7” Touchscreen Display.
Output is switched off together with Raspberry Pi 5 V output by Host Watchdog.
Available output current: see Technical Specifications / Power Supply chapter.
Compatible connectors plug type: DF3-2S-2C by Hirose.
P4 – 5 VDC output for touchscreen display
1
GND
2
5 VDC