Multiroom Module 03 E 2.
Multiroom-Module 03 Re:source Multiroom Module Installation Changing the battery 2 3 4 Connections Multiroom principle Multiroom plan Multiroom golden rules 5 6 7 8-9 Timer menu Timer programming Room selection Timer selection Programming timer 9 10 10-11 11 12-17 Test function Activating the timer Special events Sleep function Setting the time Setting the time in the side room 17 17 18 18 19 20 Multiroom setup Edit room name Restore standard name Scan function Version control Hotel mode Clear all
Multiroom Module 03 Re:source Multiroom Module Revox has been developing and manufacturing Multiroom components for some 20 years now. The concept of centrally located audio equipment that can also be used independently of the additional rooms, has reached its furthest state of development to date, with the Multiroom module MK3.
Multiroom Module 03 Re:source Installation Before removing the Multiroom module from its packaging, you should make sure that you do not have any static electricity. This could cause a damaging discharge of voltage when you touch the module. You should get rid of any static charge by touching an earthed metal object like a radiator, for example. The Multiroom plug-in card is equipped with the latest in electronics and should be handled with care.
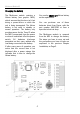
Multiroom Module 03 Re:source Changing the battery You need a CR2032 3 V lithium battery as the replacement. The Multiroom module contains a lithium battery (see graphic: MP5), which ensures that the time isn’t lost during a power-failure or while the unit is being transported. The lithium battery is not used in standby or normal operation. The battery only provides power for the Timer IC when the M51 is separated from the power or when it is switched off at the power switch.
Multiroom Module 03 Re:source Connections ZONE There are 4 connections with RJ45 connectors for the four zones, on the rear of the Multiroom module. Depending on the scope of the Multiroom installation, up to 8 Revox Additional room amplifiers can be connected to a zone. Connection is made using an uncrossed, double-screened CAT7 patch cable, with am RJ45 plug. Further information’s regarding the cabling of the multiroom-system can be found on last pages of this manual.
Multiroom Module 03 Re:source The Multiroom principle The basis of the Multiroom principle was the idea of having a central audio system which could be accessed from all other rooms in the house. The second option is to use the automatic on/off switching offered by the M51 timer. As soon as you switch an additional room on or it is activated by a timer, the following graphic appears in the M51 display, assuming the M51 is in standby mode at the time.
Multiroom Module 03 Re:source Multiroom-Plan Zone Main room Room 1.1 Room 1.2 Room 1.3 Room 1.4 Room 1.5 Room 1.6 Room 1.7 Room 1.8 Room 2.1 Room 2.2 Room 2.3 Room 2.4 Room 2.5 Room 2.6 Room 2.7 Room 2.8 Room 3.1 Room 3.2 Room 3.3 Room 3.4 Room 3.5 Room 3.6 Room 3.7 Room 3.8 Room 4.1 Room 4.2 Room 4.3 Room 4.4 Room 4.5 Room 4.6 Room 4.7 Room 4.
Multiroom Module 03 Re:source Multiroom golden rules To give you a better idea of what a Multiroom system can offer, here is a list of the 7 golden rules of Multiroom. Example: Room 2.2 selects the tuner (as the joint source for Zone ). After that, however, Room 2.4 selects the CD. The CD will now also be played in Room 2.2. Different zones can, but don’t have to, select different sources Example: While a CD is playing in Zone the radio or perhaps the CD can be heard in Zone .
Multiroom Module 03 Re:source All the amplifiers in the additional Timer menu rooms are switched off if you press and hold the Power button on the M51 for long enough. The Timer is the central controller of the Multiroom system. You can use it to wake you on certain days while on others, you can use it to send you off to dreamland, with its sleep function. The whole system can be switched off from any additional room if the amplifier off switch is pressed and held for a while.
Multiroom Module 03 Re:source Timer programming The concept behind programming is as follows: Room selection timer As the first step, you select the room that is to be controlled by the four possible timers. Firstly you select the room that should be controlled by the timer. Then you assign the corresponding properties to one of the four possible timers. You select the required room with the Room + softkeys. Only those rooms that are actually connected to the M51 are shown.
Multiroom Module 03 Re:source Room selection Timer selection If rooms have been given own names, like in the example the name Dinner, this of course also appears in the Timer selection menu. Once you have selected the room, you then assign a timer to the room. In the above display, Timer 1 has been selected. You can select the individual timers with the Timer softkey and there are in total, 4 independent timers for each room available.
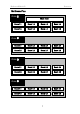
Multiroom Module 03 Re:source Select Switching time setting Using the two softkeys Select, you can define the properties of the individual timers. When an Timer is selected, the Select softkeys are used to set the switching times. The selection of Switching times, Weekday, Volume and Source is achieved using the two softkeys Select You can move in any direction, moving backwards or forwards as you want.
Multiroom Module 03 Re:source Switching time setting Weekday selection First you define the Switch on time and then the Switch off time. As shown below, in each case you enter the hours value followed by the minutes value. Once you have defined the on and off times, you get to the next input field, the Weekday when the Timer should be activated by pressing the Select softkey again. [ ] Switch-on Switch-off | | Hours Minutes | | | | Using the rotary control knob, you can set to the required weekday.
Multiroom Module 03 Re:source Weekday selection This is particularly useful if you want to use the Timer as a wake-up call. The selection is made from a continuous loop which you can mode through with the rotary control knob.
Multiroom Module 03 Re:source Volume setting Using the Multiroom module timer, you can select one of three sources to be activated, namely Tuner, DVD/CD and Aux/Server. [ ] Once the weekday has been selected, the next time you carry out Select, you can select the volume to be used. [ ] Please note Using the rotary control knob, you set the volume level from 1, very low, to 9, very loud, in an endless loop.
Multiroom Module 03 Re:source Select tuner station 1 If you have selected Tuner as your source, you will now be able to select the station you want if you press Select once more. If on the other hand you have selected DVD/CD or Aux/Server as your source, you will return to the Switching times menu. [ ] 2 3 The third option in the Remote menu is the deactivation of a source (Fig. ).
Multiroom Module 03 Re:source Test function Activating the timer The Test function allows you to carry out an effective check of the Timer settings. In particular with room selection and volume, you can check whether the right room is activated and that the right volume level has been set. As standard, the individual timers are deactivated. Once you have entered all the Timer settings, press the Test softkey. Each Timer can be activated or deactivated separately.
Multiroom Module 03 Re:source Special Events Sleep function Using the Timer programming, you can also generate nested Events. By a nested timer, we mean the situation where two different timer address the same source and the same room at the same time. Using the Sleep function, you can set a particular length of time, after which the M51 will automatically switch off. By pressing the Sleep key repeatedly, you can set the required time interval in 15 minute steps.
Multiroom Module 03 Re:source Setting the time Through the 12h/24H softkey, the Multiroom module also offers you the choice between the 24 hour or 12 hour clock format. The time must be set accurately for the Timer function to work correctly. This is set through the Setup menu. Press the Setup button on the front of the M51 for approx.
Multiroom Module 03 Re:source Setting the time in the side room Time not correctly set? The time can also be set from a side room, assuming that an M217 Wallmounted display is being used. The multiroom module contains a lithium battery (CR 2032), which ensures that the time isn’t lost during a power-failure or while the unit is being transported. The lithium battery is not used in standby or normal operation.
Multiroom Module 03 Re:source Multiroom setup Select zone The Multiroom setup offers you a wealth of information about the available and/or active additional rooms, for example, the software version of the multiroom products that are connected. In addition, you can assign names to the additional rooms, which make the system even simpler to use. and Using the two softkeys , you can select the zone that contains the room(s) you want to modify or check.
Multiroom Module 03 Re:source Edit room name Edit function The Multiroom module MKII allows you to give freely definable names to the additional rooms. You no longer have to remember which room number the kitchen has, for example. You can give it a corresponding name. When you press the softkey Edit Name, you will move to the following menu: Using the softkeys Zone and Select, select the room whose name is to be edited.
Multiroom Module 03 Re:source Please note In the following chapters, whenever a setting can be made using the rotary knob, the range to be modified is shown in the display in two square brackets [...]. At the same time, the small red Jog light, to the right of the M51 rotary knob, lights up. Once you have entered the required characters to make up the desired name, you can store your input with the softkey Store. If you want to break off the action, press the softkey Cancel.
Multiroom Module 03 Re:source Restore standard name Scan function If you want to return the name of an additional room to its factory setting, select the room in question with the softkeys Zone and Select. This function carries out a query of all the rooms in a zone, which recognises how many rooms are actually connected. If an additional room has logged on and is therefore physically available, this is shown by a star *. Now press the softkey Edit Name, to get to the editing menu.
Multiroom Module 03 Re:source Version control Version control gives the installer the option of querying the software state of the individual Multiroom components. This can be an M219 Additional room amplifier as well as an M217 wall display. Both the Version control and the Scan functions give the installer reliable information about the scope and the status of the installed additional rooms.
Multiroom Module 03 Re:source Hotel mode If the M10/ M51 is installed in a hotel or a public building, it is usually not desired that someone listening in an additional room can switch the complete system off. Hotel mode offers you the option of limiting the switch off function to the additional room and its zone. The Hotel mode allows you to customise the additional room switchoff function.
Multiroom Module 03 Re:source Clear all timers Active rooms Using the Clear Timer function, you can delete all timers at the same time and return them to their factory settings. This is particularly useful after competing installation, if the different timers have been setup for test purposes. The Multiroom module offers you the option of showing all active rooms in the display. This gives you a quick overview of which rooms are in which zone. This setting is particularly helpful during installation.
Multiroom Module 03 Re:source IR Link The following transmitted: Using the Revox Multiroom System IR Link, you can control the basic functions of third-party devices, such as video recorders, from all the Additional rooms. However, you can only control devices that Revox has listed in IR Link Menu / Code. 0-9 You use the M208remote control unit IR Link menu. This sends out an RC-5 code, commands are Play Stop Pause Fast Forward & Rewind Track Forward & Rewind 10-key keypad incl.
Multiroom Module 03 Re:source IR Output configuration Now in the second step, using the Input softkey, you select the source through which the third-party device is connected audio-technically with the M51/M10. Here, we recommend using Aux1 (M218 Keypad: Server) or Aux2 as these sources can be directly called at the press of a key, through the wallmounted unit in the side room. The IR Link is configured through the Option menu. You get to this in the Setup / Multiroom menu.
Multiroom Module 03 Re:source IR Link operation Explanation of the example: With the Revox Multiroom System, the operation of the third-party devices, e.g. DAB Tuner, which are controlled through the IR Send output, is done exclusively through the M208 Remote control. For this purpose, load the corresponding device from the M208 Project Manager database (see figure, below right) onto the M208.
Multiroom Module 03 Re:source Technical data Zone 2 RJ45 screened RJ 45 plug assignment Pin 1 Pin 2 Pin 3 Pin 4 Pin 5 Pin 6 Pin 7 Pin 8 8 1 Max. Cable length to the side room amplifier Cable type Number of timers (max.) Number of zones Number of side rooms / Zone Max.
Multiroom Module 03 Re:source Multiroom cabling The CAT 7 cable has 4 twisted cablepairs where each pair is screened. There is then a further overall screening around all the pairs. Multiroom cabling is done according to the international network standard EIA/ TIA-568-B using a CAT 7 cable.
Multiroom Module 03 Re:source Guarantee Environmental protection The guarantee period is 24 months from the date of purchase. Packaging We recommend keeping the original box and packaging material so that if required, the device can be transported safely. Your dealer should be your first contact if you need service. If he can't give you the help you need, send your Multiroom module prepaid and without any accessories to your national Sales Office.
Multiroom Module 03 Re:source MR-Module 03 Operating instructions / Part no.: 10.30.