o M219 Standard.E20.E40.E80 Side room amplifier E 2.
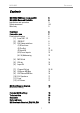
M219 MK2 Re:connect Contents M219 Mk2 Additional room amplifier M219 Mk2 Re:sound I invisible Installation and operation Safety measures Warranty 2 2 3 4-5 5 Front view Connection plan Detailed description [1] Local IN 1 2 3 [2] PRE OUT [3] DIL Setup switches (1) IR receiver (2) Pre Out (3) Input IN (4-5) Local inputs (6-7-8) Addressing 6 7 8 8 8 9 9 10 11-12 13 13 [4] [5] [6] M219 Link IR Link Input IN 14 14 15 [7] [8] [9] [10] [11] [12] Channel Select IN Revox MR Bus OUT Revox MR Bus R-L Speaker
M219 MK2 Re:connect General Multiroom Planer V2.00 The M219 is a digital Side Room Amplifier from the M Series in the Revox Multiroom programme. It is used for the reproduction of music in the additional rooms in a Multiroom system and can also supply the listener with current information through an additional display. The M219 receives the signals from a selected source (Multimedia, Tuner, Server ...) in the main room through a multiroom bus cable.
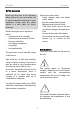
M219 MK2 Re:connect Installation Please follow the instructions in the Operating manual supplied. Unplug the unit from the mains during storms. Voltage peaks through the mains power supply caused by lightning strikes can damage the unit. Do not position the device close to strong heat sources or in direct sunlight. There must be easy access to the power plug so that the unit can be unplugged at all times. If installing in a cabinet or closed shelves, allow at least 5 cm (2 in.
M219 MK2 Re:connect Safety measures Protect your device from: - Damp, dripping water and splash water, steam. - Knocks and mechanical loads. - Magnetic and electrical fields - Cold, heat, direct rays of the sun and severe changes of temperature - Dust - Access to the inside of the device - Do not stand any articles with open flames, e.g. lit candles on the device Read and take note of the following safety advice for your own safety and to avoid unnecessary damage to your equipment.
M219 MK2 Re:connect Regulations pertaining to the unit Caution In order to avoid the risk of an electric shock, do not remove any covers. Maintenance and repairs should only be carried out by qualified Revox experts. In EU and EEC countries, Revox offers a guarantee on units bought in the EU, over and above the statutory rights of guarantee claims against the seller.
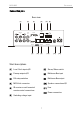
M219 MK2 Re:connect Front view M219 [A] [B] [C] M219 Room-Amplifier [C] Ventilation slots The ventilation slots on the front and the top of the M219 must always be left clear of obstructions. [A] IR Sensor The InfraRed sensor receives signals from the remote control or from any other IR control devices, such as the PDAs for the music server. Switching the IR sensor off If required, the IR sensor can be switched off using the SETUP DIL switch [3] on the rear of the M219.
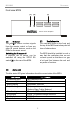
M219 MK2 Re:connect Connection plan Rear view [1] [2] [3] LOCAL IN PRE OUT SETUP [4] [5] [6] + IN - + - M219 LINK 1 2 3 L OUT 1 2 3 4 5 6 7 8 R 1 2 3 4 CHANNEL IN SELECT [7] [8] + R- L + SPEAKERS FUSE AC - POWER MR-BUS [9] [10] [11] [12] OUT Short descriptions [1] Local Cinch inputs L/R [7] Stereo/ Mono switch [2] Preamp outputs L/R [8] Multiroom Bus input [3] DIL setup switches [9] Multiroom Bus output [4] M219-Link connector [10] Speaker connections L/R [5
M219 MK2 Re:connect Detailbeschreibung [1] [2] LOCAL IN 1 2 3 PRE OUT Local Cinch inputs L/R Preamp outputs L/R The M219 has 3 local line inputs for a CD player or TV, for example, which are located directly in the room where the M219 is. The local audio inputs are activated by the Local key on the (wallmounted) remote control.
M219 MK2 Re:connect DIL setup switches NO Function Factory setting 1 M219 IR eye on/off On 2 Pre-Out: Fixed Volume Off 3 LOCAL IN 1 Fixed Volume Off 4 Number of local inputs On 5 Number of local inputs On 6 M219 address Off 7 M219 address Off 8 M219 address Off Please note: The switch is in the ON position when it is down You can enter your own personal DIL switch settings in a table included on the last pages of this manual, providing you with a record for future reference.
M219 MK2 Re:connect (2) PRE OUT Two operating modes are possible with the M219’s preamp output: Floating Volume (Factory setting from serial # 2000): This is the standard mode setting. In this case, the PRE OUT level changes parallel to the speaker level. This means that as you increase the volume at the speakers, for example, the PRE OUT level is automatically changed at the same time.
M219 MK2 Re:connect (3) Voltage input IN (from serial # 2000) INFO Using the voltage input IN on the M219, the local audio input LOCAL IN 1 can be activated by the application of 5 – 24 VDC. This means that as soon as the voltage is present at IN, the M219 switches on automatically and selects the input LOCAL IN 1. When the voltage is removed from input IN, the M219 switches off again automatically, as long as no other source apart from LOCAL IN 1 was addressed.
M219 MK2 Re:connect Cabling: Voltage input IN Audio Local (audio)-source OUT e.g. TV WITHOUT + WITH - M219 LINK LOCAL IN 1 2 3 PRE OUT SETUP + IN - Slave Slave switching-voltage output 5-24V OUT DC 5-24V OUT DC Slave Audio Local (audio)-source OUT e.g.
M219 MK2 Re:connect M219 local inputs See description: [1] LOCAL IN 1 2 3 Number of local inputs DIL switch 4 DIL switch 5 0 Off Off 1 Off On 2 On Off 3 On On DIL position 4 5 4 5 4 5 4 5 M219 addressing If you want to control each M219 individually, to use the alarm function of the M51 Timer, for example, it is necessary to assign each M219 its own address. The maximum number of M219s is limited to 8 per zone.
M219 MK2 [4] Re:connect [5] IR-LINK Connection for IR receiver or wallmounted remote control M219-Link - M217 Display connection - M200/ M203 TV interface If it is not possible or not required that the M219 is controlled directly with a remote control, a wall-mounted remote controller (e.g. M218) or and external IR eye (MR-204) can be connected to the IR-LINK connector. Connection to the IR receiver or the wall-mounted remote controller is made using a screwable Phoenix plug connector.
M219 MK2 [6] Re:connect IN Voltage input (from serial # 2000) Using the voltage input IN on the M219, the local audio input LOCAL IN 1 can be activated by the application of 5 – 24 VDC. This means that as soon as the voltage is present at IN, the M219 switches automatically to LOCAL IN 1, irrespective of which source had been selected previously. For further information please refer to DIL switch (3) / Page 11.
M219 MK2 [7] Re:connect CHANNEL SELECT Configuration Operating mode DIL- 1 Switch DIL- 2 Switch DIL- 3 Switch Left channel DIL- 4 Switch DIL Position Right channel Stereo On Off Off On Inverse Stereo Off On On Off Mono On On On On 1 2 3 4 1 2 3 4 1 2 3 4 You can change the switch settings during operation if the volume level is turned down low.
M219 MK2 Re:connect FUSE [10] R – L SPEAKERS Speaker connection [11] Fuse Always use a cable of a sufficient diameter for connecting your speakers to the M219. Always power the unit down before replacing the fuse. When replacing the fuse, always one of the same type as shown on the M219 rating label. Revox recommends: up to 15m / 50ft: 1.5 mm2 / AWG15 up to 30m / 100ft: 2.5 mm2 / AWG13 over 30m / 100ft: 4.
M219 MK2 Re:connect M219 Cabling plan diagram 18
M219 MK2 Re:connect Multiroomverkabelung Multiroom cabling uses a CAT 7 cable, in accordance with the international network standard EIA/TIA-568-B. The CAT 7 cable is characterised by 4 twisted pairs, where each pair has its own screening. There is a complete screening around all four pairs.
M219 MK2 Re:connect Technical data AMPLIFIER PART: Music power: 2 x 50 Watt at 4 Ohm / 1% THD 2 x 25 Watt at 4 Ohm / RMS Frequency range: 10 Hz - 25 kHz / -3 dB Damping factor: > 200 at 8 Ohm / 1 kHz Harmonic distortion: 0.03 % at 10 Watt GENERAL M219 DATA: Power voltage: 200-240 V AC 100-120 V AC Power fuse rating: T 500mA L 250V T 1,0A L 250V Power consumption: Max.
M219 MK2 Re:connect Guarantee Delivered items The guarantee period is 24 months from the date of purchase. Your dealer should be your first contact if you need service. If he can't give you the help you need, send the M219 carriage free and without any accessories to your national Sales Office. M219 Multiroom amplifier Power cable Installation instructions Side room amplifier versions: M219 Standard (Part no.: 1.551.060.
M219 MK2 Re:connect M219 Side room amplifier - Operating instructions / Part no.: 10.30.