POP �D SCANNER Quick Start Guide ����.�8 V�.�.
POP �D SCANNER Visit our website www.revopoint3d.com for the latest updates to our software and documentation.
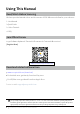
Using This Manual Read/Watch Before Scanning We have provided tutorial videos and documents of POP �D scanner bellow for your reference: �. User Manual �.Quick Guide �. Video Tutorials �. FAQ Join Official Forum to get Software Updates & Tutorials & Showcases & Contests & Discussions! [Register Now] http://forum.revopoint3d.com Download related software from www.revopoint�d.
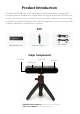
Product Introduction The Revopoint POP �D scanner has a built-in binocular structured light, ensuring highly- accurate acquisition of �D point cloud data. With a set of depth cameras (two IR sensors and one projector) and one projector, the POP scanner can obtain single-frame accuracy as high as �.�mm. Its powerful specifications allow a variety of applications such as scanning models, sculptures, human faces, industrial parts, and more.
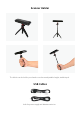
Scanner Holder The holder can be held in your hand or used as an adjustable-height, stable tripod.
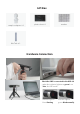
Gift Box sample sculpture � plastic sheet� markers Blu Tack � Hardware Connection Check the POP is connected to the USB �.
Software: Handy Scan & Handy Studio Your package contains a flash drive with the necessary software (Handy Scan) and a brief overview document. Visit our website www.revopoint�d.com if you misplace the drive and to download the most recent version.
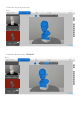
� Place the object on proper site � Adjust the distance to the“Excellent”
� Adjust RGB and Depth parameters: click "Auto" first, then "Manual” Refer to User Manuel for detailed parameter adjusting � � Click" � "to start a new project
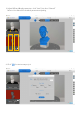
� Select a Scan mode and Texture: For the first operation, we recommend“Feature”and“No color”; Refer to User Manual for other scan modes and Texture selecting.
� Click“ ”to complete your scan.
� Click“ ”to export the �D model Name the file and save in ply., obj. or stl..
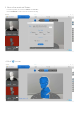
� Select local model, and Import the scanned �D model � Function Buttons: Click one by one to process the scanned model convert the point clouds into mesh/plane clip the model plane fill holes on the model surface smooth the flat/curved surface generate left-and-right mirror image of the scanned model cancel the current operation and revert to the previous state export the scanned file. (Note: save the model in Ply. /Stl. / Obj..
� Merge align two imported models merge aligned models into one model cancel the current operation and revert to the previous state export models in ply./obj.