
User Manual


EN
12
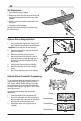
Tail Replacement
1. Disconnect the elevator linkage.
2. Remove one screw from the bottom of the aircraft
and slide the horizontal tail out of the rear of the
fuselage.
3. Slide the new tail into position and secure it with
one screw.
4. Connect the control linkages.
See the Control Centering section to properly align
the control surface.
Optional Aileron Wing Installation
Optional Aileron Transmitter Programming
1. Using double sided tape or glue (epoxy or hot
glue) install the aileron servo into the fuselage.
Important: Do not use thin CA near the servo.
2. Attach the aileron servo plug into the aileron
slot on the receiver.
3. Attach the pushrods to the servo arm.
4. Attach the servo arm to the servo. Insert a
screw driver down through the small hole in
the top of the fuselage to tighten the servo
horn screw.
5. Carefully slide the wing into the fuselage.
6. Attach the pushrods to the aileron control
horns.
7. See Control Centering earlier in this manual.
To use the aileron wing, the transmitter needs to be
converted from 3CH (throttle, elevator, rudder) to
4CH (throttle, rudder, elevator, aileron). Follow the
steps listed below. Once complete, the transmitter
will retain these settings. To go back to 3CH, simply
repeat this process.
Perform the following steps with the aircraft
powered off.
1. Lower the throttle to the off position (0%).
2. Hold in the left rudder trim while powering on
the transmitter. After 3 seconds the transmitter
will beep and the LED will glow solid.
3. Release the rudder trim; programming is
complete.
1
2
2
3ch
4ch
Throttle
Elevator/Rudder
Elevator/Aileron
Throttle/Rudder