ASCENT™ SPX Instruction Manual • Manuel d’utilisation Model: RVOF1200 Ascent SPx RTF
EN NOTICE All instructions, warranties and other collateral documents are subject to change at the sole discretion of Horizon Hobby, LLC. For up-to-date product literature, visit www.horizonhobby.com and click on the support tab for this product.
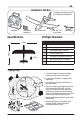
EN Included in the Box To register your product online, go to www.horizonhobby.com Transmitter AA Alkaline Batteries (4) Ascent SPx Specifications 850 mAh 7.4V Li-Ion Battery USB Charger Preflight Checklist 600mm 739mm 225 g 1. Find a safe and open area. 2. Charge flight battery. 3. Install flight battery in aircraft. 4. Perform Control Test. 5. Plan flight for flying field conditions. 6. Set a flight timer for 10 minutes. 7.
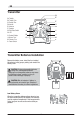
EN Transmitter D A: Throttle B: Throttle Trim C: Rudder Trim D: Handle E: Antenna F: Speaker G: Dual Rate Switch H: LED I: Elevator/Rudder J: Aileron Trim* K: Elevator Trim L: Power Switch E F G H A I B J C K L Transmitter Batteries Installation Remove the battery cover, install the four included AA batteries (noting proper polarity) and reinstall the battery cover. CAUTION: If using rechargeable batteries, charge only rechargeable batteries.
EN Charging Warnings The USB charger has been designed to safely charge the included Li-Ion battery. • Always charge batteries away from flammable materials. • Always inspect the battery before charging. • Always disconnect the battery after charging, and let the charger cool between charges. • Always constantly monitor the temperature of the battery pack while charging. • ONLY USE A CHARGER SPECIFICALLY DESIGNED TO CHARGE Li-Ion BATTERIES.
EN Wing Installation 1. Carefully slide the wing into the fuselage as shown. 2. Continue sliding until the wing locks into place. 3. The wing can be removed for storage by simply pulling it back out. Tip: Firmly grasp the wing at the root (close to the center) and not out at the tips. Installing the Flight Battery 1 1. Make sure the throttle is in the off position (0%) and then turn on the transmitter. 2. Remove the canopy from the aircraft. 3. Plug in the flight battery. 4.
EN Control Test 1. Turn the aircraft and transmitter on. 2. Arm the aircraft. 3. Move the sticks on the transmitter to ensure the aircraft responds as shown. Transmitter 4. Note the corresponding flight direction to control surface movement. 5. If surfaces do not move as expected, DO NOT fly. See the troubleshooting section in the back of this manual.
EN Control Centering After assembly, confirm that the control surfaces are centered. If the control surfaces are not centered, mechanically center the control surfaces by adjusting the linkages. If adjustment is required, turn the clevis on the linkage to change the length of the linkage between the servo arm and the control horn. 1. Slide the rubber tube from the clevis. 2. Carefully spread the clevis apart to remove it from the control horn. 3.
EN Flying Taking Off Get help to hand launch your aircraft so you can concentrate on flying. If you must hand launch the aircraft alone, hold the model in your dominant hand and the transmitter in your other hand. Wind 0–5 mph (0–8 km/h) 1. Face into the wind and apply full (100%) throttle. 2. Hold the plane horizontal and launch straight and level into the wind. 3. The aircraft will climb under full throttle (100%). 4.
EN In Flight Trim Direction of Drift Button to Correct If the aircraft’s nose drifts left, right, up or down while the sticks are at neutral (centered) press the trim buttons as shown in the chart to correct the drift. If the aircraft nose still drifts after all trim has been used, land and manually trim the aircraft. See Control Centering section earlier in this manual. When you notice any reduction of power or 10 minuets have elapsed, immediately land the aircraft and recharge the battery. Landing 1.
EN Post flight Checklist 1. Lower throttle to 0% 5. 2. Disconnect and remove the flight battery After charging is complete, remove the battery and store in a safe place 6. 3. Power off the transmitter Inspect airframe and make any repairs 4. Fully charge the flight battery 7. Store in the original product box NOTICE: When you are finished flying, never leave the aircraft in direct sunlight or in a hot, enclosed area such as a car. Doing so can damage the foam.
EN Tail Replacement 1. Disconnect the elevator linkage. 2. Remove one screw from the bottom of the aircraft and slide the horizontal tail out of the rear of the fuselage. 3. Slide the new tail into position and secure it with one screw. 4. Connect the control linkages. See the Control Centering section to properly align the control surface. Optional Aileron Wing Installation 1. Using double sided tape or glue (epoxy or hot glue) install the aileron servo into the fuselage.
EN Troubleshooting Guide Problem Aircraft does not respond to the transmitter Possible Cause Solution No connection Follow Binding Instructions. Follow “Installing the Flight Battery” instructions.
EN Limited Warranty What this Warranty Covers Horizon Hobby, LLC, (Horizon) warrants to the original purchaser that the product purchased (the “Product”) will be free from defects in materials and workmanship at the date of purchase.
EN Warranty and Service Contact Information Country of Purchase United States of America Horizon Hobby Phone Number/Email Address Horizon Service Center (Repairs and Repair Requests) servicecenter.horizonhobby. com/RequestForm/ productsupport@horizonhobby.com Horizon Product Support (Product Technical Assistance) Sales EU Horizon Technischer Service Sales: Horizon Hobby GmbH 877-504-0233 Address 4105 Fieldstone Rd Champaign, Illinois, 61822 USA websales@horizonhobby.
EN Compliance Information for the European Union EU Compliance Statement: Horizon Hobby, LLC hereby declares that this product is in compliance with the essential requirements and other relevant provisions of the RED Directive. A copy of the EU Declaration of Conformity is available online at: http://www.horizonhobby.com/ content/support-render-compliance. Instructions for disposal of WEEE by users in the European Union This product must not be disposed of with other waste.
FR Replacement Parts • Pièces de rechange Part # • Nummer Numéro • Description Codice Description RVOF1200 ASCENT SINGLE PUSHER X RTF ASCENT SINGLE PUSHER RTF RVOF1201 FUSELAGE: ASCENT SPX FUSELAGE : ASCENT SPX RVOF1202 WING: ASCENT SPX AILE : ASCENT SPX RVOF1203 HORIZONTAL STAB: ASCENT SPX STABILISATEUR HORIZONTAL : ASCENT SPX PROP W/SPINNER: ASCENT SPX HÉLICE AVEC CÔNE : ASCENT SPX RVOF1205 DECAL SHEET: ASCENT SPX AUTOCOLLANT : ASCENT SPX RVOF1206 PUSHRODS W/HARDWARE: ASCENT SPX BARR
RVOF1200 © 2017 Horizon Hobby, LLC. Revolution, the Revolution logo, and Ascent are trademarks or registered trademarks of Horizon Hobby, LLC. Updated 10/17 55179.