
User Manual


EN
10
Repairs to the foam can be made using virtually any adhesive (hot glue, regular CA (cyanoacrylate adhesive),
epoxy or tape).
1. For small tears, use CA to bond the break
2. When parts are not repairable, see the Replacement Parts List for ordering by item number. For a listing
of all replacement and optional parts, refer to the list at the back of this manual.
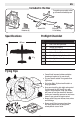
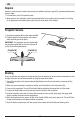
1. Remove the propeller (A) from the motor shaft ().
2. Carefully allign the new propeller on the motor
shaft and rmly press into place.
The propellers must be installed with
the propeller marked with an A on the right and B
on the left. See illustration below.
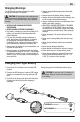
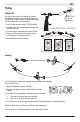
If your aircraft does not respond to the transmitter when the batteries in the aircraft and transmitter are fully
charged, bind your aircraft and transmitter by using the instructions below.
1. Turn off the aircraft by rst disconnecting the ight battery from the aircraft and then powering off the
transmitter.
2. Make sure your transmitter’s controls are neutral, and the throttle is in the off position (0%).
3. Power on the transmitter. The red LED will start ashing indicating the transmitter is in Bind mode.
4. Connect the ight battery to the aircraft and move the switch to the on position.
5. Hold the transmitter more than 24 inches (60 cm) away from the aircraft. Keep away from large metal
objects, wireless sources and other transmitters.
6. Move the throttle stick from power off (0%) to full throttle (100%) and back to power off. The red LED will
change from ashing to solid when the Bind is complete.
7. Once the Bind is complete you will have control of the motors with the throttle and steering stick.
A