ASCENT™ MTX Instruction Manual • Bedienungsanleitung • Manuel d’utilisation • Manuale di Istruzioni
EN NOTICE All instructions, warranties and other collateral documents are subject to change at the sole discretion of Horizon Hobby, LLC. For up-to-date product literature, visit www.horizonhobby.com and click on the support tab for this product.
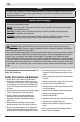
EN Included in the Box Transmitter AA Alkaline Batteries (4) Ascent MTx Specifications To register your product online, go to www.horizonhobby.com 300 mAh 3.7V Li-Po Battery USB Charger Preflight Checklist 483mm 1. Find a safe and open area. 2. Charge flight battery. 395mm 3. Install flight battery in aircraft. 4. Perform Control Test. 5. Plan flight for flying field conditions. 47 g 6. Set a flight timer for 10 minutes. 7.
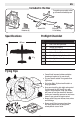
EN Transmitter B C A: Throttle B: Handle D C: Antenna E D: Speaker E: LED A F G F: Steering G: Steering Trim H: Power Switch H Transmitter Batteries Installation Remove the battery cover, install the four included AA batteries (noting proper polarity) and reinstall the battery cover. CAUTION: If using rechargeable batteries, charge only rechargeable batteries. Charging non-rechargeable batteries may cause the batteries to burst, resulting in injury to persons and/or damage to property.
EN Charging Warnings The USB charger has been designed to safely charge the included Li-Po battery. • Always charge batteries away from flammable materials. • Always inspect the battery before charging. • Always disconnect the battery after charging, and let the charger cool between charges. • Always constantly monitor the temperature of the battery pack while charging. • ONLY USE A CHARGER SPECIFICALLY DESIGNED TO CHARGE LI-PO BATTERIES.
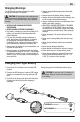
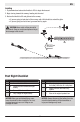
EN Installing the Flight Battery CAUTION: Always disconnect the flight battery from the aircraft when not flying to avoid over-discharging the battery. Batteries discharged to a voltage lower than the lowest approved voltage may become damaged, resulting in loss of performance and potential fire when batteries are charged. 1. Make sure the throttle is in the off position and turn on the transmitter. 2. Open the battery hatch on the bottom of the aircraft and plug in the flight battery. 3.
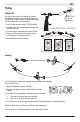
EN Flying Taking Off Get help to hand launch your aircraft so you can concentrate on flying. If you must hand launch the aircraft alone, hold the model in your dominant hand and the transmitter in your other hand. Wind 0–5 mph (0–8 km/h) 1. Face into the wind and apply 1/2 (50%) throttle. 2. Hold the plane horizontal and launch straight and level into the wind. 3. The aircraft will climb under full throttle (100%). 4. Reduce to 50% throttle once the plane is at a safe altitude (50-75 feet) to level out.
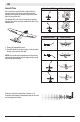
EN Aircraft Trim Direction of Drift Right Stick Right Stick If the aircraft’s nose drifts left or right while the steering stick is at neutral (centered) press the steering trim buttons as shown in the chart to the right to correct the drift. The Ascent MTx can also be trimmed by carefully bending the control surfaces molded into the tail as shown below. Button to Correct Direction of Drift 1. Center the transmitter trims. 2.
EN Landing 1. Fly downwind and reduce the throttle to 25% to begin the descent. 2. Begin turning towards the runway, heading into the wind. 3. Reduce the throttle to 0% and glide onto the runway. • If you are going to land short of the runway, add a little throttle to extend the glide. • If you are going too fast to land, go around and try again. 1 CAUTION: Never catch a flying aircraft in your hands. Doing so could cause personal injury and damage to the aircraft.
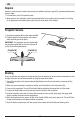
EN Repairs Repairs to the foam can be made using virtually any adhesive (hot glue, regular CA (cyanoacrylate adhesive), epoxy or tape). 1. For small tears, use CA to bond the break 2. When parts are not repairable, see the Replacement Parts List for ordering by item number. For a listing of all replacement and optional parts, refer to the list at the back of this manual. Propeller Service 1. Remove the propeller (A) from the motor shaft (B). 2.
EN Troubleshooting Guide Problem Aircraft does not respond to the transmitter Possible Cause Solution No connection Follow Binding Instructions. Follow “Installing the Flight Battery” instructions.
EN Limited Warranty What this Warranty Covers Horizon Hobby, LLC, (Horizon) warrants to the original purchaser that the product purchased (the “Product”) will be free from defects in materials and workmanship at the date of purchase.
EN Warranty and Service Contact Information Country of Purchase United States of America Horizon Hobby Phone Number/Email Address Horizon Service Center (Repairs and Repair Requests) servicecenter.horizonhobby. com/RequestForm/ productsupport@horizonhobby.com Horizon Product Support (Product Technical Assistance) Sales 877-504-0233 Address 4105 Fieldstone Rd Champaign, Illinois, 61822 USA websales@horizonhobby.
FR REMARQUE La totalité des instructions, garanties et autres documents est sujette à modification à la seule discrétion d’Horizon Hobby, LLC. Pour obtenir la documentation à jour, rendez-vous sur le site www.horizonhobby.com et cliquez sur l’onglet de support de ce produit.
FR Inclus dans la boîte Émetteur Piles alcalines AA (4) Ascent MTx Specifications Pour enregistrer votre produit en ligne, rendez-vous sur www. horizonhobby.com Batterie au lithium- Chargeur USB polymère 300 mAh 3,7 V Checklist d’avant vol 483 mm 1. Trouvez une zone sûre et bien dégagée. 2. Chargez la batterie. 395 mm 3. Installez la batterie dans l’avion. 4. Effectuez un test des commandes. 5. Planifiez votre vol en fonction des conditions du terrain. 47 g 6.
FR Émetteur B C A : Gaz B : Poignée D C : Antenne E D : Haut-parleur E : DEL A F G F : Direction G : Compensateur de direction H H : Interrupteur Installation des piles de l’émetteur Retirez le couvercle des piles, installez les quatre piles AA incluses (en faisant attention à la polarité) et remettez le couvercle des piles. ATTENTION : Si vous utilisez des piles rechargeables, ne rechargez que les piles rechargeables.
FR Avertissements relatifs à la batterie L’émetteur livré avec le Duet a été développé afin de charger la batterie Li-Po de façon sûre. • Faites toujours l’inspection de la batterie avant la charge, et ne chargez jamais des batteries hors d’usage ou endommagées. • Déconnectez toujours la batterie après la charge, et laissez le chargeur refroidir entre les charges. • Surveillez toujours en continu la température du pack de batteries au cours de la charge.
FR Installation de la batterie de vol ATTENTION : Débranchez toujours la batterie de vol de l’aéronef lorsque vous ne le faites pas voler pour éviter toute décharge excessive de la batterie. Une batterie déchargée à une tension inférieure à la plus basse tension approuvée peut s’endommager, entraînant une perte de performance et un risque d’incendie lorsque la batterie est rechargée. 1. Assurez-vous que la commande des gaz est en position éteinte et allumez l’émetteur. 2.
FR Durant le vol Décollage Faites-vous aider pour lancer votre aéronef à la main afin que vous puissiez vous concentrer sur le pilotage. Si vous devez lancer l’aéronef à la main vous-même, tenez la maquette dans votre main forte et l’émetteur dans l’autre main. Vent 0–8 km/h 1. Faites face au vent et allumez les gaz à mirégime (50 %). 2. Tenez l’avion à l’horizontale et lancez-le droit et horizontal face au vent. 3. L’aéronef montera à plein régime (100 %). 4.
FR Compensateur de l’aéronef Direction de la dérive Levier de droite Levier de droite Si le nez de l’aéronef dérive à gauche ou à droite lorsque le levier de direction est en position neutre (centrée), appuyez sur les boutons du compensateur de direction comme indiqué dans le tableau vers la droite pour corriger la dérive. L’Ascent MTx peut également être compensé en coudant soigneusement les surfaces de commande moulées dans la queue comme indiqué ci-dessous.
FR Atterrissage 1. Volez dans le sens du vent et réduisez le régime à 25 % pour commencer la descente. 2. Commencez à tourner vers la piste, en allant face au vent. 3. Réduisez le régime à 0 % et descendez sur la piste. • Si vous allez vous poser avant la piste, augmentez un peu le régime pour prolonger la descente. • Si vous allez trop vite pour atterrir, faites demi-tour et recommencez. 1 ATTENTION : N’attrapez jamais un aéronef en plein vol avec les mains.
FR Réparations La mousse peut être réparée avec presque tous les produits adhésifs (colle chaude, colle de cyanoacrylate ordinaire, époxy ou ruban). 1. Pour les petites fissures, utilisez une colle de cyanoacrylate pour colmater le trou 2. Lorsque les pièces ne sont pas réparables, consultez la liste des références des pièces de rechange pour passer vos commandes. Afin d’obtenir la liste complète des pièces de rechange et pièces vendues en option, veuillez consulter la liste au dos de ce manuel.
FR Guide de dépannage Problème L'aéronef ne répond pas à l’émetteur Solution Cause possible Pas de connexion L’émetteur est trop proche de l’aéronef ou les deux sont trop proches d’un grand objet métallique, d’une source sans fil ou d'un autre émetteur lors du raccord de la batterie ou de l’affectation Alimentation faible ou inexistante Mauvaise réponse de l’aéronef à l’émetteur Mauvaise connexion radio L'aéronef tourne dans une direction Mauvais réglage des commandes ou aéronef endommagé Mauvais ré
FR GARANTIE LIMITÉE Ce que couvre cette garantie pas prêt, en tant qu’acheteur ou utilisateur, à accepter ces responsabilités en relation avec l’utilisation du Produit, nous vous demandons de restituer au vendeur le Produit, non utilisé et dans son emballage d’origine. Horizon Hobby, LLC, (Horizon) garantit à l’acheteur original que le produit acheté (le « Produit ») est exempt de tout défaut matériel et de fabrication à la date d’achat.
FR Assurez-vous que votre nom, votre adresse et votre numéro d’autorisation de retour de marchandise sont clairement indiqués sur le carton d’expédition. demande. Vous devez inclure cette demande avec l’article envoyé en réparation. Le devis d’une réparation non couverte par la garantie comprendra la facturation de la main d’œuvre (une demi-heure de travail minimum). Des frais de transport de retour vous seront également facturés.
FR Replacement Parts • Pièces de rechange Part # Description Description RVOF1100 ASCENT MICRO TWIN X RTF ASCENT MICRO TWIN X RTF RVOF1101 REPLACEMENT AIRFRAME: ASCENT MTX FUSELAGE DE RECHANGE : ASCENT MTX PROPS (4 PCS): ASCENT MTX HÉLICES (4 PIÈCES) : ASCENT MTX 300MAH 1S LI-PO: ASCENT MTX LITHIUM-POLYMÈRE 300 MAH 1S : ASCENT MTX DECAL SHEET: ASCENT MTX FEUILLE D’AUTOCOLLANTS : ASCENT MTX RVOF1102 RVOF1103 RVOF1104 RVOF1105 USB 1S LI-PO CHARGER: ASCENT MT CHARGEUR LITHIUM-POLYMÈRE USB 1S :
RVOF1100 © 2017 Horizon Hobby, LLC. Revolution, the Revolution logo, and Ascent are trademarks or registered trademarks of Horizon Hobby, LLC.