
Manual


Digital Video Recorder
35
CLIP-COPY
A–B Clip-Copy
Selecting A–B Clip-Copy will set the starting point of the video to be clip copied, and the
icon displays at the
bottom-left corner of the screen. Selecting A–B Clip-Copy again will set the ending point of the video to be clip
copied and displays the Clip-Copy screen.
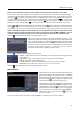
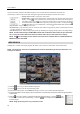
Clip-Copy
Select Clip-Copy, and the Clip-Copy screen appears to allow clip copy setup.
From: Pressing the
button toggles between On and Off. When set
to Off, you can enter a specific Date and Time. When set to On, the
copy will be from the first recorded image.
To: Pressing the
button toggles between On and Off. When set to
Off, you can enter a specific Date and Time. When set to On, the copy
will be to the last recorded image.
Channels: Select the cameras that you would like to include in your
video clip.
Password: Pressing the
button displays a virtual keyboard allowing
you to enter a password for reviewing the video clips.
Dest.: Select the storage device on which you would like to record the
video clip.
CAUTION: The USB device for clip copy must be FAT 16 or FAT32 format.
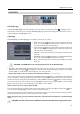
File name: The DVR automatically assigns a file name to the video clip. However, you can give the video clip file
a different name. Pressing the
button displays a virtual keyboard. Enter a file name for the video you are copying
and select Close. The DVR will automatically add “.exe” to the file name.
NOTE: When naming a file, you cannot use the following characters: \, /, :, *, ?, “, <, >, |.
Once you have given the video clip a file name, select Start and press the
button. A confirmation screen displaying
data size will appear. When the storage device does not have enough space, the DVR will ask if you want to copy as
much of the video clip as possible in the available space. Select Continue and press the
button to continue clip copy.
Once the clip copy starts, you can cancel it by selecting Stop or hide the screen by selecting Close. When selecting
Close, Clip Copy continues and a confirmation screen displays when complete.
NOTE: The file size for clip copy is limited to 2GB.
You can use other functions on the DVR while video is being copied. To do this, select Close and press the
button.
You can return to the Clip-Copy screen at any time to check the progress.
You do not need to install any special software on your personal computer to review the video clips. Refer to the Netcon
manual for instructions on how to review video clips you have copied.
NOTE: During Clip Copy, you cannot shut the system down, clear data on the storage device, or format the storage
device.
CAUTION: Do NOT disconnect the USB flash drive from the DVR while copying video clips.