
User guide

Step 1 — Prepare template
Remove template from box and read all instructions carefully. For 12"
or 15" sets, cut off left side of template on the line marked for your set.
Please call 1-800-438-6788 for assistance installing Blum products.
Technical specifications subject to change without notice.
LIT.TBX5500.07.11 © 2011 Blum, Inc. Printed in USA
Do not cut the template for use in an 18" wide cabinet opening
Cut on this line for use in a 15" wide cabinet opening
Cut on this line for use in a 12" wide cabinet opening
FOLD FOLD FOLD FOLD
Centerline for 12" set
Centerline for 18" set
Centerline for 15" set
Centerline for 12" set
Centerline for 18" set
Centerline for 15" set
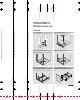
Installation
TANDEMBOX
Waste/recycle set
Step 2 — Mark centerline in cabinet
Using a framing square, mark centerline of cabinet opening. It is
helpful to make a mark that extends 20" into cabinet.
Step 4 — Mark mounting screw locations
Punch eight hole locations marked on the template, pre-boring
through template is not recommended.
Step 3 — Align and secure template
Lay template inside cabinet. Line up fold with the front edge of the
cabinet, then align template on the centerline, front and back.
Taping
template to the cabinet face and bottom is required to keep template
in place while marking the holes.
Step 6 — Attach drawer front to front bracket
Use the specifications and instructions on the reverse side of this
template to attach drawer front and install drawer. Next, open the
drawer and insert your bins. Your waste/recycle drawer is now ready
to use.
Step 5 — Mount the waste/recycle set
Remove template and place cabinet profile set on bottom of cabinet.
Set runners back 4 mm and line up centerline mark on cabinet bottom
with center marks on the metal crossrails. Use a power drill and a
#2x2" (or longer) Phillips bit to secure all eight pre-attached screws.
Step 1 — Prepare template
Remove template from box and read all instructions carefully. For the
12" or 15" sets, cut off the left side of the template on the line marked
for your set.
Please call 1-800-438-6788 for assistance installing Blum products.
Technical specifications subject to change without notice.
LIT.TBX5500.07 .11 ©2011 Blum, Inc. Printed in USA
Do not cut the template for 18" wide cabinet opening
Cut on this dotted line for use in a 15" wide cabinet opening
Cut on this dotted line for use in a 12" wide cabinet opening
FOLD FOLD FOLD FOLD
Centerline for 12" set
Centerline for 18" set
Centerline for 15" set
Centerline for 12" set
Centerline for 18" set
Centerline for 15" set
Installation
TANDEMBOX
Waste/recycle set
Step 2 — Mark centerline in cabinet
Using a square, mark the centerline of the cabinet opening. It is helpful
to make a mark that extends 20" into the cabinet.
Step 4 — Prebore for mounting screws
Punch the eight hole positions marked on the template, preboring
through the template is not recommended.
Step 3 — Align and secure template
Lay the template inside the cabinet. Line up the fold with the front
edge of the cabinet, then align template on the centerline, front and
back.
Taping the template to the cabinet fl oor is required to keep the
template in place while marking the holes.
F
or mark for
1
8" wide cabinet opening
do not cut the
template
Cut on this dott
ed line fo
r use
in a
1
5" wide cabinet opening
Cut on this dot
t
ed line
f
or use in a
12" wide cabinet op
ening
F
OL
D
FO
LD
FOL
D
F
OL
D
Cen
t
erline
f
o
r
12" se
t
Centerline
f
or
1
8" s
e
t
Cen
t
erline
f
or
1
5"
se
t
Centerline
f
o
r
1
2" se
t
Cent
erline
f
or
18
" se
t
Cen
terline
f
or 15
"
se
t
Installation
T
ANDEM plus BL
UM
O
TION
Wa
ste/recy
cle dr
awer se
t
S
tep 2 —
Mar
k
c
en
t
erli
n
e
in
ca
bine
t
Us
i
ng
a
sq
ua
re,
m
a
rk the cent
er
l
i
ne
of
t
he
cab
i
n
et ope
ni
n
g.
I
t
i
s
h
el
pful
t
o
make
a ma
r
k
t
hat
ext
e
nd
s 2
0"
i
nt
o the c
a
b
i
net.
S
te
p
1
—
Pr
e
p
ar
e
te
m
p
l
ate
Pu
nch out th
e
fr
ont
an
d ba
ck
dia
m
o
n
d
s mark
ed
on
t
h
e
c
e
nt
erli
n
e
fo
r
yo
ur
k
i
t
(1
2"
,
15"
or
18"
).
Th
en
, for
t
he
1
2
" o
r
1
5"
k
i
ts
, cu
t
o
f
f
th
e
l
e
ft
si
d
e
on
t
h
e line m
a
rk
ed for
yo
ur
k
i
t.
S
t
ep
4
—
P
r
ebo
r
e
for m
o
unting sc
r
e
ws
Pr
ebor
e
th
e ei
g
ht
h
ol
e
p
o
s
i
t
ion
s
ma
r
k
ed
on t
h
e tem
plate
with
a
2.
5 mm bit.
S
tep
3
—
A
li
gn
an
d
se
c
u
r
e t
e
m
p
l
at
e
La
y
t
he
t
em
plat
e
i
ns
i
de
t
he
cabin
e
t
.
L
i
ne
up t
he
fold w
ith th
e front
e
d
g
e
of the cabi
ne
t
,
t
hen
ali
g
n
te
m
plat
e
o
n
th
e
c
e
nt
erlin
e
, front
an
d
ba
c
k
.
NOTE
:
Ta
p
in
g
it
to
t
he
c
a
b
inet
fl
oo
r ma
y
help
keep
t
h
e
te
mpl
ate
i
n
p
l
ace
wh
ile
prebo
r
in
g the hol
e
s
.
S
t
ep 6
—
I
n
se
rt
th
e
d
r
aw
er
a
n
d b
i
n
s
E
x
te
nd
the
tw
o
r
u
nne
r
s
fu
lly a
n
d
set t
h
e
dr
awer
on
t
op o
f
t
h
e
m
so they
fi
t into the notches in th
e ba
ck
of th
e
drawer
.
C
l
ose t
h
e
d
r
aw
er
co
m
p
le
te
l
y a
nd
lis
t
en
f
or t
he lo
cki
n
g
devi
ces to
e
n
gage
the ru
nn
e
r
s
w
i
t
h
a
“
c
li
ck
.
”
Op
en th
e
d
ra
w
e
r
an
d
in
s
e
r
t
t
he
bin
s.
Yo
u
r
W
a
st
e
/
r
e
cyc
l
e
dr
awer
i
s now
re
a
dy
t
o us
e.
St
ep
5 —
Mount
t
h
e
Wa
s
t
e/r
e
cy
cle d
r
aw
e
r
s
e
t
Re
mo
ve
th
e te
m
p
la
t
e
an
d
p
l
a
c
e
t
he
W
a
st
e/
re
c
y
cl
e
d
r
awer se
t
on the
fl
oor
of
the cabi
net. Set ba
ck
the runner
s 4
m
m
an
d
li
ne
up
t
he
c
e
n
t
er
l
ine ma
rk
on
t
he cabinet
fl
o
or
with
t
he
c
e
n
t
e
r ma
r
k
s
o
n
the me
t
a
l
cros
s rails
.
Use
a
p
o
we
r dr
ill
a
n
d a
#
2x
2
"
(o
r
lon
g
er
)
Phi
l
l
i
ps
b
i
t
t
o
secure
al
l
ei
g
ht
prea
tt
ached
sc
rews
.
P
l
e
a
s
e
ca
l
l
1
-
8
0
0
-
4
3
8
-
6
7
8
8
f
o
r
as
si
s
t
a
n
c
e
i
n
s
t
a
l
l
i
n
g
B
l
u
m
p
r
o
d
u
ct
s
.
T
e
c
h
n
i
c
a
l
s
p
e
ci
fi
c
a
t
i
o
n
s
s
u
b
j
e
c
t
t
o
c
h
a
n
g
e
w
i
t
h
o
u
t
n
o
t
i
ce
.
L
I
T
.
W
R
M
5
0
0
0
.
0
3
.
1
1
©
2
0
1
1
P
r
i
n
t
e
d
i
n
U
S
A
F
o
r
m
a
r
k
f
o
r
1
8
”
w
i
d
e
c
a
b
i
n
e
t
o
p
e
n
i
n
g
d
o
n
o
t
c
u
t
th
e
te
m
p
l
a
t
e
C
u
t
o
n
th
is
d
o
t
t
e
d
l
i
n
e
f
o
r
u
s
e
i
n
a
1
5
”
w
i
d
e
c
a
b
i
n
e
t
o
p
e
n
i
n
g
C
u
t
on
t
h
i
s
d
o
t
t
e
d
l
i
n
e
f
o
r
u
s
e
i
n
a 1
2
”
w
i
d
e
c
a
b
i
n
e
t
o
p
e
n
i
n
g
F
O
L
D
F
O
L
D
F
O
L
D
F
O
L
D
C
e
n
t
er
l
i
n
e
f
or
1
2
"
s
e
t
C
e
n
te
r
l
i
n
e
f
o
r
1
8"
s
e
t
C
e
n
t
e
r
l
i
n
e
f
o
r
1
5
"
s
e
t
C
e
nt
e
r
l
i
ne
f
o
r
1
2
"
s
e
t
C
e
n
t
e
r
l
i
n
e
f
o
r
1
8
"
s
e
t
C
e
n
t
e
r
l
i
n
e
f
o
r
1
5
"
s
e
t
C
u
t
o
u
t
f
o
r
1
8
"
C
u
t
o
u
t
f
o
r
1
5
"
C
u
t
o
u
t
f
o
r
1
2
"
C
u
t
o
u
t
f
o
r
1
8
"
C
u
t
o
u
t
f
o
r
1
5
"
C
u
t
o
u
t
f
o
r
1
2
"
I
nst
a
l
l
at
i
o
n
T
AN
D
EM
plu
s
B
L
U
M
OT
IO
N
Wa
s
t
e
/r
e
cy
c
l
e
d
r
a
w
e
r
s
e
t
S
t
e
p
2
—
M
a
r
k
c
e
n
t
e
r
l
i
n
e
i
n
c
a
b
i
n
e
t
U
s
i
n
g
a
s
q
u
a
r
e
,
m
a
r
k
t
h
e
c
e
n
t
e
r
l
i
n
e
o
f
t
h
e
ca
b
i
n
e
t
o
p
e
n
i
n
g
.
I
t
i
s
h
e
l
p
f
u
l
t
o
m
a
ke
a
m
a
r
k
t
h
a
t
e
x
t
e
n
d
s
2
0
”
i
n
t
o
t
h
e
ca
b
i
n
e
t
.
S
t
e
p
1
—
P
r
e
p
a
r
e
t
e
m
p
l
a
t
e
C
u
t
o
u
t
t
h
e
d
i
a
m
on
d
s
h
a
p
e
s
m
a
r
k
e
d
o
n
t
h
e
ce
n
te
r
l
i
n
e
f
o
r
yo
u
r
ki
t
(
1
2
”
,
1
5
”
o
r
1
8
”
)
.
T
h
e
n
,
f
o
r
t
h
e
1
2
”
o
r
1
5
i
n
c
h
k
it
s
,
cu
t
o
f
f
t
h
e
l
e
f
t
si
d
e
o
n
t
h
e
l
i
n
e
m
a
r
k
e
d
f
o
r
y
o
u
r
k
it
.
S
t
e
p
4
—
P
r
e
b
o
r
e
f
o
r
m
o
u
n
t
i
n
g
s
c
rew
s
P
r
e
b
o
r
e
t
h
e
e
i
g
h
t
h
o
l
e
p
o
s
i
t
i
o
n
s
m
a
r
k
e
d
o
n
t
h
e
t
e
m
p
l
a
t
e
w
i
t
h
a
2
.
5
m
m
b
i
t
.
Ste
p
3
—
A
l
i
g
n
a
n
d
s
e
c
u
r
e
t
e
m
p
l
a
t
e
L
a
y
t
h
e
t
e
m
p
l
a
t
e
o
n
t
h
e
fl
o
o
r
o
f
t
h
e
c
a
b
i
n
e
t
l
i
n
i
n
g
u
p
t
h
e
f
o
l
d
w
i
t
h
t
h
e
f
r
o
nt
e
d
g
e
.
T
h
e
n
a
l
i
g
n
t
e
mpl
a
t
e
o
n
t
he
ce
n
t
e
r
l
i
n
e
,
f
r
o
n
t
a
n
d
b
a
ck
.
O
n
ce
i
t
i
s
i
n
t
h
e
c
o
r
r
e
c
t
p
o
si
t
i
o
n
w
e
s
u
g
g
e
s
t
t
a
p
i
n
g
i
t
d
o
w
n
so
i
t
d
o
e
s
n
’
t
m
o
ve
.
S
t
e
p
6
—
I
n
s
e
rt
d
r
a
w
e
r
a
n
d
b
i
n
s
E
x
t
e
n
d
t
h
e
t
w
o
run
n
e
r
s
f
u
l
l
y
a
n
d
s
e
t
t
h
e
d
r
a
w
e
r
o
n
t
o
p
o
f
t
h
e
m
so
t
h
a
t
t
h
e
y
fi
t
i
n
t
o
t
h
e
n
ot
c
h
e
s
i
n
t
h
e
b
a
ck
o
f
t
h
e
d
r
a
w
e
r
.
C
l
o
s
e
t
h
e
d
r
a
w
e
r
co
m
p
l
e
t
e
l
y
a
n
d
l
i
s
t
e
n
f
o
r
t
h
e
L
o
c
k
i
n
g
d
e
v
i
ce
s
t
o
e
n
g
ag
e
t
h
e
r
u
n
n
e
r
s
w
i
t
h
a
“
c
l
i
ck
.
”
O
p
e
n
t
h
e
d
r
a
w
e
r
a
n
d
i
n
s
e
r
t
t
h
e
b
i
n
s
.
Y
o
u
r
W
a
s
t
e
/
r
e
c
y
cl
e
d
r
a
w
e
r
i
s
n
o
w
r
e
a
d
y
t
o
u
s
e
.
S
t
e
p
5
—
M
o
u
n
t
t
h
e
W
a
s
t
e
/
re
c
y
c
l
e
d
r
a
w
e
r
s
e
t
R
e
mo
v
e
t
h
e
t
e
m
p
l
a
t
e
a
n
d
p
l
a
ce
t
h
e
W
ast
e
/
r
e
cy
cl
e
d
r
a
w
e
r
se
t
o
n
t
h
e
fl
o
o
r
o
f
t
h
e
ca
b
i
n
e
t
.
S
e
t
b
a
c
k
t
h
e
r
u
n
n
e
r
s
4
mm
a
n
d
l
i
n
e
u
p
t
h
e
ce
n
t
e
r
l
i
n
e
m
a
r
k
o
n
t
h
e
c
a
b
i
n
et
fl
o
o
r
w
i
t
h
t
h
e
ce
n
t
e
r
m
a
r
k
s
o
n
t
h
e
m
e
t
a
l
cr
o
s
s
r
a
i
l
s
.
U
s
e
a
p
o
w
e
r
d
r
i
l
l
a
n
d
a
#
2
x
2
”
(
o
r
l
o
n
g
e
r
)
P
h
i
l
l
i
p
s
b
i
t
t
o
s
e
c
u
r
e
a
l
l
e
i
g
h
t
p
r
e
a
t
t
a
c
h
e
d
s
c
r
e
w
s
.
I
ns
t
a
l
l
a
t
i
o
n
T
A
N
D
E
M
p
l
u
s
B
L
U
MO
T
I
O
N
W
a
s
t
e
/
r
e
c
y
c
l
e
d
r
a
w
e
r
s
e
t
S
t
e
p
2
S
t
e
p
1
S
t
e
p
4
S
t
e
p
3
Ste
p 6
S
t
e
p
5
P
le
a
s
e
c
a
1-
800
-
4
3
8
-6
7
8
8 fo
r
a
s
s
i
s
ta
n
c
e
i
n
st
a
l
lin
g
B
l
um
pr
o
d
u
cts
.
Tec
hn
i
ca
l sp
e
c
i
fi
c
a
t
io
n
s
sub
j
ec
t
t
o
c
h
an
g
e
w
ith
o
u
t no
t
ic
e
.
LI
T
.
W
R
M5
0
0
0.03
.1
1
©
2
01
1
Pr
in
t
e
d
in
U
SA
F
o
r
m
a
r
k
f
o
r
1
8
”
w
i
d
e
c
a
b
i
n
e
t
o
p
e
n
i
n
g
d
o
n
o
t
c
u
t
t
h
e
t
e
m
p
l
at
e
C
u
t
o
n
t
h
i
s
d
ot
t
e
d
l
i
n
e
f
o
r
u
s
e
i
n
a
1
5
”
w
id
e
ca
b
i
n
e
t
o
p
e
n
i
n
g
C
u
t
o
n
t
h
is
d
o
t
t
e
d
l
i
n
e
f
o
r
u
s
e
in
a
1
2
”
w
i
d
e
c
a
b
in
e
t
o
p
e
n
in
g
F
O
L
D
F
O
L
D
F
O
L
D
F
O
L
D
C
e
n
te
r
lin
e
f
o
r
1
2
"
s
e
t
C
e
n
te
rl
in
e
fo
r
1
8
"
s
e
t
C
e
n
t
e
rli
n
e
fo
r
1
5
"
s
e
t
C
e
n
t
e
r
l
i
n
e
fo
r
12
"
s
e
t
C
e
n
t
e
r
l
in
e
f
o
r
1
8
"
s
e
t
C
e
n
te
r
l
in
e
f
o
r
1
5
"
s
et
F
O
L
O
L
O
O
L
D
O
O
L
O
L
L
L
D
F
O
L
O
L
O
O
L
D
O
O
L
O
L
L
L
D
F
or mark
f
or 1
8" wide
cabinet openin
g do not cut the
te
mpla
te
Cut on this dott
ed line
f
or u
se in a 1
5" wide cabinet openin
g
Cut on this dot
t
e
d line
f
or use in a
1
2" wide cabinet ope
ning
F
OLD
FO
LD
FO
LD
F
O
LD
Cent
erline f
o
r
1
2"
se
t
Cent
er
l
ine
f
or
1
8" s
e
t
C
e
nterline
f
or
1
5
"
se
t
Cent
erline
f
or
1
2
"
se
t
Cent
erline
f
or
18
" s
e
t
Centerline
f
or
1
5
" se
t
Installation
T
ANDEM plus BL
UM
O
TION
Wa
st
e/
re
cy
cle dr
awer se
t
Ste
p
2
—
M
ark ce
n
te
rl
i
ne in
c
ab
in
e
t
U
s
i
n
g
a
s
q
u
ar
e
,
m
a
rk
th
e
ce
n
t
erli
n
e of
th
e
c
a
b
i
n
e
t
o
pen
i
n
g
.
It
is
hel
pful
to
ma
ke
a
ma
rk
th
a
t
ex
te
n
d
s
20"
i
nt
o
t
h
e
c
a
bi
net.
St
e
p
1
—
P
r
e
p
a
r
e te
m
plate
P
u
n
ch
out
t
h
e
f
ro
n
t
an
d
b
a
c
k
di
amo
nds
m
a
rk
ed
o
n
th
e
c
e
n
t
er
li
ne fo
r
y
o
ur
k
i
t
(
1
2",
1
5
"
o
r
1
8
"
)
. Then
,
for the
1
2
"
or
15
"
ki
t
s
,
c
u
t
o
f
f
the le
ft
si
d
e
on
the
l
i
n
e ma
r
k
ed
f
o
r
y
o
ur
ki
t.
S
t
ep
4
—
Pr
e
b
or
e
for
m
o
u
nt
in
g
s
c
re
ws
Pr
e
bo
r
e
th
e
ei
g
ht hole pos
i
t
i
o
ns
m
ar
ked
on
th
e
t
em
pl
a
te wi
t
h
a
2.
5
m
m
bi
t.
Ste
p
3
—
A
l
i
g
n
a
nd
secu
r
e
te
m
p
la
t
e
La
y the te
m
p
late inside t
h
e
c
ab
i
net
.
Line
up t
he
f
o
l
d
w
i
t
h the
f
ro
n
t
e
d
ge
of
t
h
e
ca
b
i
net, t
h
en
al
i
gn
te
m
p
la
te
on
t
h
e
c
e
nt
erl
i
n
e
,
f
ro
n
t
an
d
b
ack.
NO
T
E
:
Ta
pi
ng
it
to
the
c
ab
i
ne
t
fl
oor
m
a
y hel
p
k
ee
p
th
e
te
mpl
a
t
e
in
pl
ac
e
w
h
ile
p
r
ebo
r
in
g
t
he
hol
es
.
Step
6
—
Inse
rt
t
he
d
r
aw
er and bins
Ex
te
nd
t
h
e
tw
o r
unn
e
r
s
f
u
l
l
y a
n
d set the
d
r
awe
r
on
t
op
o
f th
e
m
s
o
t
hey
fi
t
i
nto
t
he
n
otches in th
e
b
a
ck
of
t
he dr
a
w
er
. Cl
os
e
t
h
e
draw
e
r
c
o
m
p
l
e
t
e
l
y
and
lis
t
en
f
o
r
t
he
lo
c
k
i
n
g
d
e
vi
ce
s
t
o
engage t
h
e
r
u
n
ne
r
s
with
a
“
c
l
i
ck
.
”
O
p
en
t
he
dra
wer
and
inse
r
t
t
h
e
bin
s.
Y
o
u
r
Wa
st
e/
r
e
cy
c
le
dr
aw
e
r is
no
w
ready
t
o
u
s
e.
Ste
p 5
—
Mount
th
e
Wa
s
te
/r
e
c
y
c
l
e
d
r
aw
e
r
s
e
t
R
e
mo
ve
the
t
em
p
late
an
d
plac
e
the
Wa
st
e
/r
e
cy
c
l
e
d
r
awer
se
t
on
the
fl
oo
r
of
t
he
ca
bi
n
et.
S
e
t
b
a
c
k
t
he
r
unner
s 4
m
m
an
d l
i
ne
u
p
the
cent
e
r
l
i
n
e
m
a
r
k
on the
c
a
b
i
net
fl
oor
w
ith t
he cent
er
ma
rk
s on
th
e
metal
cr
os
s ra
i
ls
.
Use a
p
o
wer dr
il
l
an
d
a
#
2x
2
"
(o
r long
er
)
Ph
illi
ps
b
i
t
t
o
s
e
cure al
l
ei
gh
t
prea
tt
a
c
h
e
d sc
re
ws
.
P
l
e
a
s
e
c
a
l
l
1
-
8
0
0
-
4
3
8
-
6
7
8
8
f
o
r
a
s
s
i
s
t
a
n
c
e
i
n
s
t
a
l
l
i
n
g
B
l
u
m
p
r
o
d
u
ct
s.
T
e
c
h
n
i
ca
l
s
p
e
ci
fi
ca
t
i
o
n
s
su
b
j
e
c
t
t
o
c
h
a
n
g
e
w
i
t
h
o
u
t
n
o
t
i
c
e
L
I
T
.
W
R
M
5
0
0
0
.
0
3
.
1
1
©
2
0
1
1
P
r
i
n
t
e
d
i
n
U
S
A
F
o
r
m
a
r
k
f
o
r
1
8
”
w
i
d
e
c
a
b
i
n
e
t
o
p
e
n
i
n
g
d
o
n
o
t
c
u
t
t
h
e
te
m
p
l
a
t
e
C
u
t
o
n
t
h
i
s
d
o
t
t
e
d
l
i
n
e
f
o
r
u
s
e
i
n
a
1
5
”
w
i
d
e
c
a
b
i
n
e
t
o
p
e
n
i
n
g
C
u
t
o
n
t
h
i
s
d
o
t
t
e
d
l
i
n
e
f
o
r
u
s
e
i
n
a
1
2
”
w
i
d
e
c
a
b
i
n
e
t
o
p
e
n
i
n
g
F
O
L
D
F
O
L
D
F
O
L
D
F
O
L
D
C
e
n
t
er
l
i
n
e
f
o
r
1
2
"
s
e
t
C
e
n
t
er
l
i
n
e
f
o
r
1
8
"
s
e
t
C
e
n
t
er
l
i
n
e
f
o
r
1
5
"
s
e
t
C
e
n
t
e
r
l
i
n
e
f
o
r
1
2
"
s
e
t
C
e
n
t
e
r
l
i
n
e
f
o
r
1
8
"
s
e
t
C
e
n
t
e
r
l
in
e
f
o
r
1
5
"
s
e
t
C
u
t
o
u
t
f
o
r
1
8
"
C
u
t
o
u
t
f
o
r
1
5
"
C
u
t
o
u
t
f
o
r
12
"
C
u
t
o
ut
f
o
r
1
8
"
C
u
t
o
u
t
f
o
r
1
5
"
C
u
t
o
u
t
f
o
r
12
"
I
n
s
t
a
ll
a
t
i
on
T
AN
D
EM
pl
u
s B
L
U
M
O
T
IO
N
W
a
s
t
e
/
r
e
c
y
c
l
e
d
r
awe
r
s
e
t
S
t
e
p
2
—
M
a
rk
c
e
n
t
e
r
l
i
n
e
i
n
c
a
b
i
n
e
t
U
si
n
g
a
sq
u
a
r
e
,
m
a
r
k
t
h
e
c
e
n
t
e
r
l
i
n
e
o
f
t
h
e
c
a
b
i
n
e
t
o
p
e
n
i
n
g
.
I
t
i
s
h
e
l
p
f
u
l
t
o
ma
ke
a
m
a
r
k
t
h
a
t
e
x
t
e
n
d
s
2
0
”
i
n
t
o
t
h
e
c
a
b
i
n
e
t
.
S
t
e
p
1
—
P
r
e
p
a
r
e
t
e
m
p
l
a
t
e
C
u
t
o
u
t
t
h
e
d
i
a
m
o
n
d
sh
a
p
e
s
m
a
r
k
e
d
o
n
t
h
e
ce
n
t
e
r
l
i
n
e
f
o
r
yo
u
r
k
i
t
(
1
2
”
,
1
5
”
o
r
1
8
”
)
.
T
h
e
n
,
f
o
r
t
h
e
1
2
”
o
r
1
5
i
n
c
h
ki
t
s
,
c
u
t
o
f
f
t
h
e
l
e
f
t
s
i
d
e
o
n
t
h
e
l
i
n
e
m
a
r
k
e
d
f
o
r
yo
u
r
k
it
.
S
t
e
p
4
—
P
re
b
o
r
e
f
o
r
mo
u
n
t
i
n
g
s
c
re
w
s
P
r
e
b
o
r
e
t
h
e
e
i
g
h
t
h
o
l
e
p
o
si
t
i
o
n
s
m
a
r
k
e
d
o
n
t
h
e
t
e
m
p
l
a
t
e
w
i
t
h
a
2
.
5
m
m
b
i
t
.
S
t
e
p
3
—
A
l
i
g
n
a
n
d
s
e
c
u
re
t
e
mp
l
a
t
e
L
a
y
t
h
e
t
e
m
p
l
a
t
e
o
n
t
h
e
fl
o
o
r
o
f
t
h
e
ca
b
i
n
e
t
l
i
n
i
n
g
u
p
t
h
e
f
o
l
d
w
i
t
h
t
h
e
fr
o
n
t
e
d
g
e
.
T
h
e
n
a
l
i
g
n
t
e
mp
l
a
t
e
o
n
t
h
e
c
e
n
t
e
r
l
i
n
e
,
f
r
o
n
t
an
d
b
a
c
k
.
O
n
ce
i
t
i
s
i
n
t
h
e
c
o
r
r
e
c
t
p
o
si
t
i
o
n
w
e
su
g
g
e
s
t
t
a
p
i
n
g
i
t
d
o
w
n
s
o
i
t
d
o
e
sn
’
t
m
o
v
e
.
S
t
e
p
6
—
I
n
s
e
rt
d
ra
w
e
r
a
n
d
b
i
n
s
E
x
t
e
n
d
t
h
e
t
w
o
r
u
n
n
e
r
s
f
u
l
l
y
a
n
d
se
t
t
h
e
d
r
a
w
e
r
o
n
t
o
p
o
f
t
h
e
m
s
o
t
h
a
t
t
h
e
y
fi
t
i
n
t
o
t
h
e
n
o
t
c
h
e
s
i
n
t
h
e
b
a
ck
o
f
t
h
e
d
r
a
w
e
r
.
C
l
o
s
e
t
h
e
d
r
a
w
e
r
c
o
m
p
l
e
t
e
l
y
a
n
d
l
i
s
t
e
n
f
o
r
t
h
e
L
o
c
k
i
n
g
d
e
v
i
ce
s
t
o
e
n
g
a
g
e
t
h
e
r
u
n
n
e
r
s
w
i
t
h
a
“
cl
i
c
k
.
”
O
p
e
n
t
h
e
d
r
a
w
e
r
a
n
d
i
n
s
e
r
t
t
h
e
b
i
n
s
.
Y
o
u
r
W
a
s
t
e
/
r
e
c
y
cl
e
d
r
a
w
e
r
i
s
n
o
w
r
e
a
d
y
t
o
u
s
e
.
S
t
e
p
5
—
M
o
u
n
t
t
h
e
W
a
s
t
e
/
r
e
c
y
c
l
e
d
r
a
w
e
r
s
e
t
R
e
m
o
v
e
t
h
e
t
e
mp
l
a
t
e
a
n
d
p
l
a
c
e
t
h
e
W
a
st
e
/
r
e
cy
cl
e
d
r
a
w
e
r
s
e
t
o
n
t
h
e
fl
o
o
r
o
f
t
h
e
c
a
b
i
n
e
t
.
S
e
t
b
a
c
k
t
h
e
r
u
n
n
e
r
s
4
m
m
a
n
d
l
i
n
e
u
p
t
h
e
ce
n
t
e
r
l
i
n
e
m
a
r
k
o
n
t
h
e
c
a
b
i
n
e
t
fl
o
o
r
w
i
t
h
t
h
e
c
e
n
t
e
r
m
a
r
k
s
o
n
t
h
e
m
et
a
l
c
r
o
s
s
r
a
i
l
s
.
U
s
e
a
p
o
w
e
r
d
r
i
l
l
a
n
d
a
#
2
x
2
”
(
o
r
l
o
n
g
e
r
)
P
h
i
l
l
i
p
s
b
i
t
t
o
se
cu
r
e
a
l
l
e
i
g
h
t
p
r
e
a
t
t
a
c
h
e
d
s
cr
e
w
s
.
I
ns
t
a
l
l
a
ti
o
n
T
A
N
D
E
M
p
l
u
s
B
L
U
M
O
T
I
O
N
W
a
s
t
e
/
r
e
c
y
c
l
e
d
r
a
w
e
r
s
e
t
S
t
e
p
2
S
t
e
p
1
S
t
e
p
4
S
t
e
p
3
Ste
p
6
S
t
e
p
5
P
le
a
s
e
c
1-
800
-
4
3
8
-6
7
8
8 fo
r
a
s
s
ista
n
ce
in
st
a
llin
g
B
l
um
pr
o
d
u
cts
.
Tec
hn
i
ca
l sp
e
c
i
fic
a
t
io
n
s
su
b
j
ec
t
t
o
c
h
an
g
e
wi
t
h
o
u
t no
t
i
c
e
.
LI
T
.
W
R
M5
0
0
0.03
.1
1
©
2
01
1
Pr
i
n
t
e
d
in
U
SA
F
o
r
m
a
r
k
f
o
r
1
8
”
w
i
d
e
c
a
b
i
n
e
t
o
p
e
n
i
n
g
d
o
n
o
t
c
u
t
t
h
e
t
e
m
p
l
a
t
e
C
u
t
o
n
t
h
i
s
d
o
t
t
e
d
l
in
e
f
o
r
u
s
e
i
n
a
1
5
”
w
id
e
c
a
b
i
n
e
t
o
p
e
n
i
n
g
C
u
t
o
n
t
h
is
d
o
t
t
e
d
l
i
n
e
f
o
r
u
s
e
i
n
a
1
2
”
w
i
d
e
c
a
b
i
n
e
t
o
p
e
n
in
g
F
O
L
D
F
O
L
D
F
O
L
D
F
O
L
D
C
e
n
te
rl
in
e
f
o
r
1
2"
s
e
t
C
e
n
te
rl
in
e
f
o
r
1
8
"
s
e
t
C
e
n
t
e
r
li
n
e
fo
r
1
5
"
s
e
t
C
e
n
t
e
r
l
i
n
e
fo
r
1
2
"
s
e
t
C
e
n
t
e
r
l
i
n
e
f
o
r
1
8
"
s
e
t
C
e
n
te
r
l
in
e
f
o
r
1
5
"
s
e
t
F
O
L
O
L
O
O
L
D
O
O
L
O
L
L
L
D
F
O
L
O
L
O
L
D
L
O
L
L
L
D
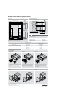
Step 6 — Attach drawer front to front bracket
Use the specifications and instructions on the reverse side of this
template to attach drawer front and install drawer. Next, open the
drawer and insert your bins. Your waste/recycle drawer is now ready
to use.
Step 5 — Mount the waste/recycle set
Remove template and place cabinet profile set on bottom of cabinet.
Set runners back 4 mm and line up centerline mark on cabinet bottom
with center marks on the metal crossrails. Use a power drill and a
#2x2" (or longer) Phillips bit to secure all eight pre-attached screws.
For mark f
or 18" wide cabinet opening do not cut the template
Cut on this dotted line for use in a 15" wide cabinet opening
Cut on this dott
ed line f
or use in a 1
2" wide cabinet opening
FOLD FOLD FOLD FOLD
Cent
erline for 1
2" se
t
Cent
erline for 18" set
Cent
erline for 15" set
Centerline for 12" set
Centerline for 18" se
t
Centerline for 15" set
Installation
TANDEMBOX
Waste/recycle drawer set
Step 2 — Mark centerline in cabin
e
t
Using a square, ma
rk the
centerline of the
cabi
net openin
g. It is helpful
to ma
ke a ma
rk that extends 20" into the
cabinet.
Step 1
— Prepar
e te
mplate
Punch out the front and back diamonds mark
ed
on the centerline for
yo
ur ki
t (1
2", 15" or 18
"). Then
, for the
12" or 15
"
kits, cu
t off the le
ft
side on the line ma
rked
for yo
ur kit.
Step 4 — Pr
ebor
e for mounting screws
Pr
ebore the eight hole positions mark
ed on the template with a
2.
5 mm bit.
Step 3 — Align and secure template
La
y the template inside the cabi
net. Line up the fold with the front
edge of the cabinet, then align template on the
centerline
, front and
back.
NOTE: Taping it
to the cabinet fl
oor may help keep the template in
place wh
ile prebor
in
g the holes.
Step 6 — Insert the dr
aw
er and bins
Ex
tend the two runners fully an
d set the drawer on top of them so they
fi t into the notches in the ba
ck of the drawer. Close the drawer
comple
tely and list
en for the lockin
g devi
ces to engage the runners
with a
“c
li
ck
.” Open the drawer and inse
rt the bins. Your
Waste/
recy
cle
drawer is now ready to use.
Step 5 — Mount the
Wa
ste/recycle dr
aw
er set
Remove the template an
d place the
Waste/recy
cl
e drawer set on the
fl
oor of the cabi
net. Set back the runner
s 4 mm and line up the
ce
nterline mark
on the cabi
net fl
oor with the cent
er mark
s on the metal
cross rails. Use a power drill and a
#2x2" (or longer) Philli
ps
bit to
secure all eight preatt
ached screws.
P
lea
se call 1-
800-
43
8-6
7
88
f
or
a
s
si
stance instal
l
i
n
g Bl
u
m
p
r
oduct
s.
Tec
hnical
specifications
subject to
c
h
a
nge
with
out
n
otice.
LIT.
WR
M
5
000
.
0
3.
11
©2
0
1
1
Printed in
USA
F
or mark
f
or
1
8
”
wide cabinet opening do not cut the
t
e
mplat
e
Cut on
this d
ott
ed line
fo
r
us
e in a
1
5
”
wide cabinet opening
Cut on th
i
s dott
ed line f
or use in a
1
2
”
wi
de c
abinet opening
F
OLD
F
OLD
F
OLD
F
OLD
Cen
t
erline
f
or
1
2" se
t
Cent
e
rlin
e
f
or
1
8
" se
t
Cent
erline
f
or
1
5"
s
e
t
Cent
erline
f
o
r
1
2"
s
e
t
Cen
t
erl
i
ne
f
or
1
8"
se
t
Cen
t
erl
ine
f
or
1
5" s
e
t
Cut o
ut
f
or
18
"
Cu
t out
for
15
"
Cu
t out
for
12
"
Cu
t
ou
t
f
or
18
"
Cut ou
t
f
o
r
15
"
Cut
out
f
o
r
12
"
Installation
T
ANDEM plus BL
UMOTION
Wa
st
e/recycle draw
er se
t
Step 2
—
M
ark centerl
i
ne
i
n cabine
t
U
s
ing
a sq
ua
r
e
,
ma
rk
the
ce
nt
erl
ine
of
t
h
e
cabi
net ope
n
i
n
g
.
I
t
is
helpf
ul
to ma
ke a ma
rk
t
hat
ex
t
e
nd
s 20
”
into
the
cabi
net.
St
ep 1
—
P
r
epar
e
te
mplate
Cut out
the diamo
n
d sh
ape
s
ma
rk
e
d
on the
ce
nt
erline
f
o
r
yo
ur
k
i
t
(1
2
”
,
15
”
or 18
”
)
. Then
,
for the
12
”
or
15
inch
kit
s
,
cu
t
of
f t
he le
ft
side
o
n
the
line ma
rk
ed
for
yo
u
r
ki
t.
Step
4
—
Pr
ebo
r
e fo
r
mountin
g
sc
re
w
s
Pr
ebo
r
e
t
he
eight hole positions mar
k
ed
on
the
t
e
mpl
ate
with a
2.
5 mm bit.
Ste
p 3
—
Align
and secure
templat
e
L
a
y t
h
e t
e
m
p
la
te on t
h
e
fl
o
or
of th
e
cabi
net lini
ng up
th
e
f
old with th
e
f
ro
nt
ed
g
e
.
Th
e
n
al
i
g
n
temp
lat
e on the
ce
nt
e
rl
ine
, f
ront a
n
d ba
ck
.
Once i
t is
in t
he
co
rrect
p
osit
ion
w
e
su
g
ges
t ta
pi
ng i
t
d
o
w
n
so it
doe
sn
’
t
mo
ve
.
Ste
p
6
—
Ins
e
rt
draw
er and bi
n
s
E
x
te
nd the
t
w
o runner
s
f
ully and set the drawe
r on top of
them so tha
t
t
h
e
y
fi
t
into th
e notc
hes
i
n th
e ba
ck
of
the
draw
e
r
.
Close
the
d
ra
wer
co
mple
te
ly and
li
sten fo
r the
Lo
c
k
in
g
devi
ce
s
to engage t
h
e runne
r
s
with
a
“
cli
ck
.
”
Op
e
n the dr
awer and
inse
rt
t
h
e
bi
ns
.
Yo
ur
W
a
st
e/
re
cy
c
le
dr
awer is
now re
a
dy to us
e
.
Step 5
—
Mount the
Wa
ste
/r
ec
ycl
e dr
awer se
t
Re
mo
v
e
t
he
t
empl
ate
and pla
c
e the
W
a
st
e
/
re
cy
cl
e
d
raw
e
r set
on
the
fl
oor of t
h
e
cabi
ne
t
. Se
t ba
ck the runners
4
mm an
d line up the
ce
nt
e
rline
ma
rk
on
t
he
cabi
n
et
fl
oor wi
th the
cent
er ma
rk
s on
the meta
l
cross
rails. Us
e
a
p
o
wer dr
ill an
d a
#2x2
”
(o
r l
o
nger
)
Ph
illips
bit
to
secu
re all
eight
pr
eatt
ach
e
d screw
s
.
I
n
sta
l
lat
i
o
n
T
A
N
D
EM
plus
BL
U
M
O
T
I
O
N
Wa
s
t
e/
r
e
c
yc
le
d
r
a
w
er
se
t
St
ep
2
St
ep
1
S
te
p
4
S
t
ep
3
S
t
e
p
6
S
te
p
5
Please c
a
1
-
8
0
0-43
8-
67
8
8
f
o
r
a
s
s
is
t
an
c
e
i
n
s
ta
l
li
n
g
Bl
u
m
p
r
od
u
c
t
s
.
T
e
c
h
n
i
c
a
l
s
pe
ci
fi
cation
s
s
u
bj
e
ct
to
ch
a
nge
w
it
h
o
u
t
n
o
tice
.
L
I
T
.WR
M
500
0
.
0
3
.
1
1
©2
0
1
1
P
rinted
i
n
U
S
A
F
o
r
ma
r
k
fo
r
1
8
”
wi
d
e
ca
b
in
e
t
o
p
e
ning
d
o
no
t
c
u
t the
te
m
p
la
t
e
Cu
t
o
n
th
is
d
ott
e
d
l
ine
fo
r
u
se
i
n
a
1
5
”
w
i
d
e cabi
ne
t
ope
n
i
ng
C
ut on
th
i
s
d
o
t
t
ed
l
i
ne
fo
r
u
se
i
n
a
1
2”
w
i
d
e
cabine
t
o
p
en
i
n
g
F
OL
D
F
OL
D
F
OL
D
F
OL
D
Cen
t
e
r
l
i
n
e
f
o
r
1
2
"
s
e
t
C
en
t
e
r
l
i
n
e
f
o
r
1
8"
se
t
C
en
t
e
r
l
i
n
e
f
o
r
1
5
"
se
t
C
e
n
t
e
r
li
ne
f
o
r
1
2
"
s
e
t
Ce
nt
e
rl
in
e
f
o
r
1
8"
s
e
t
Ce
n
t
er
l
i
n
e
f
or
1
5
"
se
t
F
OL
OL
O
OL
D
O
OL
OL
L
LD
F
OL
OL
O
OLD
O
OL
OL
L
LD
For mark f
or 18" wide cabinet opening do not cut the template
Cut on this dotted line for use in a 15" wide cabinet opening
Cut on this dott
ed line f
or use in a 1
2" wide cabinet opening
FOLD FOLD FOLD FOLD
Cent
erline for 1
2" se
t
Cent
erline for 18" set
Cent
erline for 15" set
Centerline for 12" set
Centerline for 18" se
t
Centerline for 15" set
Installation
TANDEMBOX
Waste/recycle drawer set
Step 2 — Mark centerline in cabin
e
t
Using a square, mark the
centerline of the
cabi
net openin
g. It is helpful
to ma
ke a ma
rk that extends 20" into the
cabinet.
Step 1
— Prepar
e te
mplate
Punch out the front and back diamonds mark
ed
on the centerline for
yo
ur
ki
t (1
2", 15" or 18
"). Then, for the
12" or
15
"
kits, cu
t off the le
ft
side on the line ma
rked
for yo
ur kit.
Step 4 — Pr
ebor
e for mounting screws
Pr
ebore the eight hole positions mark
ed on the template with a
2.
5 mm bit.
Step 3 — Align and secure template
La
y the template inside the cabi
net. Line up the fold with the front
edge of the cabinet, then align te
mplate on the
centerline
, front and
back.
NOTE: Taping it
to the cabinet fl
oor may help keep the template in
place wh
ile prebor
in
g the holes.
Step 6 — Insert the dr
aw
er and bins
Ex
tend the two runners fully an
d set the drawer on top of them so they
fi t into the notches in the ba
ck of the drawer. Close the drawer
comple
tely and list
en for the lockin
g devi
ces to engage the runners
with a
“cli
ck
.” Open the drawer and inse
rt the bins. Your
Waste/
recy
cle
drawer is now ready to use.
Step 5 — Mount the
Wa
ste/recycle dr
aw
er set
Remove the template an
d place the
Waste/recy
cl
e drawer set on the
fl
oor of the cabi
net. Set back the runner
s 4 mm and line up the
ce
nterline mark
on the cabi
net fl
oor with the cent
er mark
s on the metal
cross rails. Use a power drill and a
#2x2" (or longer) Philli
ps
bit to
secure all eight preatt
ached screws.
Please
c
a
ll
1
-
800-4
38
-6
7
8
8
fo
r
a
s
si
s
tance inst
a
l
l
i
n
g Bl
u
m
p
r
o
du
c
t
s.
T
ec
h
n
ica
l
spe
cifica
ti
o
ns
subje
c
t t
o
c
h
a
nge without
not
ice.
LI
T
.
WR
M
5
0
00
.
0
3
.
11
©2
0
11
P
r
inted in
USA
F
or
mark
f
or
1
8
”
wide cabinet opening
do not cut
the
t
emplat
e
Cut on
t
his d
o
tt
ed
line
f
o
r
use in
a
1
5
”
wide cabinet opening
Cut on t
h
i
s dott
ed li
n
e f
o
r use
i
n a
1
2
”
wide cabinet opening
F
OLD
F
O
L
D
F
OLD
F
O
LD
Cen
t
erline
f
or
1
2" se
t
C
ent
erline
f
or
1
8" se
t
Cent
erline
f
or
1
5" se
t
C
ent
e
rlin
e
f
or
1
2"
se
t
Cen
t
erli
ne
f
or
1
8
"
se
t
Cen
t
erl
ine
f
or
1
5"
s
e
t
Cut ou
t
f
o
r
18
"
C
ut out
for
15
"
Cut ou
t
for
12
"
Cut
ou
t
f
or
1
8
"
Cut ou
t
fo
r
15
"
Cut
out
f
o
r
12
"
Installation
T
ANDEM plus BL
UMOTION
Wa
st
e/recy
cle draw
er se
t
Step
2
—
M
a
r
k cen
ter
l
i
ne
i
n ca
bin
e
t
Us
ing
a
sq
uar
e
,
ma
rk
t
h
e
ce
n
t
e
rl
ine of
t
he
ca
bi
net
op
e
nin
g.
I
t
i
s
h
elpf
ul
to
ma
ke
a
m
a
rk
t
h
at
ex
t
e
nd
s 20
”
into
t
he
cabi
ne
t
.
Step
1
—
Pr
epar
e
tem
p
l
a
te
Cut out
the
di
a
mo
n
d sh
ap
e
s
ma
rk
ed
on
t
he
ce
nt
erline
f
o
r
y
o
u
r
k
i
t
(1
2
”
,
1
5
”
or
1
8
”
)
. Th
en
,
for the
1
2
”
or
1
5
inch
kit
s
,
c
u
t
of
f th
e
le
ft
side
o
n the
lin
e ma
rk
e
d
f
or
y
o
u
r
ki
t.
Step
4
—
Pr
e
b
or
e
fo
r
mounting sc
re
ws
Pr
ebore
t
h
e
ei
g
ht
h
ole posi
t
ions mark
e
d
on
the t
empla
te with a
2.
5
mm b
it
.
Step
3
—
Ali
g
n
an
d s
ecu
re
temp
l
at
e
La
y
t
h
e
tem
p
late
on t
h
e
fl
oor
of the
ca
bi
net linin
g u
p the
f
old
w
ith
t
he
f
ro
n
t
ed
ge
.
Th
e
n ali
g
n
temp
late
on t
h
e
ce
nt
e
rline
,
f
ro
nt an
d ba
ck
.
O
n
ce it is
i
n t
he
co
rre
c
t
po
sit
ion
we
su
gge
s
t
tapi
ng
i
t
d
o
w
n
so
it
doe
sn
’
t
m
o
ve
.
Ste
p 6
—
Inse
rt
d
r
a
w
er and
bi
n
s
Ex
t
e
nd
the
t
w
o runne
r
s
f
ully an
d se
t
the d
ra
w
e
r on
top
of
t
h
e
m
so
t
h
a
t
th
ey
fi
t
in
t
o
th
e notche
s
in the ba
c
k
of
the
dra
w
e
r
. Clo
se
t
he
d
raw
er
co
m
ple
t
e
ly an
d list
en
for t
h
e
Lo
c
k
in
g
de
vi
ce
s
to
e
n
gage
t
he
ru
n
ne
r
s
with
a
“
cli
ck
.
”
O
p
en t
h
e
d
r
aw
er and
inse
rt
t
he
b
i
ns.
Yo
ur
Wa
st
e
/
re
cy
cle
dr
aw
er is
now ready to us
e.
S
t
ep
5
—
M
o
un
t
th
e
W
aste/rec
y
c
l
e dr
a
wer se
t
Re
mo
ve
t
h
e
t
empla
t
e
and
plac
e
t
he
W
a
st
e/
re
cy
cl
e
drawer set
on th
e
fl
oo
r of
the
cabi
n
e
t
.
Set b
a
ck
th
e
ru
nn
e
rs 4 m
m an
d line
u
p t
h
e
c
e
nt
erline
ma
rk
o
n
t
he
cab
ine
t
fl
oor wi
t
h the
ce
n
t
er ma
rk
s on
the
metal
cross
rails
. U
se
a
po
w
er dr
ill an
d
a
#
2x2
”
(o
r
lo
n
ger
)
Ph
illips
bit to
s
ecure all
e
ight
p
r
ea
t
t
ache
d
screw
s
.
I
n
st
a
l
lat
i
o
n
T
A
N
D
E
M
plus
BL
U
MO
TI
O
N
Was
t
e/
r
ec
y
cle
d
r
aw
er
s
e
t
St
ep
2
Step
1
S
te
p
4
S
t
ep
3
S
t
e
p
6
S
te
p
5
Please
c
a
1
-
8
0
0-
438
-
67
8
8
f
o
r
a
s
s
is
t
an
c
e
i
n
s
t
a
l
l
i
n
g
Bl
u
m
p
r
od
u
c
t
s.
T
e
c
h
n
ic
a
l
s
pe
ci
fi
cat
ion
s
s
u
bj
e
ct
t
o
ch
a
nge
w
it
h
o
u
t
n
o
t
ic
e
.
L
IT.WR
M
500
0
.
0
3
.
1
1
©2
0
1
1
P
rint
ed
i
n
U
S
A
F
o
r
m
a
r
k
fo
r
1
8
”
wi
d
e
ca
b
in
e
t
o
p
e
n
ing
d
o
no
t
c
u
t
t
he
t
e
m
p
la
t
e
Cu
t
o
n
t
h
is
d
ot
t
e
d
l
ine fo
r
u
se
i
n
a
1
5
”
w
i
d
e cabi
n
e
t ope
n
i
ng
C
ut
on
th
i
s
d
o
t
t
ed
l
i
ne
f
o
r
u
se
i
n
a
1
2”
w
i
d
e
cabine
t
o
p
en
i
n
g
F
OL
D
F
OL
D
F
OL
D
F
O
L
D
Cen
t
e
r
l
i
n
e
f
o
r
1
2
"
s
e
t
C
en
t
e
r
l
i
n
e
f
o
r
1
8"
s
e
t
C
en
t
e
r
l
i
n
e
f
o
r
1
5
"
se
t
C
e
n
t
e
r
li
ne
f
o
r
1
2
"
s
e
t
Ce
nt
e
rl
in
e
f
o
r
1
8"
s
e
t
Ce
n
t
e
r
l
i
n
e
f
o
r
1
5
"
se
t
F
OL
OL
O
OL
D
O
OL
OL
L
LD
F
OL
OL
O
OLD
O
OL
OL
L
LD