
Door Mount Installation


Step 7
Take Dimension C (from Step 4)
and divide it by two. Measure this
distance to the left of the center point
on the inside of the cabinet door and make a
vertical line. Measure this
distance to the right of the center
point on the inside of the cabinet
door and make another vertical line
(See illustration 6)
Step 8
Remove Door Brackets from product
members and screw to inside of cabinet
door with #6 x 1/2'' flat head screws.
NOTE: Line up door bracket to cabinet door
by aligning door bracket with the vertical and
horizontal lines you have marked in Steps 6
& 7.
(See illustration7)
Step 9
Hang door with brackets attached on
the mounting screws on to the product
members. Tighten bottom screws
securly. Tighten top screws (with
washer) snugly allowing for future
adjustment.
(See illustration 8)
Step 6
Add Dimension A and Dimension B
together. Measure this distance from
bottom of the inside of your cabinet
door and mark a horizontal line.
(See illustration 5). Measure center
point on inside of cabinet door and mark
this point as well.
A+B
Center
Dimension C
Equal
Equal
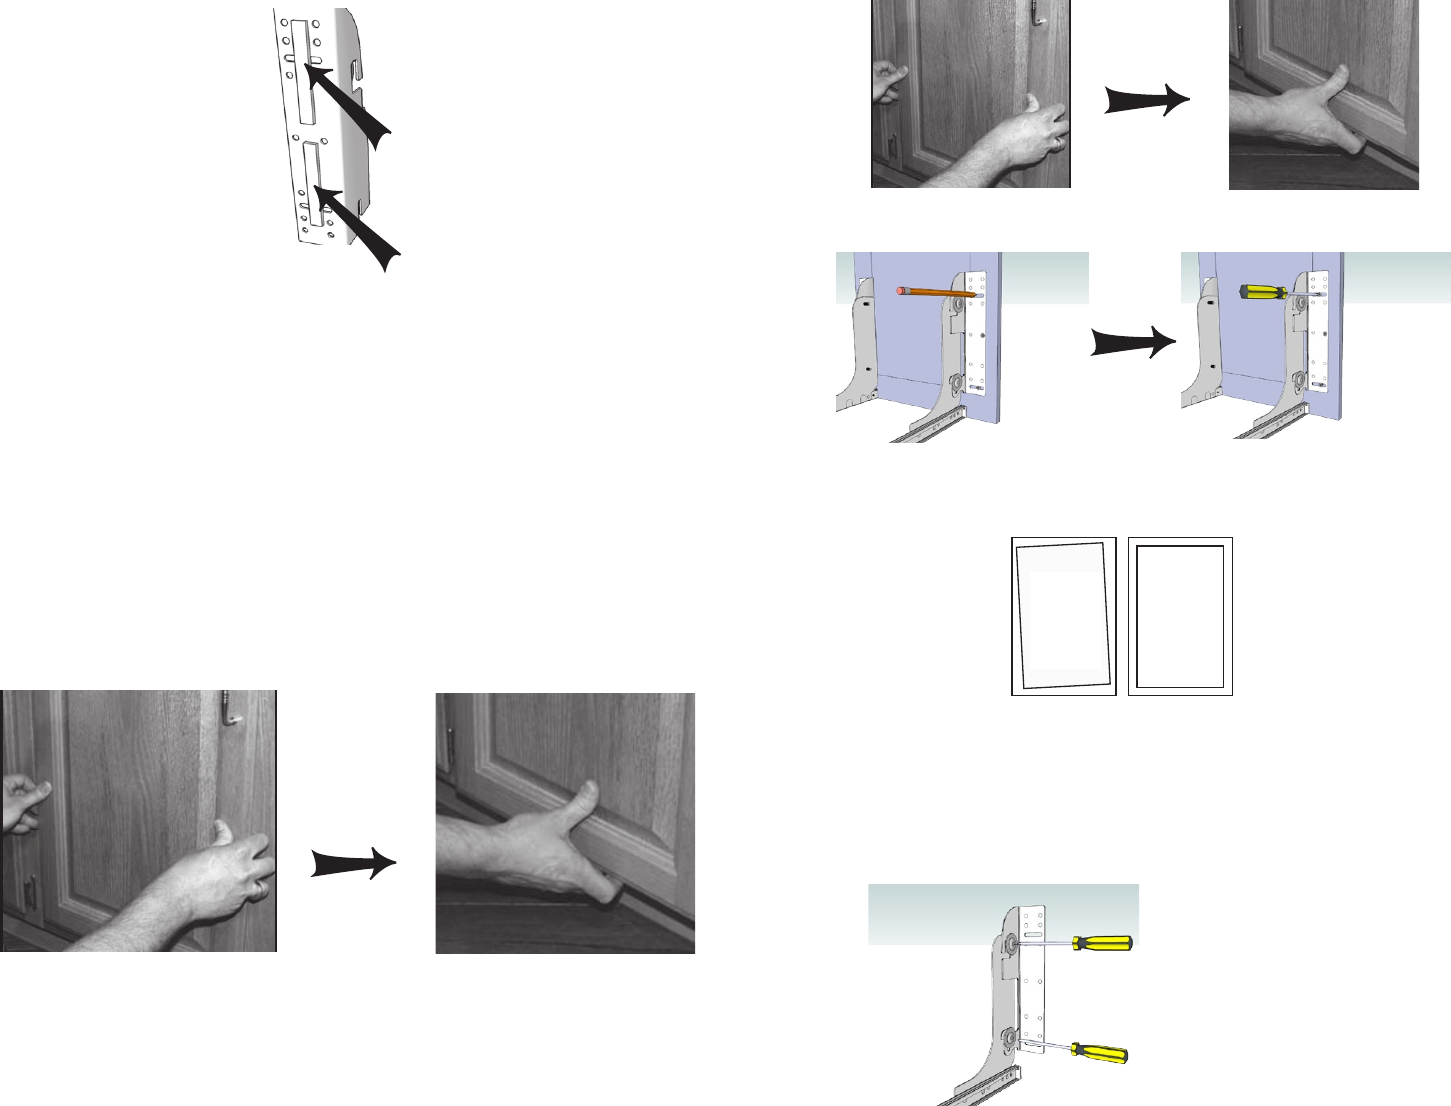
Step 10.
Be sure bumper pads are installed to all four
corners of door. Push door closed and apply
pressure to all four
corners making sure
door is flush with cabinet.
(See illustration 9).
Step 11.
Pulling from bottom,
pull door open.
(See illustration 10).
Securly tighten
top screws.
Step 12.
If your cabinet door is not straight
(even all around) you can adjust it
by loosing the screws on one of the
sides, properly align the cabinet
door and re-tighten the screws.
Helpful Hints:
There are several different
ways to mount the Door
Brackets to your cabinet
door ensuring that you
are mounting to the
thick portion of the door.
For instance, spacers can
be used when mounting Door Brackets
to the
Product Members (spacer kit included). The Door
Bracket can also be installed on the inner side of the
Product Member.
Illustration 5
illustration 8
illustration 6
ilustration 7
If your door is parallel but slightly
off center. Loosen screws
that attach the slide mounting feet
to the cabinet floor, slide assembly
sideways as needed and re-tighten
screws.
2409 Plantside Drive
Jeffersontown, KY 40299
800-626-1126
502-491-2215 fax
illustration 9
illustration 10
Door...
off left
to right
Door...
crooked
all around
Door...
straight
after
ajustment
Door...
straight
after
ajustment
Door
Door
Door
I-RV-DM KIT
Step 6: Apply pressure for the door to adhere to the brackets and by
pulling from the bottom, carefully pull open waste container.
Step 7: Mark desired hole locations that are in the thick portions of the
door and install the brackets to the cabinet door by using the provided
#6 x ½” wood screws.
STEP 5:
Peel off the exterior layer of tape.
Now carefully line up your desired
door position by eyesight using
the drawer above and any cabinets
to your left or right as a gauge for
correct alignment.
STEP 6:
Press the door firmly onto the
door brackets with the two sided
tape. Put pressure directly on the
lower left and right edge to allow
for good adhesion.
ALTERNATIVE “EASY INSTALL”
for RV Series Pull-Out Waste Containers WITH
Door Mounting Brackets Tape
Your Door Mount Kit also includes two pieces of specially designed two-sided tape. Follow the directions below for quick and easy installation
method that is usually much faster for “In-Home” retro-fitting:
STEP 1:
Follow steps one through four on “Installation
Instructions” (Seperate Sheet).
STEP 3:
Peel off one side of each of the (4) tape squares provided and
carefully place over the door bracket flanges
STEP 2:
Make sure you have correctly
selected the correct positioning of
our Door Bracket Flanges so that
the mounting holes will be located
in a position to insert the fastners
(screws) in the thick, outside
section of the door panel.
STEP 4:
Loosen the 4 bolts (2 each side) that connect the door brackets to
the product member bracket. Pull them forward (towards you) and
tighten them. This will insure that the face of the door bracket
extends slightly outside of the front frame of your cabinet.
STEP 9:
• Final adjustment
• Loosen the four bolts and make adjustments if necessary.
(See Step 12 on installation instructions)
STEP 7:
Carefully pull out door from bottom edge and mark
several holes on each side through the brackets.
STEP 8:
Fasten the brackets to the door
using the tape as a temporary hold
while you insert your #6 x 1/2"
wood screws.
2409 Plantside Drive • Jeffersontown, KY 40299
800-626-1126 • 502-491-2215 fax
www.rev-a-shelf.com
I-RV-DM-KIT-E 4-02
Step 9: Once adjusted, tighten bolts on the support L-brackets.
Step 8: If your cabinet door is not straight (even all around) you can
adjust it by loosening the screws on one of the sides, properly align the
cabinet door and re-tighten the screws. NOTE: If your door is parallel,
but slightly o center, loosen screws that attach the slide mounting
straps to the cabinet oor. Slide assembly sideways as needed and
re-tighten screws.
Paso 6: Presione la puerta para adherirla a los soportes y abra con
cuidado la puerta con el cesto tirando de la parte inferior.
Étape 6 : Appuyer fermement sur la porte pour qu’elle adhère aux
supports et ouvrir la poubelle en la tirant doucement par le bas.
Paso 5: Alinee visualmente la puerta con cuidado, utilizando la gaveta
de arriba y cualquier otro armario situado a la izquierda o derecha como
referencia para hacerlo correctamente. (Podrá realizar un ajuste nal una
vez que haya instalado la puerta en la unidad.)
Étape 5 : Aligner ensuite soigneusement la porte en utilisant le tiroir
d’au-dessus et les armoires sur les côtés, le cas échéant, comme jauge
d’alignement correct. (L’ajustement nal peut être fait après avoir
attaché la porte au meuble.)
STEP 5:
Peel off the exterior layer of tape.
Now carefully line up your desired
door position by eyesight using
the drawer above and any cabinets
to your left or right as a gauge for
correct alignment.
STEP 6:
Press the door firmly onto the
door brackets with the two sided
tape. Put pressure directly on the
lower left and right edge to allow
for good adhesion.
ALTERNATIVE “EASY INSTALL”
for RV Series Pull-Out Waste Containers WITH
Door Mounting Brackets Tape
Your Door Mount Kit also includes two pieces of specially designed two-sided tape. Follow the directions below for quick and easy installation
method that is usually much faster for “In-Home” retro-fitting:
STEP 1:
Follow steps one through four on “Installation
Instructions” (Seperate Sheet).
STEP 3:
Peel off one side of each of the (4) tape squares provided and
carefully place over the door bracket flanges
STEP 2:
Make sure you have correctly
selected the correct positioning of
our Door Bracket Flanges so that
the mounting holes will be located
in a position to insert the fastners
(screws) in the thick, outside
section of the door panel.
STEP 4:
Loosen the 4 bolts (2 each side) that connect the door brackets to
the product member bracket. Pull them forward (towards you) and
tighten them. This will insure that the face of the door bracket
extends slightly outside of the front frame of your cabinet.
STEP 9:
• Final adjustment
• Loosen the four bolts and make adjustments if necessary.
(See Step 12 on installation instructions)
STEP 7:
Carefully pull out door from bottom edge and mark
several holes on each side through the brackets.
STEP 8:
Fasten the brackets to the door
using the tape as a temporary hold
while you insert your #6 x 1/2"
wood screws.
2409 Plantside Drive • Jeffersontown, KY 40299
800-626-1126 • 502-491-2215 fax
www.rev-a-shelf.com
I-RV-DM-KIT-E 4-02
Paso 4: Ponga el bastidor en la posición cerrada y coloque cinta
adhesiva de doble cara en los soportes.
Étape 4 : Avec le cadre en position fermée, appliquer du ruban adhésif à
double face aux supports.