
Installation Guide


2
Customer Service: 800-626-1126 | rev-a-shelf.com
FIG. C-1
FIG. C-2
#2#2#2
#2#2#2
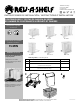
Note: Your RV series has
been shipped fully assembled
for ease of installation.
First remove the container(s)
from the wire frame. Place the
frame inside of your cabinet.
Look to make sure that there
is plenty of clearance to shut
the door and for the waste
containers (See Figure A).
STEP 1
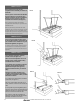
If there is sufcient clearance,
install (2) rear screws (See
Figure C-1).
Note: If framework prevents
access to rear screws,
remove framework by pulling
out and lifting frame from
slides.
If your product features full
extension slides remove
frame by disengaging release
triggers (See Figure C-2).
Press one side up and the
other side down.
Finally, replace the frame
onto the slides then place
your waste containers in the
wire frame and the installation
is complete.
STEP 2
With the frame in a closed
position, insert the front two
screws, making sure that the
framework is square to the
front of the cabinet
(See Figure B).
STEP 3
FIG. A
FIG. B