
Installation & Assembly

I-CB-0317
Fan Pants Rack
1. Position Pants Rack where desired.
2. Use (2) Euro Screws to mount in closet system holes.
3. Complete installation by using #8 x ½” screws in remaining 4 holes.
Note: Mounting bracket may be reversed for right or left handed installation.
Wood Shoe and Purse Organizers
The wood shoe and purse organizers are designed to be used in closet systems with 24”,
30” and 36” between partitions. They can be stacked in two manners, one allows for large
openings suitable for purses, and boots. The other is suitable for shoes, and smaller items.
When stacking in either direction use the supplied dowel pins to align the organizer
partitions both vertically, and horizontally. See Figures 1 and 2.
Figure 1 Figure 2
Another Great Closet Product By
The Pull-Out Ironing Board!
Rev-A-Shelf’s unique
Pull-Out Ironing Board can be
neatly into the space of a drawer.
Simply open, unfold,
and the board rises
automatically with a
locking device that
keeps the board in
place and even with
the counter top.
Closet Wire Baskets
Top Mounting Bracket
Assembly
1. Align top mounting bracket with basket
slides as shown in Figure 1. Attach using
Installation
2.
Position mounting bracket/slide assembly
Attach to the bottom side of
the closet shelf using #8 x ½ screws.
Figure 1
Figure 2
1. Position ball bearing slide where
desired in closet
2. Align front of slide with front of closet
panel as shown in Figure 1.
If the system holes align properly with
holes in the slide, use Euro screws to
attach the slide, if not, use #8 x ½”
3. Position and install other slide.
4. Place back wire of basket into hook on
left and right slide as shown in Figure 2.
5. Pivot the basket down so that the tabs
on the basket are inserted into the slots
in the slides as shown in Figure 3.
CLOSET
INSTA LLATIO N
INSTR UCTIO NS
For more information about these products and many
of our other innovative storage solutions,
visit www.rev-a-shelf.com or call (800) 626-1126.
I-CLOSET 10/06
1. Position ball-bearing slide where desired in closet
2. Align front of slide with front of closet panel
(Fig. 1)
If the system holes align properly with holes in the
slide, use 5 mm Euro screws to attach the slide. If
system holes do not align properly with holes in
the slide, use M4 wood screws
3. Repeat step 2 for other slide.
4. Place back wire of basket into hook on left and
right slides. (Fig. 2)
5. Lower the basket down so that the tabs on the
basket are inserted into the slots on the slides.
(Fig. 3)
12400 Earl Jones Way
Louisville, KY 40299
rev-a-shelf.com
Customer Service: 800-626-1126
CLOSET BASKETS
TOOLS REQUIRED:
#2
10 MIN
ESTIMATED ASSEMBLY TIME:
CARE AND MAINTENANCE:
Clean with a damp cloth and
wipe parts dry.
Fan Pants Rack
1. Position Pants Rack where desired.
2. Use (2) Euro Screws to mount in closet system holes.
3. Complete installation by using #8 x ½” screws in remaining 4 holes.
Note: Mounting bracket may be reversed for right or left handed installation.
Wood Shoe and Purse Organizers
The wood shoe and purse organizers are designed to be used in closet systems with 24”,
30” and 36” between partitions. They can be stacked in two manners, one allows for large
openings suitable for purses, and boots. The other is suitable for shoes, and smaller items.
When stacking in either direction use the supplied dowel pins to align the organizer
partitions both vertically, and horizontally. See Figures 1 and 2.
Figure 1 Figure 2
Another Great Closet Product By
The Pull-Out Ironing Board!
Rev-A-Shelf’s unique
Pull-Out Ironing Board can be
neatly into the space of a drawer.
Simply open, unfold,
and the board rises
automatically with a
locking device that
keeps the board in
place and even with
the counter top.
Closet Wire Baskets
Top Mounting Bracket
Assembly
1. Align top mounting bracket with basket
slides as shown in Figure 1. Attach using
Installation
2.
Position mounting bracket/slide assembly
Attach to the bottom side of
the closet shelf using #8 x ½ screws.
Figure 1
Figure 2
1. Position ball bearing slide where
desired in closet
2. Align front of slide with front of closet
panel as shown in Figure 1.
If the system holes align properly with
holes in the slide, use Euro screws to
attach the slide, if not, use #8 x ½”
3. Position and install other slide.
4. Place back wire of basket into hook on
left and right slide as shown in Figure 2.
5. Pivot the basket down so that the tabs
on the basket are inserted into the slots
in the slides as shown in Figure 3.
CLOSET
INSTA LLATIO N
INSTR UCTIO NS
For more information about these products and many
of our other innovative storage solutions,
visit www.rev-a-shelf.com or call (800) 626-1126.
I-CLOSET 10/06
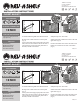
FIGURE 1
FIGURE 2
FIGURE 3
PARTS LIST
Wire Basket (1)
Ball-Bearing Slide (2)
M4 Wood Screw (4)
5 mm Euro Screw (4)
I-CB-0317
Fan Pants Rack
1. Position Pants Rack where desired.
2. Use (2) Euro Screws to mount in closet system holes.
3. Complete installation by using #8 x ½” screws in remaining 4 holes.
Note: Mounting bracket may be reversed for right or left handed installation.
Wood Shoe and Purse Organizers
The wood shoe and purse organizers are designed to be used in closet systems with 24”,
30” and 36” between partitions. They can be stacked in two manners, one allows for large
openings suitable for purses, and boots. The other is suitable for shoes, and smaller items.
When stacking in either direction use the supplied dowel pins to align the organizer
partitions both vertically, and horizontally. See Figures 1 and 2.
Figure 1 Figure 2
Another Great Closet Product By
The Pull-Out Ironing Board!
Rev-A-Shelf’s unique
Pull-Out Ironing Board can be
neatly into the space of a drawer.
Simply open, unfold,
and the board rises
automatically with a
locking device that
keeps the board in
place and even with
the counter top.
Closet Wire Baskets
Top Mounting Bracket
Assembly
1. Align top mounting bracket with basket
slides as shown in Figure 1. Attach using
Installation
2.
Position mounting bracket/slide assembly
Attach to the bottom side of
the closet shelf using #8 x ½ screws.
Figure 1
Figure 2
1. Position ball bearing slide where
desired in closet
2. Align front of slide with front of closet
panel as shown in Figure 1.
If the system holes align properly with
holes in the slide, use Euro screws to
attach the slide, if not, use #8 x ½”
3. Position and install other slide.
4. Place back wire of basket into hook on
left and right slide as shown in Figure 2.
5. Pivot the basket down so that the tabs
on the basket are inserted into the slots
in the slides as shown in Figure 3.
CLOSET
INSTA LLATIO N
INSTR UCTIO NS
For more information about these products and many
of our other innovative storage solutions,
visit www.rev-a-shelf.com or call (800) 626-1126.
I-CLOSET 10/06
1. Position ball-bearing slide where desired in closet
2. Align front of slide with front of closet panel
(Fig. 1)
If the system holes align properly with holes in the
slide, use 5 mm Euro screws to attach the slide. If
system holes do not align properly with holes in
the slide, use M4 wood screws
3. Repeat step 2 for other slide.
4. Place back wire of basket into hook on left and
right slides. (Fig. 2)
5. Lower the basket down so that the tabs on the
basket are inserted into the slots on the slides.
(Fig. 3)
12400 Earl Jones Way
Louisville, KY 40299
rev-a-shelf.com
Customer Service: 800-626-1126
CLOSET BASKETS
TOOLS REQUIRED:
#2
10 MIN
ESTIMATED ASSEMBLY TIME:
CARE AND MAINTENANCE:
Clean with a damp cloth and
wipe parts dry.
Fan Pants Rack
1. Position Pants Rack where desired.
2. Use (2) Euro Screws to mount in closet system holes.
3. Complete installation by using #8 x ½” screws in remaining 4 holes.
Note: Mounting bracket may be reversed for right or left handed installation.
Wood Shoe and Purse Organizers
The wood shoe and purse organizers are designed to be used in closet systems with 24”,
30” and 36” between partitions. They can be stacked in two manners, one allows for large
openings suitable for purses, and boots. The other is suitable for shoes, and smaller items.
When stacking in either direction use the supplied dowel pins to align the organizer
partitions both vertically, and horizontally. See Figures 1 and 2.
Figure 1 Figure 2
Another Great Closet Product By
The Pull-Out Ironing Board!
Rev-A-Shelf’s unique
Pull-Out Ironing Board can be
neatly into the space of a drawer.
Simply open, unfold,
and the board rises
automatically with a
locking device that
keeps the board in
place and even with
the counter top.
Closet Wire Baskets
Top Mounting Bracket
Assembly
1. Align top mounting bracket with basket
slides as shown in Figure 1. Attach using
Installation
2.
Position mounting bracket/slide assembly
Attach to the bottom side of
the closet shelf using #8 x ½ screws.
Figure 1
Figure 2
1. Position ball bearing slide where
desired in closet
2. Align front of slide with front of closet
panel as shown in Figure 1.
If the system holes align properly with
holes in the slide, use Euro screws to
attach the slide, if not, use #8 x ½”
3. Position and install other slide.
4. Place back wire of basket into hook on
left and right slide as shown in Figure 2.
5. Pivot the basket down so that the tabs
on the basket are inserted into the slots
in the slides as shown in Figure 3.
CLOSET
INSTA LLATIO N
INSTR UCTIO NS
For more information about these products and many
of our other innovative storage solutions,
visit www.rev-a-shelf.com or call (800) 626-1126.
I-CLOSET 10/06
Fan Pants Rack
1. Position Pants Rack where desired.
2. Use (2) Euro Screws to mount in closet system holes.
3. Complete installation by using #8 x ½” screws in remaining 4 holes.
Note: Mounting bracket may be reversed for right or left handed installation.
Wood Shoe and Purse Organizers
The wood shoe and purse organizers are designed to be used in closet systems with 24”,
30” and 36” between partitions. They can be stacked in two manners, one allows for large
openings suitable for purses, and boots. The other is suitable for shoes, and smaller items.
When stacking in either direction use the supplied dowel pins to align the organizer
partitions both vertically, and horizontally. See Figures 1 and 2.
Figure 1 Figure 2
Another Great Closet Product By
The Pull-Out Ironing Board!
Rev-A-Shelf’s unique
Pull-Out Ironing Board can be
neatly into the space of a drawer.
Simply open, unfold,
and the board rises
automatically with a
locking device that
keeps the board in
place and even with
the counter top.
Closet Wire Baskets
Top Mounting Bracket
Assembly
1. Align top mounting bracket with basket
slides as shown in Figure 1. Attach using
Installation
2.
Position mounting bracket/slide assembly
Attach to the bottom side of
the closet shelf using #8 x ½ screws.
Figure 1
Figure 2
1. Position ball bearing slide where
desired in closet
2. Align front of slide with front of closet
panel as shown in Figure 1.
If the system holes align properly with
holes in the slide, use Euro screws to
attach the slide, if not, use #8 x ½”
3. Position and install other slide.
4. Place back wire of basket into hook on
left and right slide as shown in Figure 2.
5. Pivot the basket down so that the tabs
on the basket are inserted into the slots
in the slides as shown in Figure 3.
CLOSET
INSTA LLATIO N
INSTR UCTIO NS
For more information about these products and many
of our other innovative storage solutions,
visit www.rev-a-shelf.com or call (800) 626-1126.
I-CLOSET 10/06
Fan Pants Rack
1. Position Pants Rack where desired.
2. Use (2) Euro Screws to mount in closet system holes.
3. Complete installation by using #8 x ½” screws in remaining 4 holes.
Note: Mounting bracket may be reversed for right or left handed installation.
Wood Shoe and Purse Organizers
The wood shoe and purse organizers are designed to be used in closet systems with 24”,
30” and 36” between partitions. They can be stacked in two manners, one allows for large
openings suitable for purses, and boots. The other is suitable for shoes, and smaller items.
When stacking in either direction use the supplied dowel pins to align the organizer
partitions both vertically, and horizontally. See Figures 1 and 2.
Figure 1 Figure 2
Another Great Closet Product By
The Pull-Out Ironing Board!
Rev-A-Shelf’s unique
Pull-Out Ironing Board can be
neatly into the space of a drawer.
Simply open, unfold,
and the board rises
automatically with a
locking device that
keeps the board in
place and even with
the counter top.
Closet Wire Baskets
Top Mounting Bracket
Assembly
1. Align top mounting bracket with basket
slides as shown in Figure 1. Attach using
Installation
2.
Position mounting bracket/slide assembly
Attach to the bottom side of
the closet shelf using #8 x ½ screws.
Figure 1
Figure 2
1. Position ball bearing slide where
desired in closet
2. Align front of slide with front of closet
panel as shown in Figure 1.
If the system holes align properly with
holes in the slide, use Euro screws to
attach the slide, if not, use #8 x ½”
3. Position and install other slide.
4. Place back wire of basket into hook on
left and right slide as shown in Figure 2.
5. Pivot the basket down so that the tabs
on the basket are inserted into the slots
in the slides as shown in Figure 3.
CLOSET
INSTA LLATIO N
INSTR UCTIO NS
For more information about these products and many
of our other innovative storage solutions,
visit www.rev-a-shelf.com or call (800) 626-1126.
I-CLOSET 10/06
Fan Pants Rack
1. Position Pants Rack where desired.
2. Use (2) Euro Screws to mount in closet system holes.
3. Complete installation by using #8 x ½” screws in remaining 4 holes.
Note: Mounting bracket may be reversed for right or left handed installation.
Wood Shoe and Purse Organizers
The wood shoe and purse organizers are designed to be used in closet systems with 24”,
30” and 36” between partitions. They can be stacked in two manners, one allows for large
openings suitable for purses, and boots. The other is suitable for shoes, and smaller items.
When stacking in either direction use the supplied dowel pins to align the organizer
partitions both vertically, and horizontally. See Figures 1 and 2.
Figure 1 Figure 2
Another Great Closet Product By
The Pull-Out Ironing Board!
Rev-A-Shelf’s unique
Pull-Out Ironing Board can be
neatly into the space of a drawer.
Simply open, unfold,
and the board rises
automatically with a
locking device that
keeps the board in
place and even with
the counter top.
Closet Wire Baskets
Top Mounting Bracket
Assembly
1. Align top mounting bracket with basket
slides as shown in Figure 1. Attach using
Installation
2.
Position mounting bracket/slide assembly
Attach to the bottom side of
the closet shelf using #8 x ½ screws.
Figure 1
Figure 2
1. Position ball bearing slide where
desired in closet
2. Align front of slide with front of closet
panel as shown in Figure 1.
If the system holes align properly with
holes in the slide, use Euro screws to
attach the slide, if not, use #8 x ½”
3. Position and install other slide.
4. Place back wire of basket into hook on
left and right slide as shown in Figure 2.
5. Pivot the basket down so that the tabs
on the basket are inserted into the slots
in the slides as shown in Figure 3.
CLOSET
INSTA LLATIO N
INSTR UCTIO NS
For more information about these products and many
of our other innovative storage solutions,
visit www.rev-a-shelf.com or call (800) 626-1126.
I-CLOSET 10/06
FIGURE 1
FIGURE 2
FIGURE 3
PARTS LIST
Wire Basket (1)
Ball-Bearing Slide (2)
M4 Wood Screw (4)
5 mm Euro Screw (4)