
Installation & Assembly

INSTALLATION INSTRUCTIONS: CPDR SERIES PULL-DOWN CLOSET ROD 3
Using the provided wood
screws, install all of them
except the last three
screws in front. (See Fig 3)
Repeat Step 4 for the other
side.
NOTE: It is very important
that both pull-down
assemblies are lined up
correctly with each other to
ensure proper function.
STEP 3
STEP 4
STEP 5
Install the heavy duty stop
using the provided screws.
(See Fig 4)
NOTE: This unit comes
with two standard bumpers
that are not used in this
installation.
Standard Bumper
FIGURE 3
FIGURE 4
X
X
X
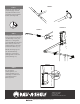
Using the provided wood screws, install all of
the (A) screws except the last (3) in the front.
Install the heavy duty stop as shown using the
provided screws that were
included.
NOTE: this unit comes
with (2) standard bumpers that
are not used in this installation.
Attach the pull-down rod to the
hanging rod and the plastic handle to
the pull-down rod using the (B) screws.
Repeat step 4 for other side.
(Note: it is very important that
both pull-down assemblies are
lined up correctly with each other to
ensure proper function.
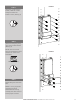
Pull down the left and right arms to attach the hanging rod
assembly to the pull-down unit. Using the (2) provided hex
bolts (C) and allen wrench attach plastic endcap to the end of
each arm as shown.
Note the hanging rod can be extended by
twisting motion to unlock and twisted back to lock into place.
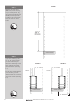
For 12” depth
closet system, it
is recommended
but not necessary
to install the (2)
provided rubber
bumpers as shown.
Using the provided wood screws, install all of
the (A) screws except the last (3) in the front.
Install the heavy duty stop as shown using the
provided screws that were
included.
NOTE: this unit comes
with (2) standard bumpers that
are not used in this installation.
Attach the pull-down rod to the
hanging rod and the plastic handle to
the pull-down rod using the (B) screws.
Repeat step 4 for other side.
(Note: it is very important that
both pull-down assemblies are
lined up correctly with each other to
ensure proper function.
Pull down the left and right arms to attach the hanging rod
assembly to the pull-down unit. Using the (2) provided hex
bolts (C) and allen wrench attach plastic endcap to the end of
each arm as shown.
Note the hanging rod can be extended by
twisting motion to unlock and twisted back to lock into place.
For 12” depth
closet system, it
is recommended
but not necessary
to install the (2)
provided rubber
bumpers as shown.