
Installation Instructions


Customer Service: 800-626-1126 | rev-a-shelf.com
2
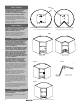
Place the cover cap over the
indicator hole (See Figure 5).
STEP 2
STEP 4
STEP 3
FIG. 2
FIG. 3 FIG. 4
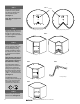
D-Shape start position
D-Shape
Kidney-Shape start position
Kidney-Shape
Kidney-Shape
Tribase
Install the shelf by tilting it in a
diagonal position, then ease it
through the cabinet opening
and place it against the cabinet
oor (See Figure 2).
Ensure tribase (back plate) is
locked into correct position.
You will hear a distinct click
when locked into place.
(See Figure 1).
Note: Does not apply to full
circle trays.
STEP 1
FIG. 1
For full circle and D-Shape
shelves rotate the shelf, using
the pre-drilled hole, locate
the rst bearing mounting
location and afx the shelf to
the cabinet oor with (1) #8 x
1- 1/4” at head screw (See
Figure 3).
Note: Because of the stop on
D-Shape and Kidney shelves,
apply pressure to the top of
the shelf before rotating.
For Kidney-Shape shelves,
apply pressure and rotate the
shelf until you see the rst
bearing mounting location by
the bird’s mouth then afx the
shelf to the cabinet oor with
(1) #8 x 1- 1/4” at head screw
(See Figure 4).
For ALL shelves repeat
rotating until the remaining (3)
#8 x 1- 1/4” at head screws
are installed, and the unit is
secured to the cabinet oor.
#2#2#2
FIG. 5