
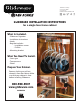
Installation Instructions
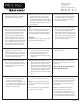

1. Measure the opening at the top of the
cabinet, nd the center and make a
light pencil mark on the cabinet.
2. Measure the distance from the inside
bottom of the base cabinet to the
bottom of the upper portion of the
face frame. Transfer that measurement
to the back inside of the cabinet. Make
the mark at approximately the center
of the cabinet.
3. Measure 2 ¼” down from the mark
on the back of the cabinet and make
a new mark. Measure the width of
the cabinet to nd the center and
intersect the new mark.
4. Locate the mounting bracket and
mark the center bottom of the bracket
(bracket right side up should resemble
an “F”). Take that mark and line it up
with the intersected mark on the
back of the cabinet. While holding
the mounting bracket on the back
of the cabinet, level the bracket and
trace a horizontal line underneath the
entire width of the bracket (This will
help you locate the position of the
mounting bracket for the next step).
Tip!
Before attacking the mounting bracket,
set the 1 ¼” screws into the front of
the pre-drilled holes until they slightly
protrude from the back of the bracket.
Optional:
You may choose to apply silicone to the
back of the mounting bracket.
5. Place the mounting bracket on the
back of the cabinet. Align the bottom
of the mounting bracket with the
horizontal line that was made in Step
4. The screws that are protruding from
the back of the mounting bracket will
be located inside the pre-drilled holes
on the back of the cabinet.
6. While pressing the mounting bracket
against the back of the cabinet,
ensure that the screws are positioned
over the pre-drilled holes. Fasten the
bracket to the cabinet by tightening
each of the screws until snug.
7. Locate the Glideware unit and remove
the centerpiece by fully extending.
Push down the lever on one side
and pull back the glide. Do the
same for the other side. Remove the
centerpiece.
8. Make a center mark on the front of the
Glideware unit.
9. Slide the back of the Glideware unit
into the mounting bracket and line
up the center mark on the front of the
cabinet with the center mark of the
front of the unit.
10. While holding the Glideware unit
against the bottom of the upper part
of the front of the cabinet, ensure
that the front of the Glideware unit is
ush with the face of the cabinet and
the two marks are aligned. Using the
drill bit provided, pre-drill cabinet
through the holes in the front of the
unit.
11. Gently fasten the unit to the front
of the cabinet using the (2) 1 ½” screws
provided.
Important! - Do not over tighten as
this could split the wood.
12. Fully extend the glides out from
the unit. While holding the glides
on the unit in place, align the
centerpiece and slide the glides into
the associated slots in the unit. Push
the centerpiece inward until it clicks.
Repeat for the other side.
13. Push the centerpiece in towards the
cabinet completely until closed.
Note: Initially you may feel resistance
but once “seated,” the unit will operate
smoothly.
Place your hooks in any arrangement,
hang your ware and enjoy!
Glideware may also be fastened directly
to the counter sub top or to the top of
the cabinet, such as a frameless cabinet
style. Be sure that there is clearance
for the Glideware to operate without
interference.
Tip! For dual Glideware installation,
measure largest item to hang on
each side and space Glideware units
accordingly. To get the most out of your
space, hang all large diameter items on
one side and smaller items on the other.
I-GLD-0817
by
12400 Earl Jones Way
Louisville, KY 40299
rev-a-shelf.com
Customer Service: 800-626-1126