
Assembly Instructions

12400 Earl Jones Way
Louisville, KY 40299
rev-a-shelf.com
Customer Service: 800-626-1126
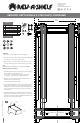
REDUCED DEPTH SINGLE 8 LITER WASTE CONTAINER
Center line of cabinet
Fold here to t into cabinet opening
1
3
4
5 6
2
Edge of paper to back of door
Assembly
1. Remove the slide triggers from their wrapping.
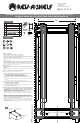
2. Turn the wood box over and locate the pre-drilled holes
on the front lip of the box, refer to Fig.1
3. Using the #6 x 1/2” Pan Head Screws, attach the left
and right sided triggers and set woodbox to the side.
NOTE
Release triggers are marked with an “L” & “R” for Left and Right.
Marking slide hole locations
1. Place template into cabinet and position front edge to
where the back of the door will be.
a. Inset door = set back the thickness of the door
b. Overlay = place at the front edge of cabinet
2. Using an awl, mark through the bold dotted screw
locations onto the cabinet oor.
a. Remove template when done.
3. Lay the assembled slide set over the top of the marked
holes. Using the #8 x 5/8” Truss Head Screws, attach
the slides to the cabinet oor through the slotted holes
on the frame. We recommend pre-drilling rst with a
3/32” drill bit.
4. Place the wood box with attached triggers on top of the
slides and push back until you hear a “click” sound. Cycle
a few times to check function of slides and make sure the
door will not hit frame when closed.
T-4WCSC-15819-1217
PARTS LIST
No. Description Qty.
1 Frame 1
2 Slide Assembly 1
3 Release Levers (L&R) 2
4 #8 x 5/8” Truss Head Screws 4
5 #6 x 1/2” Pan Head Screws 4
6 8L Waste Container w/ Lid 1
TOOLS REQUIRED
FIG.
1
Pre-drilled
holes
Pre-drilled
hole
Locking
device
6.974”
177mm