
Installation Instructions


INSTALLATION INSTRUCTIONS: CHARGING DRAWER
Customer Service: 800-626-1126 | rev-a-shelf.com
4
I-4WCDB18-0718
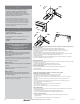
Attach the cable carrier arm to the
large bracket that is secured to
the left Blum slide by dis-engaging
the locking mechanism, inserting
the plungers, and re-engaging the
locking mechanism (See Figure H).
Slide the drawer onto the slides,
lock the slides onto the triggers,
and cycle a few times.
STEP 4
Attach the drawer front using the
gure 8 mounting brackets
(See Figure I).
NOTE: Unit can now be plugged in.
STEP 5
STEPS FOR DISENGAGING THE
CHARGING DRAWER
(BOTH FF AND FL):
FIG. H
FIG. I
FIG. J FIG. K
12400 Earl Jones Way
Louisville, KY 40299
rev-a-shelf.com
Customer Service: 800-626-1126
Plungers
Plungers
#2
IMPORTANT SAFETY INSTRUCTIONS
Caution: To reduce risk of re or electronic shock or injury to persons:
- Not intended to be used in damp locations. Dry locations only
- Not intended for long term storage. Items should be monitored.
- Drawer should be removed and plastic ties inspected to insure they are secure at least twice a year
- Route and secure cords so that they will not be pinched or damaged when drawer is closed.
- A licensed electrician should be consulted for wiring through ceiling, softs or walls. All wiring must follow NEC regulations.
- Do not alter plug
- Wood is combustible. Do not put or leave hot items in drawer.
- Do not store combustibles in drawer. (i.e. aerosols)
Step 1:
Disengage the two black plungers
that are attached to the arm in the
back of the unit. Achieve this by
pulling out the two plungers. You
will feel them disengage
(See Figure J).
Step 2:
Unplug the charging drawer outlet
from the outlet that is installed in
the cabinet.
Step 3:
Description: Remove drawer by
releasing the two blum triggers
that are on the bottom of the
drawer (See Figure K).
Customer’s responsibility:
- Install 120v outlet in rear of cabinet within 10” of bottom of drawer.
- Do not overload outlet.
- Wood is combustible. Do not put or leave hot items in drawer.
- Customer is responsible for wiring and connecting plug in cabinet
Product intention of use:
- Product is intended for the charging of handheld electronic
devices and other small handheld devices.
- Overall safety of this product is determined by its end use.
12400 Earl Jones Way
Louisville, KY 40299
rev-a-shelf.com
800-626-1126
CAJÓN DE CARGA / TIROIR CHARGEUR
I-4WCDB18-0718
20 MIN
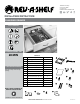
Lista de Parts/Liste des Pièces
No.
Descripcion/Description
Qty.
A Cajón de carga / Tiroir chargeur 1
B Brazo portacables / Bras porte-câbles 1
C Almohadilla antideslizante
Coussinets antidérapants
1
D Soportes de montaje de la Figura 8
Équerres de xation en « 8 »
2
E Tornillos de cabeza troncocónica n.º 6
de 1/2” / Vis à têtes cylindrique 12,7
mm, diam. 3,5 mm
4
F Tornillos de madera n.º 8 de 5/8”
Vis à bois 15,9 mm, diam. 4,2 mm
20 (12 for FL)
G Toma de corriente del cajón de carga
Prise du tiroir chargeur
1
H Tornillos alomados n.º 8 de 1/2”
Vis à têtes larges 12,7 mm, diam. 4,2 mm
2
I Carriles Blum SC / Coulisses SC Blum 2
J Escuadras posteriores BLUM
Équerres arrières Blum
2
K Gatillos de liberación BLUM
Déclencheurs d’ouverture BLUM
2
L Abrazaderas de alambre
Serre-câbles
5
M Tornillos 1/4-14 x 1/2”
Vis 12,7 mm, diam. 6,3 mm
5
N Abrazadera grande con (2) tornillos
Grande équerre avec (2) vis
1
SCALE 0.500
SCALE 0.500
A
C
E
F
G
J
H
L N
K
I
M
D
B
INSTRUCCIONES DE INSTALACIÓN / LES INSTRUCTIONS D’INSTALLATION
HERRAMIENTAS REQUERIDAS
OUTILS REQUIS
TIEMPO ESTIMADO DE
ENSAMBLADO:
DURÉE DE L’INSTALLATION:
VER VIDEOS DE
INSTALACIONES DE PRODUCTOS
REGARDER DES VIDÉOS
D’INSTALLATIONS DE PRODUITS
WWW.REV-A-SHELF.COM/VIDEOS
CUIDADO:
ENTRETIEN:
Limpie con un paño húmedo y
seque las partes.
Nettoyer avec un chiffon
humide et essuyer pour sécher
complètement.